Bot releases are hidden (Show)
Published by lukasmatena about 3 years ago
 PrusaSlicer 2.4.0-alpha3
Summary
This is the third alpha release of PrusaSlicer 2.4.0, following 2.4.0-alpha1 and 2.4.0-alpha2. This alpha mostly fixes bugs found in alpha2.
To let you enjoy the alpha without worries, the alpha builds save their profiles into PrusaSlicer-alpha directory, so you may use the alpha side by side with the current release without ruining your production configuration.
Improvements with respect to PrusaSlicer 2.4.0-alpha2
- Painting tools (supports, seam, multimaterial) no longer use a separate undo/redo stack. Instead, the events are added into the main stack. When the painting tool is closed, all the snapshots taken during painting are compacted into one. This means that fine undo/redo is available during painting, but the main stack is not flooded with the individual events after the painting is finished.
- "New project" and "Load project" actions newly clear the undo/redo stack by default, however one may revert to the old behavior by unchecking "Clear Undo / Redo stack on new project" in preferences #2812.
- The new 'Slicing finished' notification automatically fades out after 2 seconds #7017.
- The triangle mesh simplification dialog newly allows to render the model in wireframe view, which helps to better asses the achieved mesh complexity and decimation rate.
Bugs fixed, reported for PrusaSlicer 2.4.0-alpha2
- Fixed import of volumes from 3MFs. Repeated loading and saving gradually increased size of 3MF files containing multi-material objects or objects with modifier meshes #7011, slicing some models was broken #7039 and some models were positioned incorrectly in Z #7010. The "inflated" 3MFs generated by alpha2 are now being shrunk back when loaded and saved again with 2.4.0-alpha3.
- Fixed import of AMF files, also broken in 2.4.0-alpha2 due to admesh eradication refactoring #7015.
- The G-Code reader did not process G28, M132 and M402 correctly, leading to issues such as shifted models in the preview. This was a regression due to G-code parser speed up #7016.
- Standalone G-Code Viewer was modifying access times of G-code files loaded. This was a regression with respect to PrusaSlicer 2.4.0-alpha1 #7005.
- Fixed a G-Code Viewer crash when loading G-Codes generated by SuperSlicer #7008.
- SLA specific: Importing SL1 archives into PrusaSlicer did not work for SL1 archives produced by old PrusaSlicer versions, which did not store PrusaSlicer Print / SLA material / Printer presets into the SL1 archive. Importing such SL1 archives is newly allowed, however the SLA mode needs to be active and the active Print / SLA material / Printer presets will be used #6915.
- SLA resin material config option 'Correction for expansion' was not applied correctly, namely the Z correction was applied to Y axis #7013.
- Fixed possible crash when an object was deleted with the simplification gizmo active.
- First layer support expansion was not applied when printing without raft. This was a regression due to support refactoring in PrusaSlicer 2.4.0-alpha1.
- Fixed crash after a new resin was added in Configuration Wizard while an SLA printer was active.
Published by lukasmatena about 3 years ago
PrusaSlicer 2.4.0-alpha2
Summary
This is the second alpha release of PrusaSlicer 2.4.0, following 2.4.0-alpha1. This alpha adds several new features and improvements and it fixes bugs found in the first alpha. The most important change is significant speed-up of the G-Code generator.
To let you enjoy the alpha without worries, the alpha builds save their profiles into PrusaSlicer-alpha directory, so you may use the alpha side by side with the current release without ruining your production configuration.
Improvements with respect to PrusaSlicer 2.4.0-alpha1
- G-Code export was parallelized and optimized. This results in significant improvement of performance: The total slicing time is now 2x to 4x shorter, higher speed up is achieved on high-end CPUs #2263.
- The G-Code coordinates are newly exported without emitting the leading and trailing zeros, which makes the G-code a bit smaller. While the new G-code conforms to standard, it may not be consumed by some non-conforming applications #6996.
- 3MFs, AMFs and OBJs are loaded considerably faster, models imported from them are no longer repaired automatically (see 'Architecture and infrastructure' below for further details)
- Mesh repair statistics used to be confusing: It was not quite clear which errors were fixed during import and whether there are any errors remaining after the mesh import and repair. This has been improved: The fixed / remaining errors are newly shown clearly at the side panel and the "exclamation mark" icon is shown with white color for a completely fixed mesh, while an orange color is used for a not fully fixed mesh.
- Bottom status bar was removed and replaced by notifications showing progress of slicing and the "abort slicing" button. This also solves the Windows 10 dark mode issue, where we were not able to adjust status bar colors #6860.
- Windows specific: InnoCielo Meridian injects AMHook.dll into PrusaSlicer, which makes PrusaSlicer to crash. We added AMHook.dll to a blacklist so a warning dialog will be shown on startup when that DLLs is injected into PrusaSlicer #2939. This is a similar issue to the dreaded Nahimic OSD issue #6864 which we blacklisted in PrusaSlicer 2.4.0-alpha1.
- OSX specific: The PrusaSlicer and G-code viewer application icons were updated with the new rectangular background to match the new OSX icon style #6874 thanks @xarbit.
- Windows specific: Several function calls that might have been considered suspicious by anti-virus software were replaced by alternatives. This should lower the probability that PrusaSlicer will be reported as a potential threat. #6914, thanks @jschuh
- Windows specific: Selected mode button (Simple/Advanced/Expert) has now an orange background to make the active mode more distinct #6860.
- The G-code preview settings at the bottom of the Preview screen are no longer resetted to their defaults after each slicing #5471.
- Windows specific: 'Fix by Netfabb' can now be used on several objects at once.
- Place on face no longer unifies rotation of multiple instances around their Z axes to the same angle.
- The new "Tip of the day" notifications can now reference menu items. We use it to activate the "Configuration Snapshots" dialog from a "tip of the day".
- When navigating to a configuration option from the Search dialog, the option's input field gets focus automatically #6941.
- The dialog asking about unsaved changes is now shown in all scenarios when some changes in presets would be lost #6991.
- The placeholder
{version}(denoting current PrusaSlicer version) can newly be used in output filename format template string #7002. - When the "Reload from disk" action was called on an object for which only the source file name, not the full path to the source file name was known, PrusaSlicer used to always ask the user to look up the source file location manually, while newly PrusaSlicer searches for the source file next to the active project file before asking the user for help.
Bugs fixed with respect to PrusaSlicer 2.3.3
- Fixed crash when the bed texture was located in a directory that user had no permission to access #6873.
- The 'Entering SLA support points' undo/redo snapshot is now taken before the gizmo is opened, not after. This bug was introduced between 2.2.0 and 2.3.0 and resulted in two identical snapshots on the undo/redo stack.
- It is now possible to use Backspace to delete selected items at the object list. Delete and Backspace should now be equivalent in all contexts. The reason that Backspace is used as an alternative to Delete is that some laptops do not have the Delete key at all (some Macs, Chromebooks).
- Fixed handling of "N/A" config options under some translations #6921.
- Fixed a rare error preventing slicing of specific models #6933.
- Fixed color of objects in preview for SLA printers. Until now, the color of the last filament selected in FDM mode was used.
- When printing with a wipe tower, all objects are required to have the same variable layer height profile. The test for this constraint was buggy and it sometimes allowed incorrectly the slicing to continue, leading to cryptic error messages later on. This is now fixed.
- When slicing was finished while the user was moving the object in the scene, it would reset the object's location. This was happening mainly with the background processing enabled #6898.
- Selection rectangle in SLA support points editing mode did not work reliably when the object was rotated or scaled #4666.
- The view settings combo boxes had incorrect layout the first time they were opened.
- OSX specific: The items in the dialog with selection of object-specific settings to show was incorrectly stretched #6926
- Linux specific: Flatpak package did not allow to export to external devices because of insufficient permission #6758, thanks @xarbit
- Linux specific: Fixed crash when
$USERenvironment variable was not set #3969. - Windows specific: Under certain circumstances, a system text edit box unintentionally appeared in the right panel.
Bugs fixed, reported for PrusaSlicer 2.4.0-alpha1
- Painted supports and seams did not work correctly on objects with multiple volumes #6863.
- Fixed possible crash in the new triangle mesh simplification tool when the required number of triangles was too small.
- Fixed a crash after deleting an object when simplification preview was shown.
- Plater was incorrectly cleared on New Project / Open Project after the "Do you want to save the changes to the current project" dialog was canceled #6866.
- Painted seam was broken on vertical surfaces, while it worked in PrusaSlicer 2.3.3.
- 'Replace by stl' is no more allowed when some gizmo is active, which may have lead to a crash in some scenarios.
- Fixed crash when enabling visualization of tool change markers in preview
- Fixed crash when importing gcode generated with Simplify3D and switching to tool view.
- Ajusted the wording of "Compare presets" pop-up windows showing differences in multi-line texts #6903.
- Toolpath width in G-code Preview was clamped to 1 mm, which did not work for large nozzle diameters. The width is newly clamped to 2 mm or 4 * layer height, whatever is bigger #6828.
- Fixed several drag and drop issues in object list, which appeared when some of the new rows informing about painted supports, painted seems etc. were shown.
- Fixed inconsistencies of selection in scene and the object list.
- Fixed deleting volumes through the right panel with the new "Paint-on supports", etc. items visible.
- When supports are turned on with 'Detect bridging perimeters' disabled, a dialog box offering to turn it on is opened. From now on, this dialog does not have a 'Cancel' button (which was confusing) and requires strictly 'Yes' or 'No'.
- When using a painting gizmo (supports/seam/multimaterial painting) with objects with modifiers, one could see inside the modifier when it was partly below the bed, which clips the bottom of it.
- Print setting changes were not applied to all instances if one of the instances was rotated #6971.
- Extra bridging layers were sometimes generated when the new thick_bridges option was off. #6957, thanks @jschuh for the fix.
- Fixed crash when support patern spacing was set to zero #6989.
- With the settings shown in a floating window, the Search did not bring back the Settings floating window if it was was minimized #6958.
- Windows specific: Combo-box with preset names was too narrow with the new "Settings tab as menu items" enabled #6993.
- G-code Preview did not update when switching to the G-code viewer for the first time after automatic background processing completed slicing #6983.
- Windows-specific: Cycling through tabs using Ctrl+PageUp/PageDown was not implemented for the new custom Notebook control #6938.
- Double slider was sometimes captured after certain mouse click combinations and could be moved even after the pointer no more over it.
- Fixed endless loop in raft generator, which was broken for certain parameter combinations newly available in 2.4.0-alpha1.
- New project was sometimes incorrectly marked as unsaved.
- Retractions, deretractions and similar markers were placed at a wrong z in the gcode preview.
Architecture, infrastructure
- Removed support of PRUSA files, which used to be produced by PrusaControl. PrusaControl was discontinued many years ago.
- Slic3r, Slic3rPE and PrusaSlicer extensively used admesh library for internal storage and manipulation of triangle meshes. The admesh library was designed with the purpose of importing and fixing errors in STL files, while in Slic3r / PrusaSlicer admesh was also misused as a heavy weight general triangle mesh representation and the same triangle mesh was also kept in memory using a simpler redundant "Indexed triangle set" representation. Starting with this release, PrusaSlicer only uses admesh for loading and fixing STL files, thus the triangle meshes are only kept using the "Indexed triangle set" structure, which reduces memory consumption. Triangle meshes imported from 3MFs, AMFs and OBJs are no longer repaired by admesh. For PrusaSlicer generated 3MFs it means that the triangle meshes will be loaded exactly the same way they were stored, while earlier PrusaSlicer may have modified a mesh with non-manifold edges slightly by trying to repair it each time a 3MF was loaded. For 3MFs not produced by PrusaSlicer and for AMFs and OBJs it may mean that model errors will not be fixed, however in contrary to the STL file format, the 3MF, AMF and OBJ file formats are indexed triangle sets with triangle neighborship clearly expressed by shared vertex indices, thus cracks in triangle meshes are less likely. Not repairing 3MFs through admesh considerably speeds up loading of PrusaSlicer project files.
Published by bubnikv about 3 years ago
PrusaSlicer 2.4.0-alpha1
Summary
This is the first alpha release of PrusaSlicer 2.4.0, introducing Multi-material painting tool, improved FDM supports and raft, Windows dark mode, Fuzzy Skin, per object Brim configuration, Negative volumes, automatic Color Print for signs, Shape Gallery, "Tip of the day" notifications, Model simplification, support for Marlin 2 acceleration control, support of 3DLabPrint airplane models, new 3rd party printer profiles and many more new features, improvements and bugfixes.
To let you enjoy the alpha without worries, the alpha builds save their profiles into PrusaSlicer-alpha directory, so you may use the alpha side by side with the current release without ruining your production configuration.
The software is based on work of Alessandro Ranelucci (@alranel) and the RepRap community. The first public commit is from 2011-09-01, meaning that exactly today, PrusaSlicer based on Slic3r celebrates its tenth birthday🎂🍾 Thanks to all who contributed during the decade and helped to continuously improve the software.
Complete description of improvements and changes with respect to the current PrusaSlicer 2.3.3 release follows.
Because the github Releases page clips the text to 25 thousand characters, full PrusaSlicer 2.4.0-alpha1 release log is available at the wiki.
Multi material painting #3535
In PrusaSlicer 2.3.0 we have introduced paint-on supports and seams. Seeing the painting tools in PrusaSlicer, many customers asked for similar tools to help with multi material printing. Indeed, preparing models for multi material FDM prints used to be a laborious and time consuming process. With this release of PrusaSlicer, that is a thing of the past and coloring an object for multi material printing requires just a handful of bucket fill and brush stroke operations.

The editing tool opens with N hot key and it offers the following tools:
- Brush: similar to the old support or seam painting tool.
- Smart fill: fills a region below the mouse cursor up to a sharp edge (the sharp edge threshold is adjustable at the panel).
- Bucket fill: replace a patch of one color with another.

Combo boxes in the panel allow mapping different extruders to left and right mouse button. The number and color of the selected extruder is shown for clarity. The color that is used for visualization can be overridden by clicking the colored square next to the selected extruder. This visualization color is not saved anywhere and will be lost when the application closes.
Once the object is painted, the object surface is segmented into patches of same material and the patches are extended inwards. The regions painted at the top resp. bottom surfaces are extended by the number of top_solid_layers resp. bottom_solid_layers (configurable in Print Settings->Layers and Perimeters). The regions painted at the side walls are expanded inwards up to maximum mmu_segmented_region_max_width (which is a new configuration parameter accessible in Print Settings->Multiple Extruders->Advanced).
The painting only affects the slicing result, the model itself is not altered and the colored "parts" cannot be exported separately.
Notes
Please note that thin features are not printable with FDM technolgy, thus for example painting a thin wall with two distinct colors will not make the thin wall printable. Such thin non-printable regions created during segmentation are thus detected and merged with the neighboring region, changing its color. PrusaSlicer will print thinner features with "detect thin walls" enabled, thus one is advised to try to enable "detect thin walls" if painting over thin features.
There are two extra limitations arising from technical reasons:
- The multi material painting is limited to 16 extruders. If your printer uses more extruders, only the first 16 will be available in the painting tool.
- Multi material painting cannot be combined with XY size compensation. The XY size compensation will be ignored during slicing if the object is also multi material painted.
The user is informed by a notification in both cases.
Bottom layers bridges
PrusaSlicer is based on the pioneering work of Alessandro Ranelucci and the RepRap community on the Slic3r project. As already mentioned above, the project was started ten years ago and a lot has changed since then indeed. The 3D printers are no more a rarity, ABS is not the only filament, motion systems are accurate and extruders are no more leaky. Thus adjustments to the slicing algorithms are called for.
Slic3r's strategies of FDM supports and object over support differ from the other FDM slicers. Namely, Slic3r was designed to make use of FDM bridging capabilities to circumvent the necessity of supports. And printing bridges with ABS was not that easy: The bridges were reliable only if extruding thick strands. Combining the thick bridges with supports required the 1st layer objects being printed thicker than the other layers, leading to ugly object undersides.
All the other FDM slicers evolved differently: The first layer over supports is printed with the same flow as the other layers, thus the first layer over supports looks nicer as long as the strands bridged reliably or supported by a support interface. For support materials that do not bridge reliably, dense support is required for high quality of objects over supports.
Starting with this release, PrusaSlicer newly offers printing bridges and 1st object layers over supports with the default layer thickness. The bridging behavior is configurable with a new "thick_bridges" boolean option. If enabled, the old Slic3r bridging strategy is applied, while if disabled, bridging is performed in a similar fashion to the other FDM slicers, leading to better bottom quality over supports. With "thick_bridges" disabled, the behavior of "bridge_flow_ratio" changes: Instead of modifying cross section of a rounded extrusion while keeping the gap between the extrusion threads constant, extrusion spacing is maintained while modifying the extrusion width and / or height to reach the prescribed extrusion ratio.

FDM supports improvements
FDM supports were substantially redesigned in this release, answering frequent (and rightful) complaints from the users:
- New "snug" shape of the support columns. By default, PrusaSlicer projects support columns into a regular grid for stability. Supports projected into a regular grid have a well defined minimum area, however they tend to leak out of regions they support along the object walls down to the print bed. We newly implement "snug" supports, which maintain the shape of the supported overhangs, thus avoiding the leaks with the trade-off of possibly lower support stability #555 #740 #902 #1346 #1993 #2708 #3083 #4783 #6240.
The support shape is configured with a new "support_material_style" config field, which accepts two values: "grid" (the old behavior) vs. "snug" (the new shape). The "snug" supports accept a new parameter "support_material_closing_radius", which controls merging close support islands and simplification of the support column shape. We borrowed a functionsmooth_outward()from Cura written by @BagelOrb to robustly simplify support island contours during merging of multiple support overhang islands.

- If "support on build plate only" is enabled, the support columns are newly trimmed to not land on top of an object. However this may make the column too small to be stable #915 #1340 #3980 #4199.
- Support enforcers newly take precedence over "supports on build plate only" and over "don't support bridges". This applies to both the enforcer and blocker modifier meshes and paint-on supports. Also the fact that the enforcers take precedence over blockers is indicated by sorting the enforcer meshes below the blocker modifiers at the side panel (the volume lower in the list always takes precedence over a volume upper in the list) #1870 #1997 #2801 #3741 #3831 #5105 #5748.
- A new configuration value "support_material_bottom_contact_distance" has been added to complement "support_material_contact_distance". If "support_material_bottom_contact_distance" is positive, it defines separation gap between the object top surfaces and bottom of support towers, while "support_material_contact_distance" defines gap between the support and object bottom surfaces. If "support_material_bottom_contact_distance" is set to zero, the old "support_material_contact_distance" applies to both top and bottom distances.
- Similarly, a new configuration value "support_material_bottom_interface_layers" has been added to complement "support_material_interface_layers". If "support_material_bottom_interface_layers" is non negative, it defines number of dense support interface layers between the object top surfaces and bottom of support towers, while "support_material_interface_layers" defines number of dense support interface layers between the support and object bottom surfaces. If "support_material_bottom_interface_layers" is set to "same as top" (value -1), the old "support_material_interface_layers" is used to define both. If "support_material_interface_layers" is set to zero, neither top nor bottom support interface layers are being created #4288.
- The support 1st layer density and expansion is newly configurable with "raft_first_layer_density" and "raft_first_layer_expansion", allowing to disable support 1st layer expansion completely. While the two configuration values start with "raft_", they are applied to the 1st support layer if the raft is disabled #1165 #2568 #3772.
- The support interface pattern is newly configurable with "support_material_interface_pattern" to "default", "rectilinear" and "concentric". Default is concentric for soluble interfaces and rectilinear for non-soluble support interfaces. We expect this settings to be useful for printing with soluble interfaces: While the concentric pattern may produce smoother surfaces at sides of an object, rectilinear support interface may produce nicer horizontal surfaces #1197.
- Improved soluble support interfaces over non-soluble support base columns (#5823). Printing a soluble interface directly over non-soluble sparse support is not a good idea. Soluble support material often does not stick properly to non-soluble material and the soluble material may not bridge the gaps between sparse support lines. Based on #5903 by @spiky2021, PrusaSlicer newly extrudes half of the support interface layers with the support base material, so that the dense soluble support interface material is extruded over a dense base interface material layer. While the soluble interface pattern is now configurable with "support_material_interface_pattern", the non-soluble dense interface is always extruded with rectilinear pattern, which bridges better over the sparse support.
- The FDM sparse zig-zag infill algorithm was redesigned to support dense support interface layers reliably #2969 #4295 #4951.
- Brim is newly calculated around the object, not around the 1st layer of the support and supports are printed over the brim on other layers #713 #1156 #3395 #3396.
- A single perimeter line is newly extruded around the support 1st layer to improve print bed adhesion #756 #2101.
- Support first layer used to be printed with concentric pattern for soluble materials, it is newly printed with rectilinear infill all the time #684 #1445.
- UI related, paint-on supports: Extra dialog for auto setting by angle gizmo was removed, the slider is now embedded in the main paint-on supports gizmo dialog.
FDM support generator bugfixes
- Fixed spilling of FDM supports using the old "grid" support style due to some numerical inaccuracy issues #5209 #6067.
- Reduced leakage of FDM supports using the old "grid" support style through object holes. The leakage was significant with thin walled objects. Newly the supports are only allowed to fill a grid cell, never to expand into a neighboring support grid cells, and the risk of leakage through thin walls was reduced by over-sampling the support grid #5054.

- Fixed excessive cooling slow down over supports. Cooling was incorrectly calculated from the time to print a support layer when the support layer was printed at its own Z height. PrusaSlicer may print a support layer at its own Z height not synchronized with any other object print Z height to guarantee the support contact Z distance. As the cooling slow down was incorrectly applied to each layer independently, a support only layer and the successive object layer were slowed down unnecessarily. Newly PrusaSlicer applies a cooling slow down logic to all support layers together with the object layer being supported #984.
- Fixed paint-on supports on horizontal surfaces, where the painted regions were assigned incorrectly to one layer below or one layer above the painted regions due to numerical issues #5948.
- Fixed excessive 1st layer support raft expansion. PrusaSlicer used to fill holes in the 1st layer support raft on purpose to improve adhesion, however this behavior was found too aggressive. Filling holes in the support 1st layer is disabled now while the user may newly apply a higher raft_expansion if one wants a stronger 1st layer adhesion #430.
- Fixed leakage of 1st layer support raft through thin object walls during the 1st layer support raft expansion. The 1st layer support raft is newly expanded carefully with multiple steps to avoid the leakage #2245.
- Fixed unnecessary support interafaces created by aggressively merging concentric support interfaces #4570.
- Re-enabled "Enforce support for first N layers" even if "Generate supports" is disabled #470.
FDM Raft enhancements #1277 #2823 #3425 #6053
- The raft newly supports separate configuration of "raft_contact_z_distance". Indeed, we want the "raft_contact_z_distance" to be smaller than "contact_z_distance", as we value the quality of the 1st object layer over raft interface and it is easy to remove raft with a blade.
- "raft_expansion" is newly configurable.
- First object layer above the raft interface is no more printed with a bridging flow, but a normal flow. This produces much nicer bottom object surface.
- Because the first object layer above the raft interface is no more printed with a bridging flow, the bottom infill pattern is newly respected #3507.
- Speed and acceleration of first object layer above the raft interface is newly configurable with "first_layer_speed_over_raft" and "first_layer_acceleration_over_raft" #6166 #6623.
The raft rework is based on #6003 thanks @nemart69 for the contribution.
First layer height
The following properties of the FDM support generator changed:
- The "first_layer_height" parameter was made global to the print, it is no more object specific. We consider the 1st layer height to be a property of the print. Also the skirt and brim are calculated and printed for multiple objects in a single step, therefore allowing different 1st layer height for different objects was questionable from the start.
- Because now first_layer_height is print specific, the "first_layer_height" no more supports relative values with respect to object layer height. Thus "first_layer_height" defined relative to the object layer height is newly converted to an absolute value when importing a config file or a project file.
Brim and skirt enhancements
Inner brims, brim per object
Previous PrusaSlicer versions only generated outer brim, leaving any possible holes in the first layer without brim and forcing users to use workarounds using extra thin object parts etc. Starting with this release, it is possible to generate outer brims, inner brims or both.
Also, brim settings are now object specific and brim is not generated for all objects at once, but for each of them separately. This allows to turn brim on just for some of the objects, use different brim width for individual objects etc.
#286
#651
#1033
#2182
#2290
#2455
Brim and elephant foot compensation, configurable brim offset
Purpose of the brim is to increase adhesion of the object to the print bed, meaning that it must be fused to the object. On the other hand, it must be possible to remove the brim without damaging the object itself. This means that the gap between the object and the brim must be chosen carefully. This issue is further alleviated by elephant foot effect, always present on the first layer of a print.
In previous versions, elephant foot compensation (EFC) was applied on the first layer of the object, while the brim was left as if no EFC was applied. This leads to a small gap between the object and the innermost loop of the brim, which should be filled due to the elephant foot effect. However, this made the actual sticking of the brim quite sensitive to z-height adjustment of the nozzle and sometimes led to inadequate attachment of the brim to the object.
Starting with this release, the brim is generated after EFC of the object. The offset of the brim can be further adjusted by a new configuration parameter "brim_separation" (which is independent on EFC), allowing the user to fine tune the brim offset to his or her liking.
#4850
#3779
As long as brim offset is set to zero, the EFC should never detach the brim from the object.
#3870
#6795
#4736
#3949
#3915
#4736
#6602
When loading a project file (3MF) stored by earlier PrusaSlicer version, the "brim_separation" value is set equal to the elephant foot compensation value to produce the same brim as was created with the PrusaSlicer that saved that project file.
Draft shield
Skirt printed around the printed objects is present in PrusaSlicer for years (and it was in original Slic3r before). There are several uses the skirt can serve and that people use it for. Priming of the nozzle at the beginning of the print, priming after a toolchange, or using a very high skirt as a draft shield are the most usual. Skirt is a multi-purpose tool and this release brings several changes in its configuration and behavior to make its use more intuitive (especially regarding its usage combined with a brim).
The old boolean configuration option "draft_shield" is now an enum and allows following selection:
- Disabled: the skirt is not used as a draft shield, it is printed around all objects' brims to the specified height
- Limited: the skirt is as close to the objects as specified by "skirt_distance" (possibly intersecting brims), it is built to the specified height ("skirt_height")
- Enabled: same as 'Limited', except "skirt_height" is ignored and the skirt is as tall as the tallest object

This allows the brim to improve draft shield print bed adhesion and to push the draft shield as close to the object as possible, while not creating any skirt/brim intersections when the user does not intend to use skirt in place of a draft shield.
#4802
#5056
#4736
#3692
#6544
When draft shield is used, skirt loops are printed uninterrupted and brim loops are cut. While it may make more sense to do it the other way round, shortening skirt is unacceptable because of "min_skirt_length" parameter and possible usage for nozzle purging.
Negative volumes, modifier & extruder override rules
PrusaSlicer newly supports "negative volumes" to subtract pieces of geometry from a model #4920. While there was a way to achieve a similar effect by setting zero number of top / bottom layers, zero perimeters and no infill in earlier versions of PrusaSlicer, the new "negative volumes" are much easier to use and they are processed faster and the old workaround produced artifacts as in #5095. Read more in the Documentation.

PrusaSlicer newly clips the volumes and applies the modifiers in the order they are presented at the side panel, latter volume clipping the former one, latter modifier overriding the former modifier or volume. The configuration values applied to objects, volumes and modifiers are newly collected in the following order:
- Global parameters
- Object parameters
- Volume parameters
- Layer range parameters
- Modifier parameters
- Extruder ID by Multi-material painting
This is a breaking change, where in earlier PrusaSlicer versions modifier parameters were applied over object parameters, ignoring parameters of volumes, layer range modifiers and other modifier meshes with which they overlap #5986. This was particularly painful for multi-material prints, where an application of a modifier mesh to set an infill rate resetted the extruder ID to the object default one #2657 #3012 #6091. Also newly a "Default" extruder assigned to a modifier mesh or a layer range modifier does not change the extruder of the underlying geometry.
Mutual clipping of multi-material volumes newly respects the order at the object list while in the earlier PrusaSlicer versions the volumes were first grouped by an extruder ID and then clipped #3272 #3318 #4114 #5831. Please note that the clipping order was changed as well: The latter volume newly clips the former volume. This is a breaking change, however we believe it is worth it as the new order is natural especially for the chaining of modifier attributes.
Following bugs were fixed during the refactoring:
- Modifiers applied over an object with contour simplification (parameter 'resolution') produced gaps inside an object along the modifier boundary #6451 thanks @supermerill for pointing out the issue.
Fuzzy skin #2010
We have ported the popular Fuzzy Skin feature of Cura into PrusaSlicer, thanks Cura team for keeping Cura open source. The Fuzzy Skin feature in PrusaSlicer works the same as in Cura: Fuzzification is applied to external perimeters only, hole perimeters may or may not be fuzzified. The perimeter is being resampled with a random step size and each new sample point is being shifted inside or outside of the perimeter by a random length. This simple algorithm produces surprisingly nice results suitable for tool handles or just to give the print surface a new interesting look or to hide print imprecisions. Read more in the Documentation.

Multi-material wipe tower
- Soluble filament is known to not bind to other materials well. Thus for the wipe tower stability, PrusaSlicer newly does not use soluble filament for wipe tower perimeters or wipe tower sparse infill #1948.
- Soluble filament is known to not bridge well. Thus PrusaSlicer newly never wipes a soluble filament over a sparse wipe tower, but it prints a dense layer of non-soluble filament at the layer below for the soluble filament to stick to #2818.
- Wipe tower first layer is newly printed with non-soluble material if possible by reordering the 1st layer extrusions to start with the soluble material, thus the soluble material will not be purged at the 1st layer #3953.
- Fixed an issue where the travel speed was not used when moving from a custom tool change position to the wipe tower #5483.
- Wipe tower 1st layer is newly extruded with first_layer_speed.
- Improved placement of extruder priming regions on circular beds #6459.
- Before moving to the wipe tower, filament is newly retracted using a normal retraction length, while it was retracted using the tool change retraction length before.
- Wipe tower brim width is newly adjustable.
Support for 3DLabPrint airplane models
PrusaSlicer newly supports slicing of 3DLabPrint airplane models. These 3DLabPrint models were designed to be sliced with Simplify3D with a single perimeter and no infill to produce a single perimeter wing surface reinforced by single perimeter ribs. From the solid geometry point of view, these models contain overlapping bodies, thus they are not valid solid models. After the model is sliced, polygons in each layer are merged and further processed with a Clipper library by most of the FDM slicers, including PrusaSlicer, Cura and most likely by the closed source Simplify3D as well, however the slicers differ in what fill rule they apply by default. Simplify3D always uses the Even-Odd fill rule, while Cura and PrusaSlicer use the Positive fill rule by default. To allow slicing the 3DLabPrint models, PrusaSlicer implements a new "Slicing Mode" option, allowing one to switch between the "Positive" (default) and "Even / Odd" rule. Yet another new "Slicing Mode" option "Close Holes" makes PrusaSlicer to fill in all internal structures #3062 #3708.
Sequential print
- When sequential print is active, there is always a risk that the print head will hit some of the objects. It is possible to set extruder clearance distance and height so that PrusaSlicer would check for possible collision. The clearance areas are now also visualized in the scene when moving objects around and in case of a collision #4195.

- Because we do not support Color Print with sequential print, we newly indicate the fact by showing the "Color Print" icon at the vertical slider of the G-code viewer grayed out and we also newly show a tooltip explaining why the action is not available #5437.
- Aligned seam did not work correctly when printing sequentially bd2cbea
G-code generator, firmware flavors
Support of modern Marlin firmware
Prusa's MK2 and MK3 printer firmware is running on an 8-bit Atmel microcontroller and it is based on a heavily modified legacy Marlin, while the Prusa3D Mini printer and our upcoming 3D printer models are equipped with 32 bit boards running Marlin 2 as a motion controller. Until now, PrusaSlicer produced G-code for the legacy Marlin firmware only. We newly split the Marlin firmware flavor to 'Marlin (legacy)' and 'Marlin 2' to be able to support new Marlin 2 features, above all the more fine grained acceleration control, separating the acceleration while traveling from acceleration while extruding #1089 #1994 #6457.
With the 'Marlin (legacy)' firmware flavor active, M204 Pa Rb Ta is emitted at the G-code preamble, where a, b are the values from machine limits, while M204 S... is emitted for feature type dependent acceleration settings.
With the 'Marlin 2' firmware flavor active, M204 Pa Rb Tc is emitted at the G-code preamble, where a, b, c are the values from machine limits, while M204 P... is emitted for feature type dependent acceleration settings, not overriding the travel acceleration.
Other new features
- Added new parameter to enable / disable gap fill. Until now one was able to disable gap fill by setting gap fill speed to zero, which was counter intuitive #2956 #5999 thanks @xorza.
- One may newly set the travel speed for the Z axis independently from travel speed in other axes. The new "travel_speed_z" configuration value defaults to zero, meaning that the "travel_speed" is used instead, thus being backward compatible with the old profiles and project files #2945 #3995 #6365 #6369 thanks @martinbudden.
- RepRapFirmware specific: Use "M204 P" instead of "M204 S" to control acceleration
#5740
thanks @rsobik. - PrusaSlicer newly generates M73 code with the remaining times to the next color change or pause print event. The remaining time G-code M73 has been extended with two new remaining times: Cxx and Dxx for normal vs. stealth (silent) printer mode.
- Added macro processing of color_change_gcode, pause_print_gcode and template_custom_gcode custom G-codes when emitting them into the output G-code.
#5782 - Added new placeholder for custom tool change gcode (toolchange_z), which provides Z coordinate of the tool change at the top of a wipe tower, while layer_z provides the Z coordinate of the last object layer printed. The two Z coordinates differ in case the wipe tower was generated without sparse layers
#3834. - G-code post-processor is newly executed before the G-code is copied to the target location. Indeed, running a post-processing script on SD card is not a good idea. Please note that the G-code viewer still visualizes G-code before post-processing
#6000 thanks @xorza. - G-code post-processor framework has been extended: #6042
- New environment variable SLIC3R_PP_HOST contains one of "File", "PrusaLink", "Repetier", "SL1Host", "OctoPrint", "FlashAir", "Duet", "AstroBox" ...
- New environment variable SLIC3R_PP_OUTPUT_NAME contains the name of the G-code file including path (for SLIC3R_PP_HOST == "File") or a name that will be given to the file after it is upload to the host (PrusaLink, Octoprint ...)
- The post-processing script may suggest a new output file name (likely based on SLIC3R_PP_OUTPUT_NAME) by saving it as a single line into a new "output name" temp file. The "output name" file name is created by suffixing the input G-code file name with ".output_name".
- Configuration stored into G-code is newly delimited with "; prusaslicer_config = begin" and "; prusaslicer_config = end". These delimiters look like any other key / value configuration pairs on purpose to be compatible with older PrusaSlicer versions trying to parse configuration from G-code. The G-code viewer reads the "; generated by PrusaSlicer ...." header and if the G-code was generated by PrusaSlicer 2.4.0-alpha0 and newer, it expects that the configuration block is enclosed by the new delimiters. This makes the G-code parser more robust going forward and G-codes can now be loaded by the G-code viewer even if an OctoPrint plugin adds its own comments at the end of the G-code after PrusaSlicer's configuration
#6730.
The following G-code generator bugs were fixed:
- PrusaSlicer emits various annotations for its own use, namely to augment the G-code for viewing. For example, layer height could not be guessed from the G-code reliably for bridges or for layers over supports, thus PrusaSlicer emits ";HEIGHT:xxx" when the current layer height changes. There is a risk however, that the user may enter the same annotation into some of the custom G-code block thus confusing the G-code viewer. The PrusaSlicer newly checks for the reserved comments in custom G-codes and isses a warning both when such a G-code comment is entered into custom G-code parameter and when a G-code is produced using such a questionable custom G-code block
#5538. - Fixed an issue in "avoid crossing perimeters" with the extruder wipe enabled, where there were unnecessary travels produced in the opposite direction of the wipe travel
8f293f0.
613f961 - Fixed a bug in fan speed ramp up formula
#5893. - Fixed initialization of the random number generator for the custom G-code macro processor #5219(comment).
- Fixed first layer slow down in case the "autospeed" feature was enabled. Fix merged from upstream slic3r, thanks @alranel
#5829. - Fixed hang-up with very low infill rates due to rounding to zero followed by a division by zero
#5910. - Reworked the skirt generator to generate skirt just at non-empty layers (layers that actually extrude object or support) and to respect minimum layer height. Skirt generator stops at the first layer where those two conditions cannot be met simultaneously.
#5652. - Fixed unnecessary splitting of solid fill surfaces. This was a regression issue introduced in PrusaSlicer 2.3.0 during the implementation of infill anchoring
#4437
#5988. - Fixed application of painted seams in case the painted triangles were strictly vertical.
- Fixed "Iron all surfaces" feature
#5703. - Fixed G-code export for "No extrusion" firmware flavor by not emitting the E axis. The fix is partial as no extrusions are shown by the final G-code preview
#6023. - Fixed unreliable application of filament overrides to custom G-code sections. Sometimes the main config value was used instead of a filament override and vice versa #3649.
G-code viewer improvements
The following new features were implemented for the G-code viewer:
- The G-code newly supports visualization of seams
#6755. - The G-code viewer also newly supports visualization of the G-code snippet centered around the active G-code line. The G-code snippet is shown once the extruder position is moved using the horizontal slider.
- A current G-code line number is now shown now at the horizontal slider instead of an index of a move
#5611. - Extrusions produced by the custom start G-code were not visualized as extrusions, but as travel lines. They are newly displayed correctly as custom extrusions and they are visualized as if extruded at the 1st layer independent of their Z position and extrusion height.
- The G-code may be newly colored by the temperature of the active extruder
#4402
#6106
thanks @combolek. - The printing time of the first layer is newly available at the G-code legend
#5763. - Filament used (length and weight) per extruder and per Color Change interval is newly shown at the G-code legend
#2825
#5980. - The G-code legend may not fit small screens, thus it has newly been made scrollable.
The following bugs were fixed:
- The used filament weight and cost are newly correctly shown for PrusaSlicer generated G-codes by the stand-alone G-code viewer by parsing the filament density and cost from the G-code config section.
- Prusa's own G-codes Tc, Tx and T? specific to Multi Material Upgrade (MMU) no more produce warnings to the console
#6006. - PrusaSlicer generated G-codes are now imported correctly even if the G-code is prefixed with an additional header, for example generated by ArcWelder
#6117. - Extended the G-code processor to read G28 (move to origin)
#5843. - Improved compatibility with newer Simplify3D G-codes by extracting the print bed size from their G-code.
- Similar to the Marlin 2 firmware, RepRapFirmware expects M204 P instead of M204 S to set the acceleration while extruding
#5599
#5740
thanks @rsobik. - Fixed configuration pop-up menu of the horizontal slider - enabling / disabling "Show estimated time" and "Show object height" did not work correctly
#6650. - Multi-material specific: Horizontal slider did not work correctly with "No sparse layers" enabled for the wipe tower, where the wipe tower layers are not necessarily extruded at the same height as object layers. This is now solved by starting a new "layer" at the vertical scroll bar every time the print Z changes (Z is lowered down to a sparse wipe tower or Z goes up back to top of an object)
#6232. - Improved parsing of Simplify3D G-code: Filament densities and diameters are newly extracted, allowing us to calculate used filament length and weight for S3D G-codes
a2788f3.
Arrangement, SLA auto-orientation
- Arrangement will now search for suitable rotation when arranging items larger than the bed 49c6ce7
- Arrangement ignores objects which can't fit into a single bed, the user is notified when it happens c30ac4b
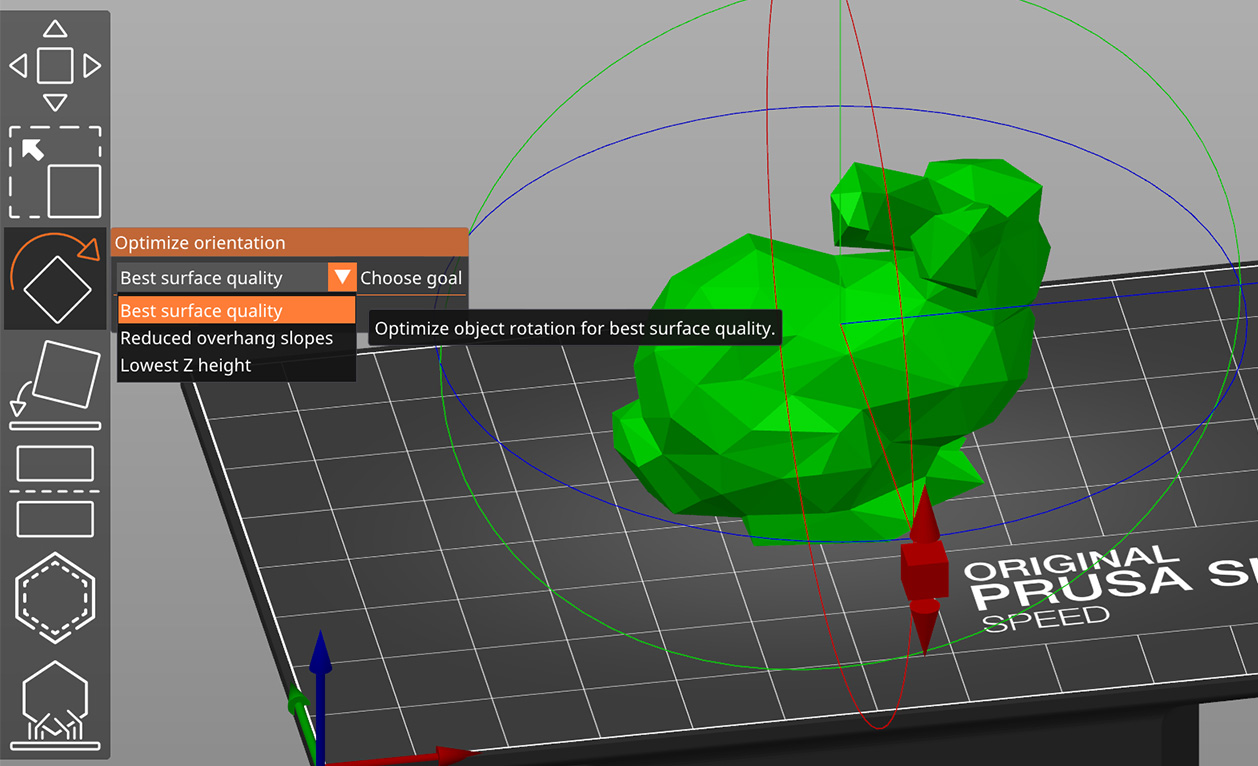
- In PrusaSlicer 2.3.0 we have changed the SLA auto-orientation algorithm. Some users were not happy about the change, thus we newly provide a configuration dialog at the Rotate gizmo allowing one to select the auto-orientation algorithm. #5714
SLA improvements and bugfixes
- Cancellation of slicing was very slow when attempted during rasterization step. This should now be fixed.
#6253 - Exporting STL function no longer produces inverted normals when mirroring is applied
#6406
978b359 - SLA preview now does not show full object when slider is at 1st layer
c54ce89 - Trimming after hollowing in SLA mode
e57eca0
82954ba - SLA Drill holes are now drilled one by one and a warning is displayed when the operation fails. This will hopefully increase robustness when dealing with complicated or broken meshes.
4b9de03 .. 3e5e020 - A notification to save changes first is shown when attempting to slice or save the project during SLA support points editing.
3fd36f0
7057348 - Fixed a possible crash when deleting an object during SLA support points editing (bug introduced between 2.2.0 and 2.3.0)
#5736 - macOS specific: Backspace in SLA gizmo now deletes selected points (like a delete would) and not the whole object, which was quite unexpected.
b30a6d5
Project state #5671 #6212 #5998 #6473
Due to technical limits of internal architecture inherited from original Slic3r, PrusaSlicer did not have any concept of opened project. That is, it did not track whether current plater contents was modified since it was loaded etc. This led to desperate moments when a user closed the application and instead of being asked about unsaved changes, they would all be discarded without a warning.
This release introduces this concept of edited project. When a 3MF is loaded and the objects are modified, an asterisk is shown in the title bar as an indication of unchanged changes in the project. This disappears after the changes are saved. Attempting to close the application, to open another project etc will open a dialog about whether the changes should be saved first.
The currently edited project is reset to an empty project when a new project is created (File->New Project). A confirmation dialog is shown when there are unsaved changes in current project. While the plater content is still recoverable by Undo after opening a new project, the link to the previously opened project will not be recovered and the objects will be considered as parts of the new (unsaved) project. The same applies to 'Undo/redo', i.e., it undoes the action but does not change the correspondence to a project, so when you for example open project1, move object, open project2, undo and save, the content of project1 will be saved into project2. Also, creating New Project does not affect modified profiles.
Modifying configuration parameters in selected profiles is also considered as a change in the currently active project. When attempting to close the application with such an unsaved change, the user would again be asked whether to save the project. In case they select 'Yes', the modified profile will be saved into the 3MF and the application will close. However, answering 'No' will close the unsaved project and the "Unsaved changes dialog" (introduced in PrusaSlicer 2.3.0) will pop-up asking whether the modification of the profile should be saved (not into the 3MF, but into the profile).
Moving the object below the print bed #1513
We are newly allowing an object to be moved below the print bed to print just the part of the object above the print bed. Arguably this was already doable with the "Cut" tool, but the new way is much simpler to use and very handy for example if one just needs to flatten the bottom of an uneven object to be printable without a raft. We do not allow the object to be lifted above the print bed: Elevated objects are not printable without a raft and supports. If an object is not flat, raft shall be enabled for the object by the user.
An object is either on the print bed or below the print bed. If an object is on the print bed, the software behaves as before: After rotating and scaling, the object Z position is adjusted to touch the print bed. On the other hand, if an object is partially below the print bed, scaling and rotation does not change object's Z position as long as the object is not elevated above the print bed. If an object is elevated above the print bed, it is again lowered to touch the print bed. There is also a new button "Drop to bed" at the object manipulation panel to move the object back to the print bed, however the same action may be done just by elevating the object above the print bed with the move gizmo and letting it drop back to the print bed.
If the object is partially below the print bed, a white contour is drawn along the object - print bed intersection to indicate where the object will be trimmed. When manipulating the object with a move / rotate / scale gizmos or when hovering over the object with a mouse cursor, the white intersection contour is drawn not clipped by the object to make it easier to flatten an uneven bottom of an object.
When in painting gizmo, the part below the print bed is being clipped and painting on the print bed clipping plane is not allowed.
Moving objects below print bed is not allowed in SLA mode for now as it would make the placement of SLA supports confusing. Thus when switching from an FDM printer to a SLA printer, all objects below the print bed are being lifted to touch the print bed.
Automatic Color Print for signs
After slicing a sign object, a notification is newly shown in the G-Code preview informing that the object looks like a sign and that one may want to use the Color Print feature to manually switch the filament. If one agrees with the suggestion by clicking on the notification hyperlink, the color change events are inserted into the vertical scroll bar.

This feature was proposed by @richrap, thanks for the suggestion.
Shape Gallery #6703
We have implemented a Shape Gallery offering both system shapes distributed with PrusaSlicer installation and user shapes installed into user's configuration directory. The Shape Gallery could be used to insert a shape on the plater, as an additional part of an object or as a modifier similarly to how a built in shape (cube, cylinder, sphere) has been inserted by earlier PrusaSlicers. The Shape Gallery could be used for example to emboss a recycling code to the bottom of an object #4349, for loading Mickeymouse brims to augment brims etc. STL and OBJ files may be loaded by the "Add" button or by drag & dropping into the Gallery window. A thumbnail is generated for a user shape automatically, which is saved as an PNG image file, however the user may want to replace the generated thumbnail image with her/his own.
The Shape Galery is not available in Simple mode.
Windows Dark Mode #4493
Based on the popular request, we have implemented Dark Mode for Windows and we have also fixed the High Contrast mode #3038.
While PrusaSlicer supports dark mode on OSX and Linux for some time already, Dark Mode on Windows was the one from the hard basket. PrusaSlicer's user interface is implemented using a wxWidgets multi-platform library, which wraps around the native controls the platform provides. On Windows, wxWidgets wrap around the aging Win32 controls, for which there is no official Dark Mode support provided by Microsoft since the introduction of the Dark Mode into Windows 10 in fall 2018. Unfortunately Microsoft just implemented an undocumented API for the controls used by Windows Explorer to switch to Dark Mode. If a Win32 control is not used by Windows Explorer main window, it is not Dark Moded and it never will be, and the API for those controls that are supported is not official, thus it may be changed without notice.
We have done our best using the undocumented Dark Mode API and skinning of Win32 controls. We even implemented our own replacements for some Win32 controls, which were not skinnable, for example the tabbed notebook that we use to switch between the Plater / Print / Filament / Printer profiles (this one fixes speed of switching the tabs on 4k displays #6309). Still some of the controls are not skinned properly, for example the scroll bars, status bar or the spin control buttons, thus PrusaSlicer may not look quite polished in Dark Mode. Therefore for now we decided to not switch PrusaSlicer into Dark Mode following the Windows system settings, but we are letting the user to select dark mode from Preferences using the "Use Dark color mode (experimental)" checkbox.
We were inspired by the Notepad++ effort, which released its Dark Moded version just recently. We are using source code borrowed from Notepad++ interfacing with the unpublished Dark Mode API, which is based on this project. As far as we are aware of, Notepad++ is the only Win32 open source application which implements Dark Mode to a reasonable extent.
As an alternative to the "tabbed notebook" control to switch between the Plater / Print / Filament / Printer profiles, we newly allow these tabs to be placed into the application menu, which may be welcome on small laptop screens.

"Did you know" aka "Tip of the day" notifications
PrusaSlicer grows more powerful every day offering many unique features not found in other slicers. To streamline everyday slicing, many features are accessible through hot keys and keyboard modifiers (Ctrl / Alt + mouse key). We newly present "Did you know" hints inside a notification, often providing a hyper link to highlight a user interface element (toolbar button, configuration parameter) or to open a help page in web browser. The tips may be disabled in preferences, however we believe you will find them useful.

Upload progress
Many of our users run a small or not so small print farm, thus they may use a single PrusaSlicer session to slice and upload G-codes to multiple 3D printers in succession. To better support this workflow, we implemented the following improvements:
- The existing "Print Host Upload Queue" dialog newly supports sorting by columns and a file size column has been added.
- Size and position of the "Print Host Uplad Queue" dialog is newly persistent.
- A notification is popped up in the 3D view for each upload task initiated showing an upload progress. Thus in most cases one will not need to open the old "Print Host Upload Queue" dialog at all.

Mesh simplification
Sometimes the model imported into PrusaSlicer is excessively detailed, slowing down speed of user interaction, slicing and producing project files (3MF/AMF) of excessive sizes. We newly provide a model simplification tool based on Quadric Edge Collapse algorithm, thus our implementation produces similar results to Microsoft 3D Builder model simplification or to MeshLab Quadric Edge Collapse simplification tool. The simplification rate is controlled either by required level of detail (which internally uses estimates of maximum geometric error with respect to the original model) or by the fraction of triangles to be removed.
A very high simplification rate may be used to achieve a "Low Poly" effect.

Other UI improvements
- Confirmation dialog on "Delete All" was removed, it now works the same way as if the objects were removed one by one. The confirmation dialog had its purpose until Undo / Redo was implemented #3886.
- In addition to reloading an existing object or volume geometry from disk, PrusaSlicer newly allows to replace the geometry with a different file
#3856. - PrusaSlicer newly displays the decimal separators according to user's locales, while a dot was displayed before.
- "Split to objects" feature newly supports splitting a multi-volume object into multiple objects, while this feature used to split just a single volume into multiple objects before. If the object has multiple volumes, its volumes are assigned each to its own object. First after the object has a single volume only, "Split to objects" will split a volume into multiple disconnected objects if possible.
- Added border to filament color in right panel combo box to improve visibility of light filaments.
#5914, thanks @scottmudge. - Added possibility to compare configuration profiles (
Window->Compare presets)
4cdcfe6 - Added hot keys "1-9" for assigning an extruder number to an object or a volume with the keyboard focus at the object list, "0" assigns the "default" extruder. Similarly, a new hotkey "p" toggles the "printable" flag of the selected objects or volumes.
#6216. - The "Printable" menu item is newly available for multiple object selection as well
3a53606. - macOS specific: Enabled the platform standard "Cmd+M" hot key to minimize the application. The "3DConnexion legacy set sensitivity dialog" hot key was changed to "Cmd+Shift+M" on macOS.
- The background of the XYZ fields in the "Object manipulation panel" may newly be colored with the color of the gizmo axes (red, green, blue). Configurable in Preferences by "Use colors for axes values in Manipulation panel", disabled by default
#4931. - Once the user paints support enforcers and supports are not enabled, a notification is newly shown suggesting to enable supports by clicking on a hyperlink
#5307. - Fixed minor text alignment issue in G-code viewer vertical scroll bar
#6182. - Multi-material specific: The "Color Change" dialog newly allows to generate random extruder swap sequences, producing a rainbow effect #1866.
- Settings of colors indicating the difficulty of configuration options (Simple / Advanced / Expert) was moved to Preferences to be easy to discover
#5489. - With the paint-on supports gizmo inactive, it is not clear whether an object has any supports painted. The similar applies to the painted seams, multi-material painted segmentation or variable layer height features. If any of these tools were used on an object, the fact is newly indicated at the object list by an extra line (clicking this line opens editing of the respected property, Del key can be used to remove it). Similarly it is indicated at the object list if an object is partially below the print bed (this is a new feature in PrusaSlicer 2.4.0-alpha1). In addition, we open a notification after loading a project indicating which of these features were applied to at least a single object.
- Updated MK2 & MK3 textures 57a73c5
- Linux specific: PrusaSlicer defines icons for many menu items, however many Linux desktops are configured so that no menu icons are shown by GTK2/GTK3 based applications, most likely because these icons are often huge. PrusaSlicer newly forces GTK2/3 to always display its tiny icons in its menus ignoring desktop defaults.
Other new features and improvements
- Zipping 3MFs now uses ZIP64 format, thus our 3MFs are no more limited to 4 GB of uncompressed file and total archive size. Because Microsoft 3MF implementation does not support ZIP64, we only use the ZIP64 extension if necessary #6193.
- Windows specific, upload to print host: If the upload is secured using a self-signed SSL certificate, the Windows system often refuses the self-signed certificate because it cannot check its revocation. PrusaSlicer newly allows one to suppress the revocation check #1781.
- Linux specific, also applies to Linux on Chrome OS: Desktop integration support (conditionally compiled) allows one to install desktop integration files (PrusaSlicer.desktop, PrusaSlicer-gcodeviewer.desktop and the icons) into user's desktop. The desktop integration is offered by the installation wizard and desktop integration may also be installed / deinstalled manually from the Configuration menu. Manual desktop integration is quite useful if one experiments with multiple AppImages of different PrusaSlicer versions, the last one for which the desktop installation is performed wins #1431.
Bugs fixed
UI bugs fixed
- OSX specific: Fixed handling of spin controls at the Purging Volumes dialog, the spin control values were sometimes not accepted #6056.
- Multi-material specific: Fixed crashing after decreasing number of printer extruders and accessing object popup menu
#6094. - Fixed inconsistency when copying an object, which is marked as not to be printed
#5619. - Linux / GTK specific: Fixed asserts emitted by the Platter preset combo boxes
#5510. - Linux / GTK specific: Fixed assert in installation wizard, on filament selection page
#5152. - Multi-material specific: After deleting all but the last volume from an object, the object's default extruder is newly initialized with the extruder of the last volume remaining. This has not been done before leading to the object being sliced with the extruder of the volume, while just the color of the object's extruder was shown in the object list.
03dee86 - Linux / GTK specific: Fixed the "view" combo box at the bottom of the screen, which centered the active item around the mouse cursor, thus often pushing most of the combo box items out of the screen. This is an unfortunate behavior of GTK Choice control, which we have now replaced with a Combo Box control
#6110. - Fixed installation wizard issue newly introduced in wxWidgets 3.1.4, where the spin controls to define nozzle and filament diameters did not accept commas. Worked around by replacing these spin controls with text inputs.
- Linux / GTK specific: Fixed surprising opening of an edit field when one pressed a letter key with the object list focused
b87c03f. - Fixed a rare crash when deleting last object from plater
0c7095d. - Windows specific: Fixed focus issue after closing a "parameter validation error" message box and returning the focus to the parameter page
3c37aed. - Linux / GTK3 specific: Fixed insufficient height of combo boxes on the plater side panel
#5163
#5505. - Fixed copy / paste of multiple objects with different attributes assigned (for example with different infill rate) leading to "Unsupported Selection" error
#5517. - Fixed extrusion width validation logic in case the extrusion width was specified wrt. layer height
#4631. - Fixed updates of combo boxes: Enter key did not make the combo box to accept a new value, thus the slicing back-end was not being updated
#6692. - Fixed crash when trying to open a pop-up menu of one modifier while parameters of another modifier were editable at the side panel. This was a regression since PrusaSlicer 2.3.0
#6782. - With the settings configured as floating in its own non-modal window and with the non-modal window minimized, selecting a settings page with the Ctrl-2/3/4 hot keys or from the PrusaSlicer menu did not restore the minimized window. This is now fixed
#6548. - Installing / uninstalling filaments or SLA materials using the Configuration Wizard did not work reliably
#6436. - Fixed a glitch, where editing the top solid infill type and speed was disabled in vase mode #4241.
Presets
- Fixed a loophole in PrusaSlicer, where the user was allowed to save his own profile name under the name of a system profile alias (aka symbolic name). For example, user was able to save the "0.2mm QUALITY @MK3" profile as "0.2mm QUALITY" user profile, which is the symbolic name of the system profile
#5638. - Fixed a crash when importing a config bundle as a config file. This was broken for multi-material configs with different filament profiles selected.
#5825 - Fixed reload from disk after a project is loaded from a 3MF. Reload from disk worked for a fresh project, but for a project loaded from 3MF the "reload from disk" feature did not reload a geometry at the same position and scale
#5541. - Reload from disk was not available for geometries imported from a 3MF or AMF format (for example if the 3MF or AMF was exported from SolidWorks) #5071.
- Fixed storing of "pause print" custom G-code message into a project file. The "pause print" message was correctly emitted into G-code for a fresh project, but not after the project was loaded from 3MF #5888.
- Fixed activation of printer specific "default" print / filament / sla print / sla material profiles after the first printer ever is installed by the Configuration Wizard.
- Fixed storing / loading of the list of Printer profiles associated with a Physical Printer profile. Printer profile names containing semicolons or leading / trailing spaces were not handled correctly. The list of printer profiles is saved using an old "preset_name" config key the old unreliable way for compatibility with PrusaSlicer 2.3.3. In addition the list of profiles is stored in a robust way using a new "preset_names" key #5503.
- Implemented automatic conversion from meters to millimeters on loading of extremely small objects, which most likely were exported in meters. Also new menu items were added to convert from / to meters manually #4521.
- Fixed loading of project files referencing system profiles, which are not installed at the target machine. In that case the old PrusaSlicer activated some random profiles, while the new PrusaSlicer temporarily installs the missing profiles until PrusaSlicer is closed and the user is being informed with a notification.
Other bug fixes
- Windows specific: Fixed "Fix by Netfabb" for scaled volumes, which were scaled twice after they were fixed.
- Windows specific: ASUS and MSI install applications, which use libraries from Nahimic. These Nahimic libraries are then injected into our PrusaSlicer on start-up and they lead to a crash of PrusaSlicer on start-up on some dual screen setups. We were not able to fix the issue as we were not able to get our hands on such a system, thus we implemented detection of black listed DLLs being injected into PrusaSlicer, we report them and advise to disable those services. Also the black listed DLLs injected into PrusaSlicer are being shown by the System Info dialog #2142 #2522 #3689 #4793 #5091 #5573.
- Linux specific: Fixed invocation of PrusaSlicer by referencing prusa-slicer binary with a $PATH variable or symlink #5542 #5751.
- Fixed command line slicing with no printer technology (FDM or SLA) specified. Slicer should slice in FDM mode when no printer_technology is provided. This was broken between 2.2.0 and 2.3.0 (1bffc2b), where 2.3.0 sliced in SLA mode by default, but saved the output as .gcode #5029.
- Fixed crash in arrangement when the polygons to be arranged contained duplicate points #5749.
- Fixed parsing of --scale-to-fit command line parameter, reworked the scaling algorithm and placing objects to bed, which have been broken since PrusaSlicer 2.0. Also added a new command line parameter '--ensure-on-bed', which is 'true' by default: When an object is placed on the print bed, it is being aligned in Z to sit on the print bed, which corresponds to what the PrusaSlicer would do when an object is imported into the UI #5772, #6788.
- Fixed crash when splitting models from command line using the '--split' command line parameter and empty meshes are created during the splitting #5979 #5991 thanks @combolek.
- Initialization of PrintConfig derived classes was not thread safe #6475, thanks @supermerill for pointing out that issue.
- Fixed deadlock when canceling the slicing while gcode is creating thumbnails #6476, thanks @supermerill for pointing out the issue.
New 3rd party printer profiles
- Added gCreate gMax printer profiles, thanks @gordo3di
Localization
- Dictionaries for CZ, DE, ES, FR, IT and PL were updated by Prusa Research.
Contributors are welcome, please check the localization guide - Korean localization update #6314 thanks @ulsanether.
Architecture, infrastructure
- We removed libglut dependency, which is one little step forward to deprecate legacy OpenGL.
- We updated ImGUI to version 1.83 to support localized decimal separator (dot versus comma).
- Windows specific: Enabling /utf-8 on MSVC should fix compilation errors on Chinese Windows #5583.
- Windows specific: Visual Studio newly supports Address Sanitizer. PrusaSlicer newly supports ASAN builds on Windows using the -DSLIC3R_ASAN=on CMake switch the same way as on POSIX platforms.
- We have fixed huge number of compiler warnings. We are striving to keep our builds warning free on all major platforms.
- OSX specific: We increased the minimum required OSX version from 10.9 to 10.10 due to an update of wxWidgets, that does not compile on OSX 10.9.
- CMakeLists was updated to require MINIMUM_BOOST_VERSION 1.66.0 due to Base64 dependency #3375 #5508 thanks @pmjdebruijn.
- When compiling wxWidgets as a static dependency, wxMediaCtrl support is no more compiled in as we don't need it and wxMediaCtrl requires unexpected compile dependencies on Linux #5815 #6160.
- Linux / GTK specific: Fixed compilation against wxWidgets 3.0 #5752 thanks @sebastianha.
- Updated boost version from 1.70.0 to 1.75.0 due to an issue with newest Xcode / clang incorrectly reporting that it supports
__cpp_lib_uncaught_exceptionswhile it does not if targeting older platforms. This issue has been worked around first in boost 1.74.0. - When building static dependencies, the dependency script used to always download sources from internet. Because the Linux / Snap build system prohibits internet connection, we extended the build system to build dependencies with no internet connection by specifying a DEP_DOWNLOAD_DIR pointing to required source code packages already downloaded.
- Updated the Catch2 framework from v2.13.3 to v2.13.6, fixes compilation on Fedora Rawhide #6518 thanks @ausil.
- Fixed boost dependency URL as the original host's lifetime has ended #6349 thanks @krisrok.
- Some components of Thread Building Blocks (atomics, mutexes) were recently deprecated with standard library equivalents #6590 thanks @zavorka
- Add a simple Windows command-line build script (#6674) thanks @jshuh
- Linux specific: Fixed FHS install dirs #5930 thanks @dimitry-ishenko.
This release log is clipped by github
Because the github Releases page clips the text to 25 thousand characters, full PrusaSlicer 2.4.0-alpha1 release log is available at the wiki.
Published by bubnikv over 3 years ago
PrusaSlicer 2.3.3
Summary
PrusaSlicer 2.3.3 is a patch release following PrusaSlicer 2.3.2 release, fixing an unfortunate bug in handling FDM multi-material project and configuration files #6711.
Published by bubnikv over 3 years ago
PrusaSlicer 2.3.2
Summary
This is a final release of PrusaSlicer 2.3.2, following 2.3.2-beta and 2.3.2-rc. For the new features in the 2.3.2 series, please read the change logs of the beta and release candidate. The final release is functionally equal to the release candidate, with a single additional improvement:
Before installing profile updates, a configuration snapshot is taken. In rare circumstances when the current configuration is not consistent, taking a configuration snapshot fails. PrusaSlicer 2.3.2 newly informs about the issue and offers either to install the configuration updates even if taking the configuration snapshot failed or to abort update of the profiles.
Published by bubnikv over 3 years ago
PrusaSlicer 2.3.2-rc
Summary
This is a release candidate of PrusaSlicer 2.3.2, following 2.3.2-beta. For the new features in the 2.3.2 series, please read the change log of the beta release. The release candidate is functionally equal to the beta release, the only difference being updates of CZ, DE, ES, FR, IT, NL, PL dictionaries.
Unlike the beta, the release candidate saves its profiles into PrusaSlicer directory, which is the same directory where the previous releases of PrusaSlicer (and the rcs) keep their profiles. If you were testing the PrusaSlicer 2.3.2 beta, your may consider exporting a Config Bundle from PrusaSlicer 2.3.2-beta and importing it into PrusaSlicer 2.3.2-rc.
Published by bubnikv over 3 years ago
PrusaSlicer 2.3.2-beta
Summary
This is a beta release of PrusaSlicer 2.3.2, introducing support for the new Prusa SL1S SPEED masked SLA printer, Prusa CW1S firmware updater, PrusaLink host type for Prusa i3 MK3 printers, Monotonic infill for all solid layers, better support for reading configurations of newer PrusaSlicer releases, new 3rd party printer profiles and a handful of bug fixes.
To let you enjoy the beta without worries, the beta builds save their profiles into PrusaSlicer-beta directory, so you may use the beta side by side with the current release without ruining your production configuration.
New features
- Support for Prusa SL1S printer. Files to be printed on Prusa SL1 resp. SL1S printer are exported with an ".sl1" resp. ".sl1s" extension.
- Firmware updater support for Prusa Curing and Washing machine CW1S.
- Support for a new PrusaLink host type. PrusaLink is a new name of the networking interface of our printers (SL1/SL1S, MK3 with a PrusaLink Raspberry PI zero image). We are working on PrusaLink for Prusa Mini. The host type of SL1 in PrusaSlicer has been renamed to PrusaLink for clarity.
- In PrusaSlicer 2.3.0 we have introduced the Monotonic infill for top / bottom surfaces. We received a feedback, that the top surfaces were not always smooth because the monotonic infill was only applied to the top most infill, but not to the solid infills below. In PrusaSlicer 2.3.2, if the top solid infill is Monotonic, all internal solid infill is newly Monotonic as well #4939.
- When opening the Installation Wizard to install a new printer or a new filament / SLA material, PrusaSlicer newly offers to install configuration updates first before opening the Wizard, because otherwise the user may not be presented with all printers, filaments or SLA materials available.
- Support for forward compatibility of configurations. Imagine a new infill type is added to a future PrusaSlicer release. If a 3MF was created using the new infill type, PrusaSlicer 2.3.1 would refuse to load the 3MF, while PrusaSlicer 2.3.2 will substitute the unknown infill type with its default and it will present the substitution to the user. The "forward compatibility" feature supports not only adding new enumerated values . For example infill types or firmware flavors) to existing configuration keys, but also turning booleans (on/off) to enumerated values (for example, "draft shield" will change from "enabled/disabled" to "enabled/disabled/limited" in PrusaSlicer 2.4.0.
Bugs fixed
- Fixed import of some OpenSCAD generated STLs. Until recently OpenSCAD generated ASCII STLs by default with insufficient accuracy of coordinates https://github.com/openscad/openscad/issues/2651. This triggered a bug in PrusaSlicer that caused these STLs to not be sliced correctly #4654 #5122 #5668 #5811 #5895.
- Fixed considerable performance issue when filling in top resp. bottom surface with Hilbert Curve Infill #5771.
- Fixed performance issue in bridging calculation #5974.
- Fixed blobs on print after returning from M600 G-code after manual color change. PrusaSlicer did not take into account, that the nozzle is pressurized (deretracted) after M600 finishes, thus it incorrectly triggered extra deretract in some scenarios #6362.
- Windows specific: Transactional saving of PrusaSlicer.ini to ensure that configuration could be recovered in the case PrusaSlicer.ini is corrupted. On Windows, seemingly the "Move file" Windows API is not atomic, thus PrusaSlicer.ini may get corrupted during the "Move file" operation on power outage or if PrusaSlicer crashes during the operation. It happens very rarely, but it happens. To work around the issue, the config is newly written first into a temp file marked with a MD5 checksum. Once the file is saved, it is copied to a backup file first, then moved to PrusaSlicer.ini. If loading PrusaSlicer.ini fails, the backup file is loaded instead, however only if its MD5 checksum is valid. #2438, #4915, #5812.
- Linux specific: Fixed an incompatibility with some file systems. Namely PrusaSlicer 2.3.1 would not start at all if the home directory was encrypted. This was a regression in regard to PrusaSlicer 2.3.1 caused by an update of boost::filesystem library #4716 #6588.
Localization
- updated Russian translation, thanks @AndylgTom
- updated Ukrainian, thanks @YuSanka
3rd party printer profiles
- TriLab AzteQ Industrial printer was added.
- Various improvements of Anycubic, Artillery and Creality profiles.
Published by bubnikv over 3 years ago
PrusaSlicer 2.3.1
Summary
This a final release of PrusaSlicer 2.3.1, introducing native builds for the new Apple Silicon MacBooks, Chrome OS support, performance improvements in G-code rendering, security fixes and new 3rd party printer profiles. For full changelog on PrusaSlicer 2.3.1 series, please check the PrusaSlicer 2.3.1-rc change log.
Bugs fixed with respect to PrusaSlicer 2.3.0
- OSX specific: Fixed a crash reported by a single user only on application start-up due to some unexpected values returned by OSX API when detecting removable media #5719.
Published by bubnikv over 3 years ago
PrusaSlicer 2.3.1-rc
Summary
This a release candidate of PrusaSlicer 2.3.1, introducing native builds for the new Apple Silicon MacBooks, Chrome OS support, performance improvements in G-code rendering, security fixes and new 3rd party printer profiles.
Universal OSX builds, Apple Silicon support #5179 #5124
Starting with this release, PrusaSlicer supports the new Apple Silicon MacBooks and MacMinis natively, running about 30% faster than emulated x86-64. The new Universal builds contain binaries of both x86-64 and ARM platforms, thus the distributed package is somehow larger than the previous PrusaSlicer.
Apple deprecated the multi-platform graphics API OpenGL about a year ago. Luckily MacBooks still support OpenGL, however G-code preview rendering of larger G-codes on new Apple M1 machines was extremely slow on PrusaSlicer 2.3.0 #5412 #5695 #5854, #6211. We were lucky to fix that issue through a trial and error process due to a lack of OpenGL API documentation and debugging tools from Apple.
We thank @xarbit and @obelisk for their initial work on PrusaSlicer M1 port #5179 #5313.
Chrome OS support #3392
Chromebooks are getting increasingly popular due to their low price, good usability and stability. This makes the Chromebooks the number 1 pick for the US educational institutions. Luckily Google now offers a containerized Linux on modern Chromebooks out of the box and PrusaSlicer runs in the virtualized Linux environment nicely.
Some users managed to run PrusaSlicer on Chrome OS before, see this post. We encountered the following issues when testing PrusaSlicer on Chrome OS, and we solved some of them:
- Red / Blue color channels were flipped by the OpenGL graphics virtualization. We solved that by disabling multi-sample anti-aliasing on Chrome OS and we reported the issue to Google.
- USB devices of Prusa3D printers are not being routed to Linux, thus the Firmware Updater does not work yet. We have reported that to Google and most likely the Prusa3D USB devices will be supported by some of the upcoming ChromeOS updates.
- Support of removable media detection and eject: PrusaSlicer newly detects removable media on Chrome OS. Eject of removable media is disabled in PrusaSlicer on ChromeOS, as such a function will likely never be available to Linux applications on Chrome OS due to security reasons. Please note that you have to explicitly share each removable media you plug in with Linux.
- Desktop integration: If the PrusaSlicer.desktop resp. PrusaSlicer icon is installed manually to
$HOME/.local/share/applicationsresp.$HOME/ .local/share/icons/hicolor/96x96/apps, then the PrusaSlicer application will be available at the Chrome OS application launcher. We will likely implement an automatic desktop integration into PrusaSlicer 2.4.0.
We have documented installation of PrusaSlicer on Chrome OS in our installation guide.
PrusaSlicer requires around 8 GB of RAM for processing full build plate prints, so you will be more lucky with Chromebooks that are equipped with at least 8 GB of RAM. On a 4 GB Chromebook you will be able to slice just about 4 3D Benchies and 4 Tree frogs at a 0.15 mm layer height. Please note that Chrome OS gives the Linux virtual machine 1 GB less than the physical RAM and there is no swapping enabled in the Linux virtual machine, thus a 4 GB Chromebook gives just 3 GB of RAM to Linux running PrusaSlicer, which is not much. Please note also, that on ARM Chromebooks the situation is worse: Only 3GB of RAM are given to Linux even on 8 GB chromebooks.
Also please note that the OpenGL support on ARM Chromebooks may be flaky. Current Chrome OS provides hardware OpenGL virtualization on modern devices, but the GPU performance of some ARM SOCs (for example Mediatek) is quite low, while on one ARM device we tested PrusaSlicer crashes when switching windows, which is likely a bug in ChromeOS OpenGL virtualization. Therefore we recommend Chrome OS devices with Intel CPUs for now to run PrusaSlicer.
New 3rd party printer profiles
- Multiple Creality printers profiles were added (Ender-3 Max, Ender-4, Ender-6, CR-5 Pro, CR-5 Pro H, CR-6 SE, CR-6 Max, CR-10 Max, CR-200B, CR-8), thanks @pmjdebruijn.
- Added Artillery printer profiles (Sidewinder X1, Genius), thanks @SzabolcsHornyak.
- Added INAT printer profiles, thanks @MarkINAT.
- Updated Anycubic Kossel bed texture (thanks @brunosso) and Anycubic Kossel bed STL.
Vulnerability issues fixed
The Talos Cisco Intelligence Group did a great job identifying potential security issues in loading invalid and potentially malicious AMF and 3MF files, see their vulnerability reports TALOS-2020-1222 and TALOS-2020-1218. We fixed these two potential security issues with this release of PrusaSlicer.
Bugs fixed with respect to PrusaSlicer 2.3.0
- The OpenGL changes mentioned in the "Universal OSX builds" section also fixed some OpenGL related issues on Linux #5889 #6304.
- Reduced number of hits shown by the "Find config option" dialog, fixed case insensitive search for non-Latin1 languages #5202.
- Fixed G-code preview with coloring by a tool and visualization of travels enabled #6095.
- Fixed opening of drop down menus at the bottom of the screen on multi-monitor setups #2999 #5911 #5957. This issue has been fixed by us in wxWidgets and accepted by the upstream.
Published by bubnikv almost 4 years ago
PrusaSlicer 2.3.0
Summary
This a final release of PrusaSlicer 2.3.0, introducing paint-on supports (video), ironing (video), monotonic infill, seam painting, adaptive and support cubic infill, print time per feature analysis, standalone G-code viewer application, better auto-arrange with a customizable gap and rotation, search function for the settings, reworked "Avoid crossing perimeters" function, physical printers (network settings), many new 3rd party printer profiles and much, much more.
The final release follows releases 2.3.0-alpha1, 2.3.0-alpha2, 2.3.0-alpha3, 2.3.0-alpha4, 2.3.0-beta1, 2.3.0-beta2, 2.3.0-beta3, 2.3.0-rc1, 2.3.0-rc2 and 2.3.0-rc3. This release fixes bugs found in the last release candidate. For all the new features in the 2.3.0 series, please read the change logs of all the alphas, betas and release candidates.
Unlike the alphas and the betas, the release build saves its profiles into PrusaSlicer directory, which is the same directory where the previous releases of PrusaSlicer (and the rcs) keep their profiles. If you were testing the PrusaSlicer 2.3.0 alphas or betas, your profiles from them would have to be manually imported into PrusaSlicer 2.3.0-rc3 by exporting and importing the Config Bundle.
Bugs fixed with respect to PrusaSlicer 2.3.0-rc3
- Linux specific: Fixed new linker dependencies - glib and GTK libraries. (#5722, #5739, #5717, thanks @combolek)
- Linux specific: Fixed "Single instance" feature for AppImage. (#5733)
- Linux specific: Fixed a regression issue where a change in parameter was not accepted when switching between parameter pages. (#5720)
- Fixed a crash when slicing an object producing no layers with Elephant Foot Compensation enabled. (5a1a41096b546052fc0295073d1360ed73edbd6a)
Published by lukasmatena almost 4 years ago
PrusaSlicer 2.3.0-rc3
Summary
This is the third release candidate of PrusaSlicer 2.3.0, following 2.3.0-alpha1, 2.3.0-alpha2, 2.3.0-alpha3, 2.3.0-alpha4, 2.3.0-beta1, 2.3.0-beta2, 2.3.0-beta3, 2.3.0-rc1 and 2.3.0-rc2. This release fixes bugs found in previous release candidate and couple of old bugs as well. For the new features in the 2.3.0 series, please read the change logs of all the alphas, betas and rcs.
Unlike the alphas and the betas, the release candidate saves its profiles into PrusaSlicer directory, which is the same directory where the previous releases of PrusaSlicer (and the rcs) keep their profiles. If you were testing the PrusaSlicer 2.3.0 alphas or betas, your profiles from them would have to be manually imported into PrusaSlicer 2.3.0-rc3 by exporting and importing the Config Bundle.
Bugs fixed with respect to PrusaSlicer 2.2.0
- Linux specific: Fixed long preset names in preset combo boxes overflowing at the left edge of the combo box. (#2898, thanks Ian McInerney from KiCad team)
- Linux specific: Fixed eject of SD card or flash drive with spaces in its file system label. (#3975)
- OSX specific: Fixed slow SD card or flash drive eject. (#4844)
- Concentric infill is now always being printed outside-in. This is consistent with the original Slic3r and it has been broken in PrusaSlicer for a long time, optimizing the Concentric infill path for shortest travel. (#4948)
- Linux, GTK2 bug workaround: File path text edit control in "Send G-Code to printer host" dialog was painted white on white after losing focus. (#4532)
- Fixed drag & drop issues at the object list. (#5568)
- Fixed a missing reslicing request after object settings were deleted. (#5606)
- Fixed thumbnail generation: when a custom supports/seam painting was active during the export, the thumbnail only contained the instance being edited by the gizmo. This issue happened in PrusaSlicer 2.2.0 in SLA mode with support editing gizmo active, but it now became more pronounced with the introduction of the support and seam editing in PrusaSlicer 2.3.0. (#5690)
Bugs fixed with respect to PrusaSlicer 2.3.0-rc2
- Fixed FDM auto-speed calculation in case ironing is used. Ironing extrusions are newly excluded from auto-speed calculation. (#5082)
- OSX specific: Fixed SD card / flash drive eject from 2nd instance of PrusaSlicer. (#5507)
- Fix of G-code Viewer not loading certain file extension. The Open file dialog offers to open files with the following extension:
g,gcode,ngcandgco, butngcandgcowere incorrectly rejected when selected. The same has also been fixed for importing configuration from a G-code. (#5536) - Fixed a rare crash during loading of a 3MF. (#5550)
- Fixed incorrect scaling of splash screen title on certain combination of scaled displays. (#5584)
- Custom supports/seam paining did not work correctly on scaled objects. (#5632)
- Fixed regression in coloring labels of the preset input fields after the preset input field gets modified by the user. (#5698)
- Fixed regression in 3MF import / export: Fixed XML escaping of newly introduced file name metadata field. (#5577)
- Fixed slow update when dragging the vertical slider in G-code viewer. (#5572)
- Fix of 'fill bed with instances', which ignored possible rotation of the source object when creating the new instances. (#5621)
- Enabled path planning optimization for the new Adaptive Cubic and Support Cubic infill types. (#5633)
- Fixed a crash when slicing one-layer object with raft. (#5652)
- GCode processor now accepts
T-1(set no extruder as active) as valid for RepRapFirmware and RepRap/Sprinter G-Code flavors. (#5677) - Fixed numerical issues with the new algorithm to connect infill lines with perimeters. (93a5906a18cbacfa0a903eb9fe540aab6387bd5c)
- Fixed refresh of in 3D scene notifications. They only appeared / disappeared after the user moved mouse over the 3D scene.
- Linux specific: Fixed freezing on Linux when run with non standard task affinity. (#5661, thanks @maximlevitsky)
- Linux specific: Use monospace font when reporting errors in custom G-Codes, thanks @wavexx.
- Windows specific: Iterating over presets at the preset combo box using the up / down cursor keys stopped working after Windows 2004 update. This should now be fixed. (#5531)
Localization
- Minor fixes (e.g. #5672)
- updated CZ, DE, ES, FR, IT, NL, PL
- updated PT-BR translation, thanks @guipatriota
3rd party profiles
- Added FLSun vendor and printer models FLSun QQS Pro and FLSUN Q5. (#5582, thanks @Foxies-CSTL)
Published by lukasmatena almost 4 years ago
PrusaSlicer 2.3.0-rc2
Summary
This is the second (and hopefully the last) release candidate of PrusaSlicer 2.3.0, following 2.3.0-alpha1, 2.3.0-alpha2, 2.3.0-alpha3, 2.3.0-alpha4, 2.3.0-beta1, 2.3.0-beta2, 2.3.0-beta3 and 2.3.0-rc1. This release fixes bugs found in previous release candidate. For the new features in the 2.3.0 series, please read the change logs of all the alphas, betas and rc.
Unlike the alphas and the betas, the release candidate saves its profiles into PrusaSlicer directory, which is the same directory where the previous releases of PrusaSlicer (and the rc1) keep their profiles. If you were testing the PrusaSlicer 2.3.0 alphas or betas, your profiles from them would have to be manually imported into PrusaSlicer 2.3.0-rc2 by exporting and importing the Config Bundle.
Bugs fixed with respect to PrusaSlicer 2.3.0-rc1
- Shells in Preview (when visualized) were not rendered with correct color
- Minimal height of the object list in the right sidebar was decreased so the list does not take too much space when not needed (#5462)
- Ironing was sometimes incorrectly not applied when infill parameters were changed before reslicing (#5410)
- Fix of an occasional crash caused by a faulty notification (#5514)
- Spiral vase mode would sometimes incorrectly fill in bottom of the model when slicing parameters were changed in certain order (#5528)
- When there was an object with non-ASCII characters in the name, PrusaSlicer would suggest mangled name for the GCode when exporting.
- Adaptive cubic infill was not generated correctly in case that infill extrusion width was expressed in percents.
- Fixed a hard crash in a specific case when using copy-paste on objects with modifiers (#5517)
- When switching Printer profiles in configuration tabs, currently active page was sometimes reset to General (#5531)
- Fixed a possible crash when swiching printer profiles in configuration tabs.
- Windows-specific: ConfigWizard mangled Unicode characters in printer names (#5422)
- macOS-specific: When multiple PrusaSlicer instances were running, it could crash when ejecting an SD card from some of the instances (#5507). PrusaSlicer may now wrongly report the export as failed even when it in fact succeeded, but it will not crash in this scenario anymore.
- Linux-specific: The toolbar that switches between 3D scene and Preview did not scale correctly on scaled displays with GTK3 (#5501)
- Linux-specific: Fixed spurious G-Code Viewer crashes on startup when opened through File menu in PrusaSlicer or with a gcode filename provided through command-line (#5537, #5464). Many thanks to @hadrava who significantly helped with debugging of this issue.
- Linux-specific: When started with a config directory generated by older versions, the application would crash in case that config contained print host credentials (#5513, #5074)
- Linux-specific: desktop file for Linux desktop integration now assigns correct icon to G-Code Viewer instead of using one for PrusaSlicer (#5555, thanks @pmjdebruijn)
Localization
- Fixed several issues and typos in the localizations, some even leading to a crash.
- Updated CZ, DE, ES, FR, IT, NL and PL dictionaries
Published by lukasmatena almost 4 years ago
PrusaSlicer 2.3.0-rc1
Summary
This is the first release candidate of PrusaSlicer 2.3.0, following 2.3.0-alpha1, 2.3.0-alpha2, 2.3.0-alpha3, 2.3.0-alpha4, 2.3.0-beta1, 2.3.0-beta2 and 2.3.0-beta3. This release mostly fixes bugs found in previous beta. For the new features in the 2.3.0 series, please read the change logs of the 2.3.0 alpha and beta releases.
Unlike the alphas and the betas, the release candidate saves its profiles into PrusaSlicer directory, which is the same directory where the previous releases of PrusaSlicer keep their profiles. If you were testing the PrusaSlicer 2.3.0 alphas or betas, your profiles from them would have to be manually imported into PrusaSlicer 2.3.0-rc1 by exporting and importing the Config Bundle.
Improvements with respect to PrusaSlicer 2.3.0-beta3
- The maximum detour length of 'Avoid crossing perimeters' (see 2.3.0-beta3 change log) can now be expressed as a percentage of the direct path length.
- Avoid crossing perimeters is also applied for supports.
- The 'Inches' option in right sidebar is no longer automatically checked after mm to inches conversion.
- 'Extrusion multiplier' value was clamped and the user is alerted when it is out of range.
Bugs fixed, reported for PrusaSlicer 2.3.0-beta3
- Machine limits configuration options were incorrectly used for time estimate calculations for non-Marlin firmwares (#5378)
- Keyboards shortcuts for moving the camera were not always working since the alpha phase. It is now fixed (#5470)
- Cut tool did not accept keyboard input when using millimeters as a unit (#5473, #5498)
- 'Perform cut' button in Cut tool is now disabled when the entered value is invalid.
- Scroll bar in the right panel sometimes partially obscured some of the controls (#5472, #5451)
- When one had multiple printer presets for one physical printer, a wrong preset was selected after loading a 3MF file (#5450)
- Legend in Preview was sometimes not rendered correctly (#5474)
- 'Reload from disk' did not work for AMF files (#5443)
- Extrusion widths in Preview did not show correctly when using volumetric E (#5415)
- 'Converted from inches' flag is saved into 3MF and AMF even if the file source information is not. The information was lost in previous versions.
- The Preview reverted to Normal mode visualization on reslicing, even when switched to Silent mode before (#5481)
- The new avoid crossing perimeters feature caused skipped wipe moves when the detour length exceeded the maximum set in config.
- When using initial priming of extruders with multimaterial printing, the M1 G-Code was issued to let the user confirm it was successful. This G-Code is now only emitted for Marlin firmware, the others do not support it (#5441)
- Any painted supports and seams were needlessly removed when the object was converted from/to imperial units.
- Any painted supports and seams are removed when a mesh is fixed with Netfabb. The operation makes the data invalid and attempting to use them could lead to crashes (#5458)
- Fixed excessive CPU load when a notification in 3D scene was active (#5416)
- Time estimate visualization was not correct in Silent mode.
- Fixed possible crash when loading OBJ files.
- Random seam placement could get stuck in infinite loop when support blockers were used. The seam placement is also faster.
- Windows specific: Application was losing focus after pop-up dialogs were displayed, which resulted in apparent non-responsiveness (#5141)
- macOS specific: 'Open new instance' item in macOS dock menu was shown when only one running instance was allowed in Preferences (#5463)
- Linux specific: Fixed contrast issue in unsaved changes dialog when using dark mode (#5444)
- Linux specific: Fixed text color for the mode buttons with GTK2 (#5444)
- Linux specific: Fixed incorrect combo box width in Filament Settings with GTK3 (#5444)
- Linux specific: Fixed HiDPI scaling issues with GTK3 (#3245, #4135)
- Linux specific: Layout issues in Configuration Wizard when using GTK3 (#5103, #4861 and #5444)
- Linux specific: Pan moves when using 3DConnexion SpaceMouse were jerky (#5233)
Localization
- Updated CZ, DE, ES, FR, IT and PL dictionaries
3rd party profiles
- Fixed Custom End G-Code for Creality Ender-5
Published by lukasmatena almost 4 years ago
PrusaSlicer 2.3.0-beta3
Summary
This is the third, hopefully the last beta release of PrusaSlicer 2.3.0, following 2.3.0-alpha1, 2.3.0-alpha2, 2.3.0-alpha3, 2.3.0-alpha4, 2.3.0-beta1 and 2.3.0-beta2. This release mostly fixes bugs found in previous beta, but it also brings several improvements, namely completely reworked Avoid crossing perimeters feature. For the new features in the 2.3.0 series, please read the change logs of the 2.3.0 alpha and beta releases.
To let you enjoy the beta without worries, the beta builds save their profiles into PrusaSlicer-beta directory, so you may use the beta side by side with the current release without ruining your production configuration. If upgrading from any of the PrusaSlicer 2.3.0 alpha releases, you may consider to rename your PrusaSlicer-alpha directory to PrusaSlicer-beta.
Reworked Avoid Crossing Perimeters
Avoid crossing perimeters is an algorithm to minimize crossings of external perimeters during travels, thus reducing stringing and improving overall print quality. The algorithm we inherited from Slic3r has gained a bad reputation for being suboptimal and very slow. After analyzing various path planning strategies, we have completely reworked the algorithm in this release. The old algorithm by Slic3r tried to minimize time spent when traveling over external surfaces of an already printed object. Such strategy may have been effective in the olden days of very leaky extruders. Today stringing is more an issue than leaking, thus a different strategy is called for. The new algorithm tries to route a travel path inside object islands with a shortest path while avoiding holes and concavities, while it takes the shortest path when traveling between islands.

The old algorithm often produced travels that crossed perimeters, while the new one decreases the number of perimeter crossings to a minimum. Compared to the old algorithm, slicing time is also significantly reduced. This fixes issues #355, #587, #2213, #2495, #2872, #2899, #3185, #3307, #3466, #4102, #4219, #4881, #5120, #5177 and most likely also #2604, #2891, #3968 and #4030.
We have added a new parameter Avoid crossing perimeters - Max detour length, which allows to limit the maximal length of a detour. For example, traveling from one end of a spiral to the other end inside the spiral while avoiding crossing perimeters is likely not the best idea and a straight path should be taken instead.
Other improvements with respect to PrusaSlicer 2.3.0-beta2
- The existing 'G-Code thumbnails' parameter has been made available at the Printer Settings parameter page. The new field accepts entries such as "16x16, 220x124" describing picture sizes to be exported into the G-code file. The printer firmware or an OctoPrint plugin may then show the print thumbnail on the screen. Thumbnails were generated by PrusaSlicer 2.2.0 already, but the option was not available in GUI. (#4112)
- About Dialog newly provides a button to copy PrusaSlicer version information into clipboard. (#4990)
- PrusaSlicer newly maintains a "converted from inches to mm" flag at each object model, and this new "source_in_inches" tag is also stored into AMF and 3MF files. PrusaSlicer no more allows to convert one geometry "from inches" twice in a row, and the 'Reload from disk' action reproduces conversion from inches to millimeters. (#5007)
- PrusaSlicer no more offers conversion from inches for small objects when loading 3MFs or AMF saved by PrusaSlicer, as these are considered project files. (#5006)
- Improved error reporting when loading invalid preset bundles. The line where the error occurs is now mentioned in the error message. (#5291)
- Hotkeys to add/remove instances (+ and -) newly work in the object list, not just in the Plater 3D scene. Unfortunately this does not work on OSX with non-US keyboard layouts. (#5350)
- Minimal height of the object list has been increased. The object list was getting smaller gradually as new features were being added to the side panel. (#5162)
- Preferences dialog has grown over time and became cluttered. It is newly split into several Tabs for clarity and to fit smaller screens. (#5381)
- A new macro function
random(min, max)has been added to custom G-code parser. The newrandom()function returns a random number in the range specified by the parameters. The type of parameters defines the type of the output. (#4001, #5219) thanks @ardenpm. - When using Spiral Vase mode, it is not possible to print more objects or object instances unless sequential printing is active. The latter information has now been added into the error message appearing after the user attempts to add multiple objects to Plater in non-sequential mode. (#2500)
- Refreshing G-code Preview after changing visualization options should now be faster.
- The "Export to hard drive finished" notification newly fades out after 20 seconds.
- When closing PrusaSlicer while an upload of a G-code or SL1 file is in progress, PrusaSlicer newly asks whether to cancel the upload and close PrusaSlicer, or whether to open the Upload dialog and wait.
Bugs fixed, reported for PrusaSlicer 2.3.0-beta2
- The wipe tower was not correctly placed when using Arrange. This bug was introduced sometimes between 2.2.0 and 2.3.0-alpha1. (#5320)
- SL1 file was exported with a .gcode suffix if the user did not provide output file name while slicing an SLA project from command line. (#5029)
- It is no more allowed to save a Preset giving it a name containing leading or trailing spaces. This led to problems when loading config bundles containing such presets, as these spaces are ignored by the .ini file parser. (related to #5291)
- Place on face did not correctly rotate the object at specific orientations. This should now be fixed. (#5172, #5011 and #5398)
- Retraction on layer change should be disabled in Spiral Vase mode, however it was not being disabled in filament overrides. (#5004)
- Fixed a crash with Spiral Vase mode and very small objects. (#4732)
- Fixed slicing of holes in bottom layers with Spiral Vase mode. These holes were incorrectly closed, although they can be printed with no issues, as the bottom layers are not being printed with a spiral. (#3326, #5359)
- When using Spiral Vase mode, the first layer above bottom layers is printed with gradually increasing flow to avoid bulging at the beginning of the layer, where the actual distance from the previous layer is much less than the nominal layer height. As of now, the fix has been only provided for relative extruder addressing mode. (#3712, #2795).
- Fixed a crash during slicing when a volume was not intersecting any of the slicing planes. (#4060)
- Fixed a long-existing bug which occasionally introduced imprecisions into the print when the scene was repeatedly resliced after changing configuration parameters. (#5407)
- Overhang bridges should not be supported, but this behavior was broken in previous alphas, which incorrectly supported them. This should now be fixed. (#5164, thanks @supermerill)
- When no 'Pause Print G-Code' is provided in Printer Settings, the Pause Print option will no more show in the respective context menu on the vertical Preview slider. (#5142)
- When no 'Color Print G-Code' is provided in Printer Settings, a notification is emitted after the user attempts to add a color change.
- Fixed unreliable extrusion width in G-code Preview. PrusaSlicer tried to calculate extrusion width based on the extrusion height annotation and extrusion rate (E axis), but that was not quite reliable, therefore PrusaSlicer newly exports annotations for extrusion width as well. (#4936)
- New application instance is now opened with Ctrl+Shift+I, instead of the old Ctrl+I which clashed with 'Import STL'. (#4734, #4711, thanks @wavexx)
- Not all PrusaSlicer config options were exported as environment variables for post-processing scripts. (#4901)
- Post-processing scripts were not invoked when slicing from command line. (#4903)
- Importing a config bundle containing physical printer profiles did not show them until application restart. (#5393)
- The Cut tool now shows the cutting plane height in inches when the rest of the UI uses them. It invariably used millimeters in previous versions. (#5008, #5382).
- Height labels on the vertical slider in G-code Preview were sometimes too squished, especially when using variable layer height. (#5315)
- Fixed a crash when loading a configuration snapshot taken by PrusaSlicer 2.2 and older, as the folder of the new Physical Printers was missing. The missing preset folders are now ignored. (#5125)
- An error message claiming that certain infill patterns don't work at 100% density showed incorrect current infill pattern name. (#4999)
- Fixed a grammar mistake in Spiral Vase tooltip. (#5396, thanks @RichiH)
- Fixed a possible crash when generating rectilinear infill. (#5399, thanks @supermerill)
- Presets inherited from renamed presets using the old preset name in the "inherits" field were losing the "inherits" flag when importing a config bundle. (#5319)
- In case there was a profile that mistakenly claimed to 'inherit' from itself, PrusaSlicer would get stuck in an infinite loop. This is now checked for and such "inheritance" is ignored. (#4996)
- Linux specific: Fixed visual glitches when build against wxWidgets 3.0 and GTK3. (#5298, #3571, thanks @cabbey and @rmoravcik)
- OSX specific: Arrange button had wrong description (Ctrl instead of Cmd key). (#5217)
- OSX specific: Preferences dialog was missing the option to "Enable support for legacy 3DConnexion devices". If enabled, the Cmd+M shortcut to open the 3DConnexion configuration dialog works again. (#5312)
- OSX specific: Reload from disk now uses Cmd+Shift+R keyboard shortcut instead of F5.
- The Windows "How to build" guide has been improved. (#4904) thanks @darigovresearch
- Improved error reporting on badly formatted boost::format templates. (#5418)
- Significantly lowered GPU consumption when a notification is displayed in the 3D scene, which is fading out or which will fade out. We still did not solved the CPU issue, where one thread is consuming 50% of a single core. (#5402)
- Linux specific: We have reworked again (sic!) the code to align the locale of the selected language with the locales available on the target Linux box. (#3368, #5373)
Localization
- Updated dictionaries CZ, DE, ES, FR, IT, NL, PL
- Some localized UI text were mangled due to encoding mistakes. This is now fixed. (#4975)
- Several typos fixed, one even causing a crash when adding a printer profile when using Brazilian Portuguese localization. (#5418)
3rd party profiles
- Anycubic Predator: Max print height reduced to 445 mm (#5406, thanks @nordurljosahvida)
- Anycubic Kossel: Updated end G-code, before layer change G-code and output filename format template.
Published by lukasmatena almost 4 years ago
PrusaSlicer 2.3.0-beta2
Summary
This is the second beta release of PrusaSlicer 2.3.0, following 2.3.0-alpha1, 2.3.0-alpha2, 2.3.0-alpha3, 2.3.0-alpha4 and 2.3.0-beta1. This release mostly fixes bugs found in previous beta. For the new features in the 2.3.0 series, please read the change logs of the 2.3.0 alpha and beta releases.
To let you enjoy the beta without worries, the beta builds save their profiles into PrusaSlicer-beta directory, so you may use the beta side by side with the current release without ruining your production configuration. If upgrading from any of the PrusaSlicer 2.3.0 alpha releases, you may consider to rename your PrusaSlicer-alpha directory to PrusaSlicer-beta.
Improvements with respect to PrusaSlicer 2.3.0-beta1
- When loading the presets from 3MF, AMF or G-code, PrusaSlicer used to create temporary "external" profiles. These "external" profiles were named with the name of the source file and suffixed with the name of the source profile in braces, for example "my_print.3mf (0.15mm OPTIMAL)". Starting with this release, the profiles loaded from 3MF, AMF or G-code referencing and modifying an existing local profile are no more loaded as "external", but the referenced profile is activated and modified with the loaded preset. If the referenced profile does not exist, but the profile refers to a system profile by the "inherits" field, the system profile is loaded and modified instead. This works for all profiles with the exception of multi-extruder printer with multiple filament profiles modified. In that case the first modified filament profile will be loaded as modified, while the other modified profiles will be loaded as "external".
- Name of the active physical printer is newly stored into 3MF, AMF and G-code and re-activated after reading these files. (#5178 #5272)
- New configuration option 'Full fan speed at layer' was added to filament settings. When set higher than 'Disable fan for the first [n] layers', the fan speed will be gradually ramped up from zero to maximum in that layer range. Ramping up the fan speed slowly should prevent rapid cooling of print bed followed by thermal runaway in case the print bed heater could not keep up with the fan. Prusa3D filament profiles were updated accordingly. (#848)
- The stand-alone G-code Viewer newly allows to reload G-Code file from disk. This is available in File menu or by F5 keyboard shortcut. (#5360)
- Improved reporting of errors encountered during processing of custom G-codes. The errors newly contain the offending template line with a pointer to the error location. (#1516)
- New variable
max_layer_zis now available in custom G-Codes. It represents the maximum print Z value over the already printed layers, including sequential print (unlikelayer_z, which is reset to zero at the start of each object). The custom end G-codes parking the print head were updated withmax_layer_zto avoid crashing the print head into already printed objects in sequential mode. (#5349) - Arrange function was made configurable in 2.3.0-alpha4, allowing to set spacing between objects. The spacing is newly handled independently for SLA, FDM and FDM-sequential modes. The Arrange dialog newly shows a hint "Use CTRL+Left mouse button to enter text edit mode.".
- Linux specific: When switching language to English, PrusaSlicer newly offers both US English and UK English. Previously only "English" was offered, switching to UK English, for which the locales were often not available. (#3368)
- OctoPrint basic auth by HAProxy has been documented in the tooltip of the "print_host" field at the Physical Printer configuration dialog.
Please note that the user name and password need to be URL encoded by the user. (#650)
Bugs fixed, reported for PrusaSlicer 2.3.0-beta1
- Logic of automatic selection of View mode in Preview (Feature Type/Tool/etc.) was slightly reworked so it does not switch the visualization type when not needed. Namely, when a custom tool change was present, the mode would annoyingly switch to 'ColorPrint' during any parameter change. (#5080)
- Fixed a crash after clicking the 'Refresh printers' button in physical printer dialog for Repetier host. (#5327, #5153, #5159 thanks @mloidl)
- The up/down keys in the G-code preview move the active vertical slider thumb again, while the left/right keys move the horizontal slider thumb when the G-code preview 3D scene owns the keyboard focus, and the hot keys are documented in the 'Keyboard Shortcuts' dialog. (#5333, #5190)
- Custom seam enforcers were not always respected. (#5137, #5294)
string conversion from local encoding to UTF-8. (#5180) - Arrange was sped up and arrange quality has been improved for specific cases. (#5223)
- Arrange accounts for 'Extruder clearance' again when sequential printing is enabled. (#5258)
- Arrange occasionally placed objects slightly out of bed. Also, arrange function now behaves better with broken models. (#5311)
- 'Fill bed' result is no more applied when the operation is cancelled before finishing. Also fixed a visual glitch in the status bar while the calculation was running.
- 'Fill bed' did not work correctly when some of the existing items were out of bed. This is now fixed.
- A crash has been fixed when splitting a broken model. (#2209)
- When drag & dropping multiple files onto PrusaSlicer, all files that PrusaSlicer recognizes will now be loaded, while previously loading stopped on the first non-recognized file type.
- Print Host dialog is now shown on the same display as the main application window. (#5044)
- Retraction / deretraction feed rates were stored with excessive resolution into G-code. (#5362)
- Question mark keyboard shortcut now correctly opens 'Keyboard shortcuts' dialog. This was broken in previous releases, the dialog was only accessible through the top menu.
- Windows specific: Fixed error reporting when exporting to SD card. The error message was not always shown correctly due to incorrect - Windows specific: Application icon was not correctly loaded under certain circumstances, resulting in missing icon and an error message on startup (#5254).
- Linux specific: Fixed a crash when starting PrusaSlicer with unmounted SD card. (#5354)
- Linux specific: Fix of a crash when deleting all instances of an object. (#5191)
- Linux specific: Dropdowns in settings were truncated with GTK3, also Mode selection buttons (Simple/Advanced/Expert) were not rendered correctly in dark mode. (#4911, #4490), thanks @pmjdebruijn
Localization
- Dictionaries for CZ, DE, ES, FR, IT and PL were updated by Prusa Research.
- Fixed misleading message in Brazilian Portuguese, where the translation said "Export failed" while the export succeeded (#5314)
- First draft of Russian translation merged, thanks @alexws54tk, @yurayko and others. The Russian dictionary is not in a very good shape and it needs more love from the community.
Contributors are welcome, please check the [localization guide (https://github.com/prusa3d/PrusaSlicer/blob/master/doc/Localization_guide.md)
3rd party profiles
- Minor Creality profiles update (#5330, thanks @pmjdebruijn)
Apple Silicon builds
We are happy to announce that PrusaSlicer can now be compiled for the new Apple Silicon ARM based architecture. Many thanks to @xarbit and @obelisk for their help in making it happen. (#5313, #5316, #5179, #5124, #5322)
The Apple Silicon builds are compiled against wxWidgets 3.1.4, while all our other builds were compiled against wxWidgets 3.1.3, therefore the Apple Silicon builds will require some additional testing.
Published by lukasmatena almost 4 years ago
PrusaSlicer 2.3.0-beta1
Summary
This is the first beta release of PrusaSlicer 2.3.0, following 2.3.0-alpha1, 2.3.0-alpha2, 2.3.0-alpha3 and 2.3.0-alpha4. This release mostly fixes bugs found in previous alphas. For the new features in the 2.3.0 series, please read the release logs of the 2.3.0 alphas.
To let you enjoy the beta without worries, the beta builds save their profiles into PrusaSlicer-beta directory, so you may use the beta side by side with the current release without ruining your production configuration. If upgrading from any of the PrusaSlicer 2.3.0 alpha release, you may consider to rename your PrusaSlicer-alpha directory to PrusaSlicer-beta.
Improvements with respect to PrusaSlicer 2.3.0-alpha4
- The stand-alone G-Code Viewer newly understands G-code annotations produced by KISSlicer to indentify types of extrusions.
- The stand-alone G-Code Viewer newly shows per layer time estimates on the vertical slider for G-codes produced by Cura, Simplify3D, CraftWare and ideaMaker.
- Previous alphas introduced hyperlinks from parameter pages to Prusa3D Knowledge Base. The hyperlink tooltip newly shows the description of the parameter in addition to the hyperlink, while it only showed the URL in alpha4.
- Clicking the parameter hyperlink in configuration pages opens a dialog to confirm that the user wants to browse the online help. This dialog was already present in alpha4, but it only showed once and remembered the answer, while it newly offers an explicit 'Remember my choice' checkbox.
- Wipe moves can newly be visualized in G-code preview when enabled in the bottom dropdown. This only works for G-codes produced by PrusaSlicer 2.3.0-beta1, as it relies on new
WIPE_START/WIPE_ENDG-code decorations. - When drag & dropping a file onto PrusaSlicer application window, the application is newly brought to the top, so that the new dialog asking how to import the 3MF file (as project, as config file, or just import geometries) will be immediately accessible.
- The new 'Fill print bed with instances' function and the arrangement with rotations are now faster and more reliable. The new Arrange dialog indicates (slow) at the "enable rotations" checkbox.
- Windows specific: Configuration Wizard now allows to control associations of 3MF and STL files with PrusaSlicer, and to associate G-codes with the PrusaSlicer's own stand-alone G-code viewer. The file associations are also configurable at the Preferences dialog.
- Legacy 3DConnection support on Windows and OSX: On Windows and OSX, PrusaSlicer communicates with the 3DConnexion driver to receive events from the 3DConnexion devices. 3DConnexion is continuously dropping support for their legacy products (sic!) and an old 3DConnexion device often produces incorrectly scaled events through the driver. We have resurrected our own configuration dialog to set the scaling of each axis. This configuration dialog is now available only if the 3DConnexion legacy mode is enabled in PrusaSlicer preferences. For the devices supported by the 3DConnexion driver it is recommended to configure the 3DConnexion settings in the 3DConnexion driver. (#4892, #4899)
- A new parameter was added to control the length of the infill anchors: the old "infill_anchor" controls the length of the short anchor at the end of an infill line, while the new "infill_anchor_max" controls the length of an anchor connecting two infill lines, which is usually longer than the first one. More details are to be found in the tooltips of the respective parameter fields. For Prusa3D printers, the infill_anchor is set to 2.5 mm, while the infill_anchor_max is set to 12 mm for the common 0.4 mm diameter nozzle bore.
Bugs fixed, reported for PrusaSlicer 2.3.0-alpha4
- Fixed a crash in the new algorithm for anchoring infill lines to inner perimeters. This unfortunate bug was introduced in alpha4. (#5208, #5226, #5229, #5240, #5244, #5245, #5246, #5250, #5257, #5263, #5283, #5288, #5289, #5290, #5292)
- Fixed monotonic infill, which sometimes left gaps near the boundaries of the filled area. (#5225, #5259)
- Right-click context menu in the scene no more shows for the wipe tower. It allowed to access options not supported for the wipe tower such as conversion to imperial units, leading to crashes. (#5234)
- G-code preview sometimes showed incorrect colors for a multi-material print. This bug was introduced in alpha4. (#5236)
- Arrangement did not work correctly with the wipe tower. This bug was introduced between 2.2.0 and 2.3.0-alpha1. (#5207, #5216).
- Fixed bug in texture mipmap compression, which could have caused some crashes.
- The preset and other combo boxes in the plater sidebar no longer react to mouse wheel scroll events. The old behavior was surprising, especially if a vertical scroll bar was active for the side bar on a small screen, where the user would expect to scroll the whole side bar. (#5231)
- The new ruler on the vertical slider (introduced in alpha4) showed too few labels for small objects.
- Editing SLA physical printer incorrectly showed FDM printer profile as a base.
- Custom seam caused the slicing process to hang with complex geometries. (#5067)
- Custom seam did not work correctly when raft was enabled or several objects with different layer height were present. (#5112, #5014)
- Random seam was broken in previous alphas, it was not random for single-perimeter walls. (#5003)
- Linux, macOS:
make installdid not correctly create the G-code viewer symlink when provided with user defined destination through DESTDIR environment variable. (#5238) thanks @Marqart - OSX specific: Drag & dropping a project file onto Finder icon did not work with Single instance enabled and if PrusaSlicer was already running.
- OSX specific, Big Sur: Fixed some font issues by patching wxWidgets (prusa3d/wxWidgets@5ceb8d8, prusa3d/wxWidgets@cd9f140, #5189)
- Fixed HTTP digest authentication on Linux and OSX. HTTP digest authentication was disabled for libcurl builds by mistake.
- Some tracing info on G-code export was incorrectly shown as errors. (#5254)
- Gyroid infill was dropping short infill segments. Walls with narrow infill regions were not connected at all.
3rd party profiles
- TriLAB profiles update (new filament profiles, 0.8mm nozzle print profile) https://github.com/prusa3d/PrusaSlicer-settings/pull/110, thanks @mat100
Published by lukasmatena almost 4 years ago
PrusaSlicer 2.3.0-alpha4
Summary
This is the fourth and hopefully the last alpha release of PrusaSlicer 2.3.0, following 2.3.0-alpha1, 2.3.0-alpha2 and 2.3.0-alpha3. This release introduces several new features, fixes bugs found in previous alphas and contains many additions and fixes in 3rd party profiles.
To let you enjoy the alpha without worries, the alpha builds save their profiles into PrusaSlicer-alpha directory, so you may use the alpha side by side with the current release without ruining your production configuration.
Improvements with respect to PrusaSlicer 2.3.0-alpha3
- The Arrange function is newly customizable. Right-clicking the 'Arrange' icon at the top toolbar opens a dialog to tune distance between objects and to allow rotation of objects around their Z axis during the arrangement. The arrangement settings are not saved in the project, but they persist between sessions in PrusaSlicer.ini. (#414, #3268)

- New 'Fill bed with instances' feature fills the print bed with the maximum number of copies of a selected object. This new feature is accessible from the context menu after right-clicking on an object. (#1350)
- Anchoring of sparse infill to an inner-most perimeter has been reworked to never overlap anchor lines one over the other. The old algorithm produced over-extrusions (left image), while the new algorithm (right image) does not. (#332 , #4076, #4204)

- Length of the sparse infill anchors may newly be configured with the new "infill_anchor" parameter. Setting the "infill_anchor" parameter to zero disables infill anchoring completely. (#1451, #5078)
- The Adaptive Cubic and Support Cubic infills newly anchor the internal dense infill lines to the outer sparse infill lines, which is quite critical for printing PETG and similar materials. Anchoring of the dense internal infill lines respects the "infill_anchor" settings, however the length of the internal anchors is capped to 5x infill line width. The following picture shows 2 mm long anchors at both the sparse and dense infill lines.

- New infill type: Aligned rectilinear infill is a variant of the old Rectilinear infill, which extrudes each layer with the same orientation. (#1938) thanks @m-schubert
- The G-code preview legend was extended when using the ColorPrint feature to show active filament colors and color changes by color boxes. (#5072)
- The stand-alone G-Code Viewer newly shows names of used Print/Filament/Print profiles.
- When drag and dropping a project file (3MF or AMF) onto the PrusaSlicer window, the user is newly asked whether to 1) open the project (that means the plater will be cleared first), 2) import just the geometry, or 3) import just the config. At the same dialog the user may choose to remember her/his decision and not ask again at the next drag & drop event. In that case the dialog may be re-enabled at application preferences.
- Vertical slider in the G-code Preview (FDM mode) and in the layer view (SLA mode) newly shows a ruler with Z-heights. A time estimate for the respective layer is shown when hovering the mouse over the slider area.
- A new Shift-G hotkey opens a dialog to jump to a layer in the G-code Preview.
- Filament spool weight can newly be set in filament settings. When filled in, the 'Sliced Info' box shows the weight of the spool plus estimated filament usage for the print (and therefore minimal weight of the spool at the beginning of the print to not run out of filament). Most of the filament profiles available for Prusa3D printer profiles were updated with the filament spool weight.
- Maximal zoom limit in the 3D scene has been increased, allowing more detailed view of the objects.
- The parameter editor was extended in alpha3 with hyperlinks to Prusa3D knowledge base. When clicking on a label text at the parameter editor with an associated hyperlink, browser window was opened. Some users found that behavior annoying or they consider it a security risk, therefore when clicking on such a hyperlink, the user is newly queried whether to open the web browser or not, and the decision is remembered. The decision may later be reverted at the application preferences. (#5196)
- Monotonic infill is now default for bottom layers. It has already been made default for the top layers. (#4963)
- Font size in the G-code preview vertical slider has been enlarged to the default font size for readability. (#5121)
- Icons and buttons in notifications were enlarged. Namely the Eject button was difficult to target.
- Layout of the "Machine limits" parameter page was improved.
- 'Export finished' notification is newly closed when the SD card or USB thumb drive is ejected.
- The print bed and printer thumbnail images are newly searched for and loaded from user's "vendor" directory before the installation "resources" directory. This allows one to customize the print bed image without having to overwrite the application global resources. Because the Wizard already reads the vendor config bundles from user's "vendor" directory, this feature allows one to install new 3rd party vendor configuration just by copying his config bundle, printer thumbnail image and print bed models to user's "vendor" directory. This feature also makes development of 3rd party printer profiles easier. (https://github.com/prusa3d/PrusaSlicer/pull/4122) thanks @aegean-odyssey
- Localization dictionaries were updated for CZ, DE, ES, FR, IT and PL languages by Prusa Research.
- Brazilian Portuguese dictionaries updated, thanks @BoaImpressao3D.
Bugs fixed, regressions with respect to PrusaSlicer 2.2.0
- Arrange function sometimes placed the last object in strange positions. (#3900)
Bugs fixed, reported for PrusaSlicer 2.3.0-alpha3
- Fixed a G-Code Viewer crash when switching to 'Tool' view with G-Codes generated by other slicers.
- G-Code preview now works correctly when sequential print or spiral vase mode is active. (#4721)
- G-Code Viewer: Fixed color print visualization for G-Code containing multiple extruders.
- The stand-alone G-Code Viewer no longer modifies the parsed G-code, the access is read-only. (#5079)
- Fixed "G-Code Preview did not show after a language was changed". (#5098)
- Fixed vertical spacing issues in Configuration Wizard so it can accommodate an increasing number of printers.
- 'Test' button in physical printer dialog is now being correctly updated.
- OSX specific: Fixed a multi-display issue: Modal dialogs now correctly open at the monitor of its parent window.
- OSX specific: Fixed a layout glitch of the mode selection buttons.
- OSX specific: Fixed scaling of the G-code preview legend after the application window was moved from Retina to non-Retina display and vice versa.
- Windows specific: Fixed incorrect layout of widgets in configuration pages when two monitors with different DPI are used.
- Linux / AppImage specific: Fixed crash on startup on some systems due to boost::filesystem::canonical() issues. (#4973)
- Linux (GTK3): Fixed layout issues in preset editor pages. (#5081)
- Linux (GTK3): Spin controls in preset editor pages only showed one of the up / down buttons. (#5053)
- Linux (GTK3): Fixed wrong background color of parameter groups in preset editor pages. (#5062)
- Fixed crash when adding a Repetier Server Physical Printer with 2 printers . (#5153) thanks @mloidl
3rd party profiles
- Anycubic Predator profile improvements and fixes (#5104, #5156, thanks @nordurljosahvida)
- New Print and Filament profiles for Creality printers (#5092, #5110, thanks @pmjdebruijn)
- Creality profiles improvements and fixes (#5114, #5117, #5143, #5193 thanks @pmjdebruijn, fixes #4980)
- Added thumbnails and bed model for new TriLAB printers (#5118, thanks @mat100)
- New TriLAB printer profiles (DeltiQ 2, DeltiQ 2 Plus), updated TriLAB print profiles (https://github.com/prusa3d/PrusaSlicer-settings/pull/108, thanks @mat100)
- A "Beta" badge has been removed from thumbnails of printers introduced in PrusaSlicer 2.2 to indicate that these profiles were verified.
What is in the working
- We are looking into ARM builds for the Apple Silicon. It is reported that PrusaSlicer 2.3.0-alpha3 is running happily on the new ARM based Macs (#5124), however we would like to evaluate performance drop of the Rosetta2 emulation layer.
Published by lukasmatena almost 4 years ago
PrusaSlicer 2.3.0-alpha3
Summary
This is the third alpha release of PrusaSlicer 2.3.0, following 2.3.0-alpha1 and 2.3.0-alpha2. This release mostly fixes bugs found in previous alphas, but it also adds several new features (such as Repetier server support) and 3rd party profiles.
To let you enjoy the alpha without worries, the alpha builds save their profiles into PrusaSlicer-alpha directory, so you may use the alpha side by side with the current release without ruining your production configuration.
Improvements with respect to PrusaSlicer 2.3.0-alpha2
- The descriptions of configuration parameters in settings tabs now work as hyperlinks that open the respective page in our online help center. There is no hyperlink when the page does not exist for the parameter.

- Added support for Repetier server print host. (thanks @docbobo, #4384)
- New option in Preferences allows to invert mouse wheel for zooming (#1336, #4395, #4701)
- OSX specific: Settings dialog for 3DConnexion devices (Cmd+M) was enabled again to allow configuration of speed. The dialog was removed in 2.3.0-alpha1 in hopes that all related settings would be configurable in driver settings directly, but this turned out not to be the case for old 3DConnexion devices, which are not supported by the 3DConnexion driver correctly (#4892)
- G-Code Viewer is now able to extract config from gcode created by Slic3r and Slic3rPE (#4982)
- G-Code shows name of loaded
.gcodein the title bar - G-Code Viewer reports invalid
.gcodefiles - New icons for standalone G-Code Viewer
- Tool marker in G-Code preview is visible by default when the horizontal slider is not at its end position.
- Configuration snapshots were extended to capture and restore SLA print profiles, SLA material profiles and Physical printers configuration.
- Reworked Export finished notification. It now contains path to G-code, "Open folder" hyperlink and Eject removable media button.
- Renamed "FDM Support Editing" to "Paint-on supports" and "Seam Editing" to "Seam painting", new icon for the paint-on supports gizmo.
- Linux: Integration of Flatpak configuration files thanks to @xarbit (#3064, #4039)
- Linux: Added a desktop file for standalone G-Code Viewer
- Filament stats exported to G-code are now exported with higher precision to match values shown in the UI (#780, thanks to @stelgenhof)
- Unmount message slightly reworded by @vranisimo, thanks (#4523)
Bugs fixed, regressions with respect to PrusaSlicer 2.2.0
- Switching of parameter pages is now faster. The lag was quite noticeable on Windows.
- Fixed unexpected switch to non-perspective camera in certain scenarios (#4987)
- Place on face sometimes positioned the object slightly inclined instead of perfectly flat (#3505)
- OSX specific: Mouse position was not correctly calculated with Retina display when the mouse wheel was being rotated
Bugs fixed, reported for PrusaSlicer 2.3.0-alpha2
- Windows: Previous alpha did not start on Windows 7 (#4972, #4974, #4979, #4994)
- Fixed incorrect time estimates (#4986, #5066)
- G-Codes for printers not supporting remaining times contained internal G-Code annotations as comments by mistake
- Horizontal slider in 3D preview is correctly updated when 'Sequential slider only applied to top layer' preference option is toggled.
- Horizontal slider range is correctly updated when individual G-code features are turned visible or invisible.
- Fixed crash in monotonous infill happening in very specific geometry situations.
- Notifications were sometimes erroneously shifted to the left in Preview mode.
- Shift+Tab erroneously showed/hid the sidebar in the standalone G-Code Viewer (#5009)
- Parsing of the G-Code annotations was made more specific so that comments provided by the user through custom G-Codes will not be interpreted as PrusaSlicer's own annotations (#4992)
- Linux: Standalone G-Code Viewer did not work correctly when started from PrusaSlicer or with a
.gcodefile as an argument (#5013) - Linux: Fix crashes on Linux when incompatible libpng version was installed in system (#4908)
New 3rd party profiles
- Added Anycubic Predator profiles, thanks @nordurljosahvida (#4960)
- Improved bed model for Ender-2, Ender-3 printers, thanks to @pmjdebruijn (#4481, #5033)
- Multiple Creality printers profiles were added (CR-10/20 family, Ender-5 and Ender-5 Plus, again thanks to @pmjdebruijn, #5049, #5060)
- Several Creality filament profiles added (#5061, #5070, @pmjdebruijn again, thanks)
- 0.15mm Print profile for TRILAB printers added
Published by lukasmatena almost 4 years ago
PrusaSlicer 2.3.0-alpha2
Summary
This is the second alpha release of PrusaSlicer 2.3.0, following 2.3.0-alpha1. This alpha adds several new features and improvements and it fixes bugs found in the first alpha.
To let you enjoy the alpha without worries, the alpha builds save their profiles into PrusaSlicer-alpha directory, so you may use the alpha side by side with the current release without ruining your production configuration. On Linux system, this version also changes the location of the configuration directory (see below).
Improvements with respect to PrusaSlicer 2.3.0-alpha1
- A new RepRapFirmware G-Code flavor was added. RepRapFirmware has deprecated usage of
M104for temperature changes in favor ofG10. The new flavor supports the new behavior. We have decided to keep the old RepRap/Sprinter flavor for compatibility with older firmware implementations. (#4553, thanks to @ardenpm) - When any gizmo is open (such as supports/seam editing) it is now possible to use Ctrl + left/right mouse click to pan and rotate the camera. This makes it easier to manipulate the objects when zoomed in during painting supports, seams and such.
- The cog button at the Printer Settings page can newly be used for both adding and editing a Physical Printer preset, while the cog button was disabled in the 1st alpha when a logical Printer preset was selected. Also the delete button at the same page can newly be used to delete a Physical Printer profile completely (#4891).
- Support for DuetSoftwareFramework print host has been added (#4345, thanks to @wilriker).
- New icons for the standalone G-Code Viewer were added.
- Configuration updates now use https instead of http (thanks @onovy, #4213)
- Linux specific: "make install" newly installs PrusaSlicer desktop integration, and a prusa-gcodeviewer symlink to prusa-slicer is created as well. This should help the distro maintainers to integrate PrusaSlicer.
- Linux specific: Configuration directory was moved into
${XDG_CONFIG_HOME}directory, as dictated by XDG Base Directory Specification. The application will inform the user about the change and hint where to move the existing configuration data when ran for the first time (#2911) - Unified wording in Printer Settings (deretraction changed to unretraction) (#3541)
- We improved error reporting in case export of G-code to a removable drive fails. We hope that this will help us to explain some yet unexplained G-code export issues.
Bugs fixed, regressions with respect to PrusaSlicer 2.2.0
- Previous alpha terminated immediately after start on macOS, unless another development build had been ran on the same machine before (#4889)
- Fixed jerky movement of 3Dconnexion mouse in G-code view (#4888)
- Filament preset selector was erroneously missing the option to 'Add/Remove filaments' (#4918)
- Selected filaments in Configuration Wizard are now not silently unselected when material type is changed (#4922)
- Colorprint was broken in multi-material mode (#4909)
- Fixed error reporting when the application would not start due to a corrupted PrusaSlicer.ini configuration file (#4915)
- Linux: Fixed crashes on startup when incompatible version of libpng was found in system libs (#4908)
Bugs fixed, reported for PrusaSlicer 2.3.0-alpha1
- Ironing was not reapplied when slicing was invalidated by changing another parameter (#4510, #4900, #4937)
- Fields in the new 'Unsaved changes' dialog are now non-editable. They were editable in the previous alpha by mistake.
- Conversion from/to imperial units was not working correctly when the object had parts/modifiers: Offset of parts resp. modifiers and modifier type were lost.
- Painted areas in FDM supports/seam editing were not visible when viewed exactly from the direction of the normal.
- 'Eject drive' notification did not show up in Simple mode.
- “Slicing finished” notification did not show up when the sidebar was collapsed.
- Windows specific: Fixed a crash after drag-and-dropping a non G-code file onto a G-Code Viewer application icon.
Published by lukasmatena about 4 years ago
PrusaSlicer 2.3.0-alpha1
Summary
This is the first alpha release of PrusaSlicer 2.3.0, introducing paint-on custom FDM supports and seams, ironing of the top layers, monotonic and adaptive cubic and cubic support infills, per-extrusion g-code preview & standalone G-code Viewer, neat notification center in the 3D scene, imperial units support, SLA supports improvements, collapsible side bar, floating presets dialog and fuzzy search in parameters, physical printer settings, nine new 3rd party printer profiles and many more new features, improvements and bugfixes.
To let you enjoy the alpha without worries, the alpha builds save their profiles into PrusaSlicer-alpha directory, so you may use the alpha side by side with the current release without ruining your production configuration.
Complete description of improvements and changes with respect to the current PrusaSlicer 2.2.0 release follows.
FDM custom supports by painting
For quite a long time already, PrusaSlicer provides support enforcers and blockers so the user has control over support generation. While this method works, it is not a pleasure to work with and manipulating the blocks where the user wants them is quite tedious.
This release brings a tool to simply paint the areas where supports should be enforced or blocked, directly on the object. The tool is available from the left toolbar and is only shown in Advanced and Expert modes. After selecting an object and clicking the toolbar icon, all other objects are hidden so they do not obscure the view, the selected object is rendered in light gray to ensure contrast and the painting tool is activated.
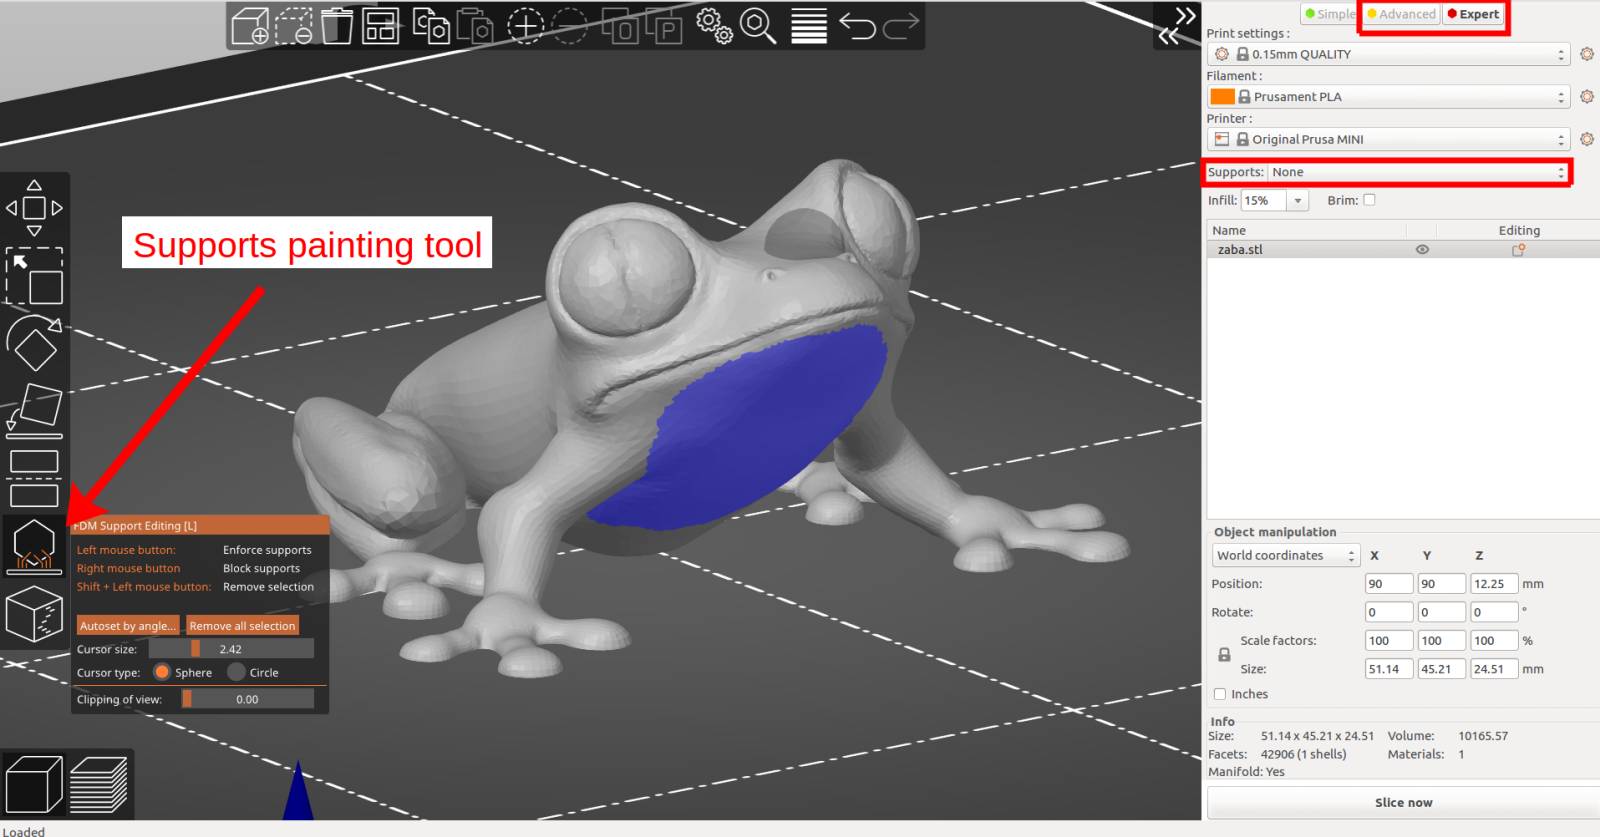
Left mouse button enforces supports, right button blocks them. The selection can be erased by Shift + mouse click. The size of the painting tool can be adjusted, as well as a cursor type: circular cursor paints all visible places inside the circle, possibly leaving unpainted areas in shaded areas, but never painting behind corners. Spherical cursor paints everything inside the sphere regardless of whether it is visible or not. You can also use the clipping plane tool to hide a part of the object, so that difficult to reach areas can be easily painted. The Autoset by angle button allows to select all triangles that are "more horizontal" than a threshold. This can be used as a default for further manual editing to ensure that no overhangs are left unsupported. The overhang triangles are visualized in real-time while the threshold is being adjusted.
Do not forget to enable supports if you want to actually generate them. The painted areas are equivalent to the old support enforcer/blockers, so their behavior depends on Auto-generated supports checkbox status in Print Settings (it can also be adjusted in the main window sidebar, highlighted in the picture above). When left unchecked, supports will be generated for support enforcers only:

If Auto-generated supports checkbox is checked, supports will be generated automatically, just not inside support blockers. This can be used to remove supports that are not necessary:

IMPORTANT NOTE: Your selection will not be completely obeyed when the painted region is small. The support generator itself works on a grid internally, the supported/unsupported areas cannot be infinitely detailed.
FDM seam placement by painting #946 #2527 #342 #728
Seams are inherent to FDM printing and they can negatively affect visual appearance of the model. PrusaSlicer always provided limited possibility to customize the seam placement in Print Settings to optimize for short travel moves, to keep the seams aligned on between successive layers, to randomize seam position along the contour, or to place it to the back of the model. The last option allows rudimentary manual control of seam placement by rotating the model on the build plate. In addition, PrusaSlicer always tried to hide the seams into share concave or convex corners and seam was never placed on an overhang.
This release introduces a new manual seam placement tool to provide more detailed control over the seam placement. The tool is accessible from the left toolbar and it is only shown in Advanced and Expert modes. After clicking on the icon, the user can paint 'Seam enforcers' or 'Seam blockers' on the model in a similar to how the new custom supports are painted.
The seam logic is the same as it was in previous releases, except that if there is a seam enforcer, it always places seams into the enforcer area. If there is a blocker, its area is excluded from possible seam candidates. The Nearest, Rear and Random options are still respected. When the Aligned option is active and enforcers are used, the seam is placed in the middle of the enforcer area. This allows to draw smooth seams over the model.

Two long-standing problems related to seam placement were fixed along the way:
- Seam set to Random did not produce really random positioning in some cases https://github.com/prusa3d/PrusaSlicer/issues/2162#issuecomment-630905183, inspired by #2222 thanks @DrLex0 #1409.
- Aligned seam should now be aligned even if an object slice consists of more than one island. The seam will newly be aligned on all the islands independently.
Ironing over top surfaces, Monotonic infill
The Ironing idea was first proposed by the user "Neotko" on the Ultimaker community forum. Neotko prototyped "Neosanding" - a smoothing of top surfaces in Simplify3D by running a second infill phase at the same print height with zero or a tiny extrusion rate perpendicularly to the first infill run. The "Neosanding" was later integrated by Ultimaker into their Cura slicer. Kisslicer integrated Ironing with a small twist: The second phase is not perpendicular to the first phase, but at 45 degrees, which Johnathan, the author of Kisslicer validated to produce better results. With this release, PrusaSlicer implements Neotko's "Neosanding" at 45 degrees as in Kisslicer.
Ironing is very sensitive to accurate extruder calibration. Too little and shiny groves will be visible at the top layer, that will not be sanded. Too much and the excess plastic will be dragged by the nozzle to the edges of the top surface. One may experiment with the ironing flow, speed and spacing to achieve the best results. Ironing may also increase the print times significantly, as the second phase of top infills is usually performed with very narrow line spacing.
To improve the top surface quality without sacrificing the print time, we have developed a novel "monotonic" infill. The "monotonic" infill is the good old rectilinear infill with modified path planning: The infill lines are extruded left to right monotonically, a line is never extruded to the left of an already extruded infill line. This strikingly simple strategy leads to a homogenous texture without ridges, which are often created when the left-to-right extrusions meet with right-to-left extrusions in the center of an infill area, while printing left to right only leads to a homogenous shine. The seemingly simple left-to-right strategy is surprisingly difficult to implement optimally. We have implemented a variant of the Ant Colony System as described by Raad Salman.
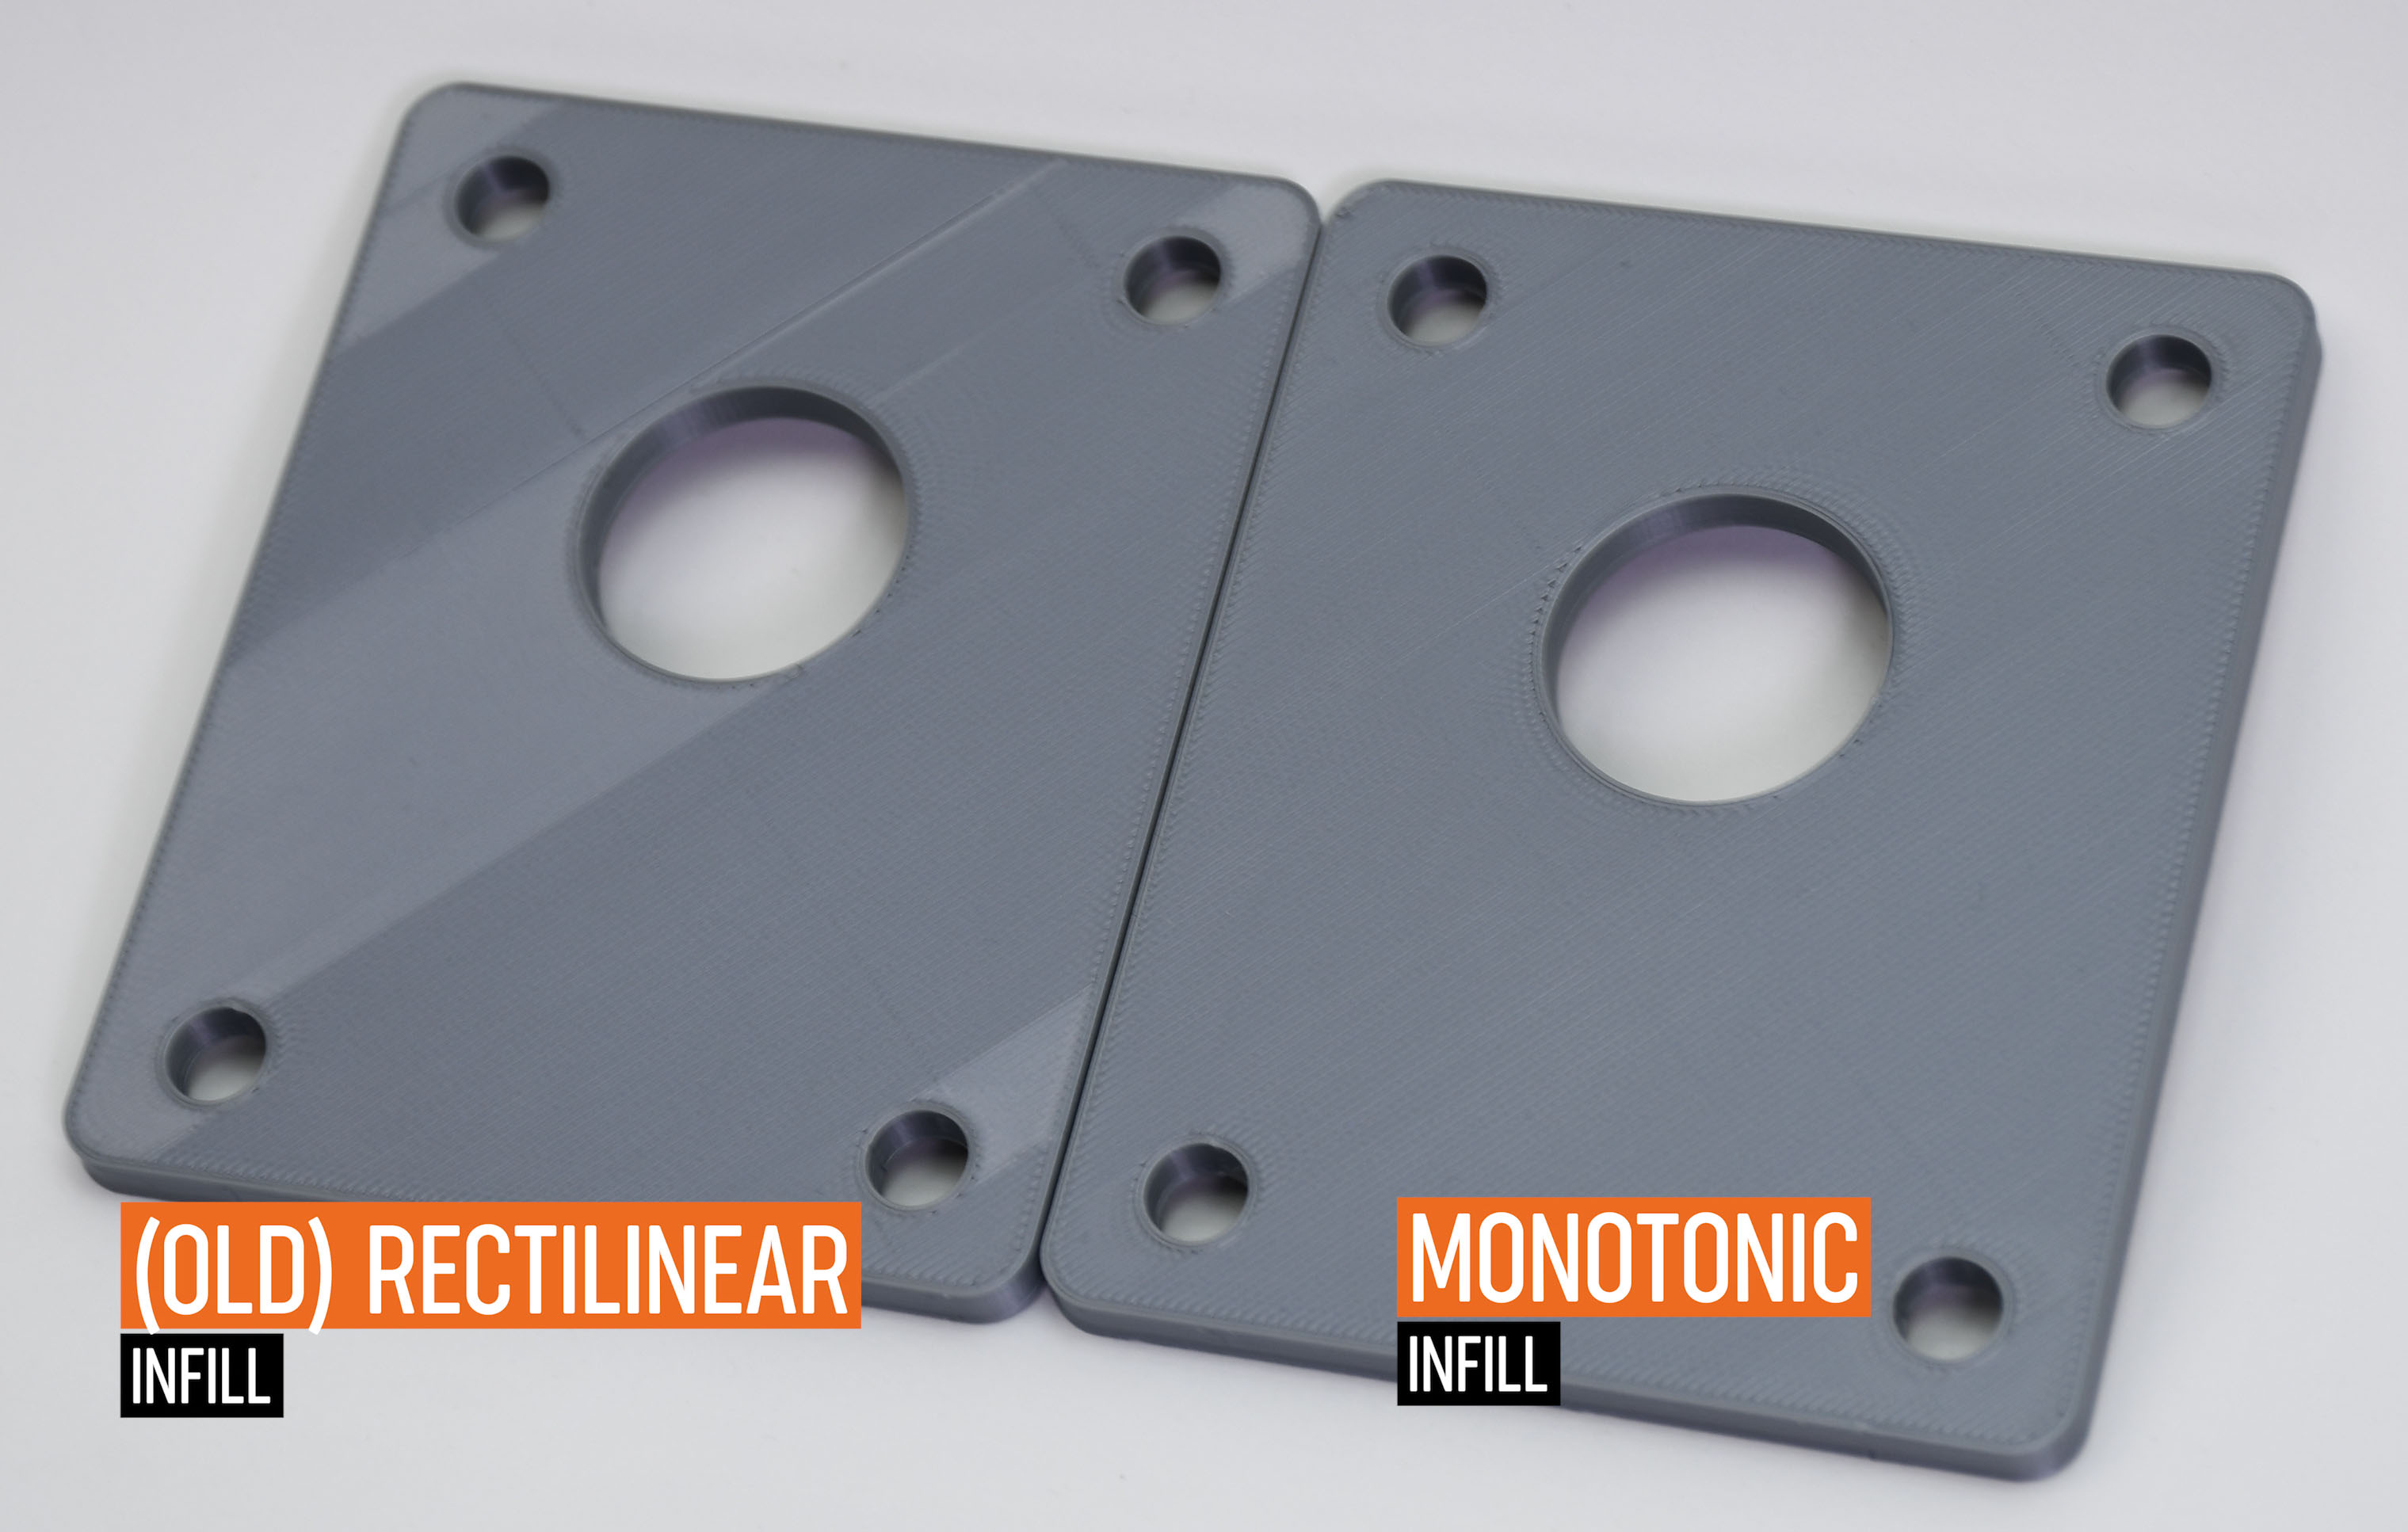
Adaptive Cubic / Adaptive Support Cubic infill
The Adaptive Cubic infil was proposed by @mboerwinkle, see the discussion, and implemented for Cura by @mboerwinkle as well. The Adaptive Cubic infill works by refining those cells of an octree, that contain any object triangle. We have picked up on the idea with a handful of improvements:
- We have added an "Adaptive Support Cubic infill" variant, which densifies the infill below roofs, while the original Adaptive Cubic infill densifies close to any surface.
- We have added anchors to each infill line. This makes the infill sturdier and it was required by PETG to stabilize the extrusion flow at the start of an infill line. Anchors are not available yet in this alpha.
- Our implementation produces a bit less dense infill than the implementation by @mboerwinkle, as we only refine those Octree cells that contain an object surface triangle, while the original implementation tested for a bounding sphere.
We expect the Adaptive Cubic infill and the Adaptive Support Cubic infills to be useful for large prints with a large volume. For example, the Adaptive Support Cubic infill decreased the print time of the famous treefrog by MorenaP scaled to a full print bed of the Prusa i3 MK2 printer by -30% compared to a cubic infill of the same density, while 44% of material was saved.
Stand-alone G-code viewer, print simulation in time #3997
PrusaSlicer offered a rich G-code viewer since Slic3r PE 1.42, however with two limitations: It was not possible to load an external G-code and print simulation in time was not possible. With this release, we are removing both these limitations and we are adding some more features.
First, we are newly providing a stand-alone G-code viewer. One can start as many G-code viewers as he wishes either by opening a G-code from the "File->G-code preview" menu, by starting the G-code viewer application, or by double clicking on a G-code file in Windows File Explorer or OSX Finder. From the technical point of view, the stand-alone G-code viewer is a PrusaSlicer in disguise. The stand-alone G-code viewer is started as a new PrusaSlicer process. The way how the G-code viewer process is started is platform specific:
- On Windows, the PrusaSlicer.dll contains all the code while the prusa-slicer.exe, prusa-slicer-console.exe and the new prusa-gcodeviewer.exe wrappers just load PrusaSlicer.dll with the proper parameters.
- On OSX, the application distribution format supports a single binary, which in our case is PrusaSlicer.app/Contents/MacOS/PrusaSlicer. For command line usage, this binary may be symlinked to prusa-gocdeviewer to start in a G-code viewer mode. Starting new instances of PrusaSlicer does not quite fit the OSX system, as the Finder only expects a single instance of a GUI application to be running. Thus when drag & dropping onto a dock icon of PrusaSlicer resp. G-code viewer, the file is sent to the first instance of PrusaSlicer resp. G-code viewer.
- On Linux, we support two binary distributions: AppImage and .tar.bz2. The .tar.bz2 format contains a new prusa-gcodeviewer starter script, while the AppImage may be symlinked to prusa-gcodeviewer to start the G-code viewer. The AppImage works by mounting the zipped filesystem image embedded inside the AppImage file and starting the application from there. It is not recommended to start prusa-gcodeviewer from an already mounted AppImage, as the AppImage will be unmounted when the PrusaSlicer that mounted it closes, see the following discussion. When the user starts a G-code viewer from an AppImage PrusaSlicer application, another AppImage is mounted by the G-code viewer, which means the PrusaSlicer binary is being loaded into RAM the second time. Therefore if one is low on RAM, it is recommended to use the .tar.bz2 distribution instead of the AppImage until the AppImage is improved to support multiple processes running from a single mounted AppImage.
PrusaSlicer standalone G-code viewer tries hard to estimate the extrusion widths, layer heights, extrusion types, types of moves, layers etc. from the G-code generated by various slicers (PrusaSlicer, Cura, Simplify3D, IdeaMaker). The G-code itself does not contain all the information mentioned above, thus the G-code is usually augmented with slicer specific comments. To support visualization of extrusion types and extrusion widths reliably for G-code generated by PrusaSlicer, the G-code generated by PrusaSlicer is newly augmented by the following comments: ";TYPE:", ";HEIGHT:" and ";LAYER_CHANGE", where these comments are only exported when the extrusion type, layer height or layer index changes. In addition, the following annotations are exported for the G-code events inserted on the vertical slider in the G-code viewer: ";COLOR_CHANGE", ";PAUSE_PRINT" and ";CUSTOM_GCODE". G-code generated by older PrusaSlicer which does not contain these new annotations will still be displayed, but the extrusion widths or extrusion types may not be shown reliably.
In the stand-alone G-code viewer or once the final G-code is available after slicing, a new horizontal slider shows up, limiting visualization of extrusions and travel by time thus allowing simulation of the print in time. By default the new horizontal slider limits visualization of the last layer selected by the vertical toolbar. Alternatively the horizontal slider limits the extrusions in all layers selected by the vertical slider. In the first case, if the horizontal slider limits visibility of the top layer, then the other layers below are rendered in a gray color. We borrowed this visualization strategy from the Craftware user interface as Cura did.
The legend newly shows the print time and the print time fraction per feature (perimeter, infill etc.), and the legend labels serve as buttons to show / hide the particular extrusion time. The print time estimate is available in both the G-code preview after slicing and in the stand-alone G-code viewer.
Single vs. multiple instances, sending arguments to an existing instance
Some users prefer to work with a single instance of PrusaSlicer only, while other users love to be able to switch between multiple PrusaSlicer instances. While Windows and Linux support multiple instances of an application by default, OSX framework keeps just a single instance of an application running. We newly allow both scenarios on all platforms: The Windows and Linux users may now keep just a single instance of PrusaSlicer running, while the OSX users may launch additional instances of PrusaSlicer. Additionally we allow opening a new PrusaSlicer instance from a running PrusaSlicer "View -> Open New Instance" menu and from Dock context menu on OSX #2929 #4447.
When one clicks on the PrusaSlicer icon to open PrusaSlicer, either a new PrusaSlicer instance is started or an existing PrusaSlicer instance is activated based on the "single instance" preferences settings. The initial value of "single instance" matches the platform default: Multiple instances are allowed on Windows and Linux, while a single instance is allowed on OSX. When one drag and drops an STL or 3MF onto a PrusaSlicer icon and "single instance" is enabled, the file is opened in an existing PrusaSlicer instance. Drag and dropping a G-code file onto a PrusaSlicer icon opens always a new G-code viewer.
An instance of PrusaSlicer is identified by its full path to the PrusaSlicer binary, thus if "single instance" is enabled, PrusaSlicer will allow a single instance of each PrusaSlicer binary to run. Thus different versions of PrusaSlicer will not affect each other, alphas and betas included.
The command line supports a new "--single-instance" or "--no-single-instance" argument to override the "single instance" settings. For example, one may prefer to open a new instance of PrusaSlicer when drag & dropping an STL over the PrusaSlicer icon, while one may want to send an STL from Autodesk Fusion 360 to an existing PrusaSlicer instance by providing a "--single-instance" command line argument when starting PrusaSlicer from Fusion 360.
OSX specific: The OSX Finder and Dock only support a single application instance. Thus when double clicking on a PrusaSlicer icon, the existing PrusaSlicer instance is always activated independent of the "single instance" settings, and drag & dropping a file onto a PrusaSlicer icon in Finder or Dock opens the file in some random, likely the first instance of PrusaSlicer. However when starting PrusaSlicer.app/Contents/MacOS/PrusaSlicer from terminal, the "single instance" preferences settings is respected. We are aware that the approach of starting multiple instances of the same application on OSX is neither recommended nor supported by the OSX framework, however for technical reasons this was the quickest way to deliver multiple PrusaSlicer windows and the stand-alone G-code viewer.
While one may argue that one should open multiple windows of PrusaSlicer inside a single process instead of starting a new process for each PrusaSlicer instance, we do not think there is any memory issue with our approach as the program image is shared among instances and the base private program memory is quite low. Most of the memory is allocated by the models, slicing, undo/redo and mainly the G-code preview, therefore starting new instance for each slicer consumes just a tiny bit more than it would if the multiple windows were managed by a single process.
Technical details: PrusaSlicer writes a lock file into its cache directory to detect another instance running. The name of the lockfile is constructed from the hashed path to the PrusaSlicer process and a ".lock" suffix. Passing commands between PrusaSlicer instances is platform specific:
- On Windows, a Window message is sent to an existing PrusaSlicer main window, where the PrusaSlicer main window is identified by a window name, window class name and a hash of the PrusaSlicer proces path.
- On Linux, PrusaSlicer instances communicate over DBUS, where each PrusaSlicer instance registers as a listener with the following name: "com.prusa3d.prusaslicer.InstanceCheck.Object" + hash of the PrusaSlicer proces path.
- On OSX, NSDistributedNotificationCenter API is used. Each instance registers itself to receive a message named "OtherPrusaSlicerInstanceMessage" + hash of the PrusaSlicer process path.
Unsaved Changes dialog #3049
When closing the application or switching profiles, PrusaSlicer newly opens a dialog with the listing of modified unchanged parameters, their old and new values. The user may decide to discard all the changes, or one may save some or all the changes into user profiles. When switching profiles, the modified parameters may also be transferred to the activated profiles.
One may decide to always save or always discard the parameter changes by checking the "Remember my choice" checkbox at the "Unsaved changes" dialog. Such decision may later be reverted in the Preferences dialog. The user interface design and code was inspired by @kumpuu #3285.
When switching the Printer profile, the active Print and Filament profiles may no more be compatible with the new Printer profile. The old PrusaSlicer selected a Printer and Filament profiles marked as "default" in the activated Printer profile. The new PrusaSlicer selects the new Print profile with the following priority:
- Compatible Print profile with the same logical name aka alias.
- Prefered Print profile with the same layer height.
- Compatible Print profile with the same layer height.
- Prefered Print profile.
- Any compatible profile.
Thus when switching the printer from "Prusa i3 MK3" with the "0.2mm SPEED" Print profile active to "Prusa i3 MK2", "0.20mm 10mms Linear Advance" Print profile is newly activated, while the previous PrusaSlicer would select the default, which is "0.15mm OPTIMAL". The same logic applies to the selection of Filament profile, while the symbolic "filament_type" parameter is matched instead of the layer height.
Improved filament installation
In PrusaSlicer, not all installed filaments are necessarily compatible with all installed printers. We require the printer vendor to explicitly enumerate those filaments, which were verified to print correctly with his printers.
In this version, we have updated the Filaments selection page of the Configuration Wizard to reflect, that an installed filament may not be available for each installed printer. Namely, we are marking the filaments, which are incompatible with some of the installed printers with an asterisk. In addition, compatible installed printer profiles are listed out for the selected filament profile at the bottom of the Filaments page.
Physical Printers settings #1880 #3050 #4217 #4549
Historically PrusaSlicer stored the printer network connection settings into the Printer profile. This became inconvenient with the introduction of read-only vendor specific system profiles, where the user had to derive his own Printer profile from a system one just to be able to configure G-code upload over the network. In addition, storing the network connection information into the Printer profile posed a security risk, which we had to patch by suppressing export of the network connection into the 3MF, G-code and Config Bundles anyway.
Starting with this version, PrusaSlicer separates the physical printer connection settings from the Printer profile into new Physical Printer profiles. A Physical Printer profile references one or more Printer profiles of the same technology (either FFF or SLA), and it assigns a network connection information to these printers. One does not have to create a Physical Printer profile if one does not need to connect to a printer over the network. The new Physical Printers are listed in a new section in the Printer selection combo box after the system and custom Printer profiles.
A new Physical Printer profile is created by clicking on the "cog" icon right to the Printer profiles combo box, or by selecting the "add or remove printers" item in the Printer combo box. The Physical Printer profile editor opens also when clicking on the new "cog" icon in the Printer settings tab. The Physical Printer profiles are being stored into PrusaSlicer/physical_printer directory.
When first installing PrusaSlicer 2.3.0-alpha1, the network connection information is removed from existing user Printer profiles and converted to new Physical Printers profiles giving them generic names "Printer 1, Printer 2, ...". The user is advised to review and rename these Physical Printer profiles generated by the conversion process. The following configuration keys are moved from Printer to Physical Printer profiles: "host_type", "print_host", "printhost_apikey", "printhost_cafile", "printhost_authorization_type", "printhost_user", "printhost_password". The last three keys are new to support SL1 HTTP digest authentication, see the following section.
If some parameter of a Printer profile is modified, a "(modified)" suffix is newly shown not only for the modified Printer profile in the list of Printer profiles, but also for all the associated Physical Printer profiles.
For security reasons, the "Export Config Bundle" function does not export the Physical Printers. To help sharing the complete PrusaSlicer profiles between ones computers, we added "Export Config Bundle with Physical Printers" option.
SLA improvements
- It is newly possible to import both a model and its print profile from an existing
.SL1archive. The feature is available through the "File->Import->Import SL1 archive" menu. Note that the original model is not available in the SL1 archive, it has to be reconstructed from the slices, thus the imported mesh will be visibly discretized and the supports (if they were used) will be fused with the object. - HTTP digest authentication (RFC 2617) is newly supported by PrusaSlicer to send files to an SL1 printer. HTTP digest authentication is configured in the new Physical Printers configuration dialog.
- Optimize orientation now orients parts flat to the print platform when configured to print directly on the platform.
- Configuration option Pad around object is only accessible from Pad parameter subpage. It was confusingly mirrored in Supports in the past.
- The bed texture is no more shown when looking from below while the support points or holes editing is in progress. It is to provide clear view of the bottom of the model with no obstructions.
- SLA support points and holes are re-projected on the mesh during loading and after Netfabb repair. This ensures that no support point or hole ends up off the mesh.
Various improvements regarding supports and hollowing were implemented. See the following table for more information and comparison with the last release.
New 3rd party printer profiles
The following 3rd party printer profiles were added or improved:
- Anycubic: Mega Zero #4057 thank @kad, Kossel Pulley, Linear and Linear Plus #4220 thanks @tc0fh, Mega S #4619 thanks @Igami
- BIBO profile improvements by @photodude
- Creality: Added Ender-2 thanks @probonopd, updated Ender-2 texture #4748 thanks @ChandlerMcCowan, updated Ender-3 bed texture, added Ender-3 with BLTouch and many other Ender improvements thanks @pmjdebruijn #4853 #4854
- TriLAB models DeltiQ M, L, XL prusa3d/PrusaSlicer-settings#100 thanks @espr14
Collapsible side bar, floating presets dialog etc.
PrusaSlicer is being used on various form factor devices ranging from ultrabooks and laptops to multi-screen workstations. One application layout does not fit them all, therefore we implemented the following layout options:
- The good old mode with Plater, Print, Filament and Printer tabs. The good old layout fits larger size laptops well.
- A bit of screen real estate is saved by hiding the tabs when the Plater is active. The configuration tabs are accessed by a new "cog" button at the top toolbar.
- Floating dialog mode, where the Print, Filament and Printer pages are shown in a floating dialog, which opens with the new "cog" button at the top toolbar. The floating dialog mode is handy on a multi-screen workstation and using it to fine tune print parameters with the background processing enabled is a joy #4093.
To support small laptops and ultrabooks, we have implemented the following new features:
- The side bar at the Plater is now collapsible if enabled in application preferences #2075 #3325.
- The side bar is collapsed with a Shift-Tab shortcut, thanks @wavexx #4735.
- Toolbars in the Plater are newly scaled down until they fit the screen.
Notification center
Starting with this version, many non-critical notifications and user requests which used to pop up as modal dialogs are newly displayed as notifications at the right side of the 3D scene. The following notifications are shown by the new notification center:
- New PrusaSlicer version or configuration profiles are available for download. This notification is shown at every application start up, therefore one no more misses an update.
- "Slicing complete" with time estimate and "Export G-code" hyperlink is shown as a notification if the side bar is collapsed.
- "Export of G-code to removable media finished" with a hyperlink to unmount the removable media.
- "Unmounting of a removable media succeeded / failed" #4821.
- "Slicing error" reporting inconsistency in slicing parameters that prohibits slicing, for example the "extruder collision with an object" in sequential print #4606.
- "Slicing warning" reporting possible problems of the print. Newly the "Empty layers detected" is reported as Slicing warning instead of stopping the slicing process, allowing to print stacked objects, for example the COVID-19 face shields #4062 #4756.
- Objects partially / fully outside the print volume. This notification used to be displayed at the bottom of the 3D scene, it is now shown by the notification center.
- 3D Mouse detached.
The notifications are sorted by severity with the most severe notifications at the bottom.
The update notifications, slicing finished, unmounting successful, 3D mouse detached and similar notifications fade out after a short time interval, while the warnings and errors are displayed as long as they are valid. Fading out of a notification is suppressed if the mouse cursor hovers over the notification.
Support for imperial units #1041 #1407 #1463 #1811 #2570
We newly provide support for imperial units for our US customers. PrusaSlicer uses metric system internally, namely all internal dimensions (model sizes, model positions, print & printer profiles and G-code) are measured in millimeters. To make the life easier to our US customers, we newly support imperial units in the following way:
- The "Object manipulation" panel newly offers an "Inches" check box. If enabled, the object position and scaling is presented and accepted in inches. PrusaSlicer still keeps the internal dimensions in mm, however they are converted from/to inches when presented to the user.
- The state of the "Inches" checkbox at the "Object manipulation" panel persists in application preferences as "use_inches" option. Initial state of the "Inches" checkbox is set at the last page of the application configuration wizard.
- The filament usage is shown in inches if the "Inches" mode is enabled.
The models are still imported / exported in millimeters by default, as most of the models available are in millimeters. However, we newly support the following:
- Importing STLs saved in inches by menu File->Import->Import STL (Imperial Units). STLs are converted from inches to millimeters on import.
- Object and Volume context menu newly contain "Convert from Imperial Unit" to scale from inches to millimeters after an object with dimensions in inches was loaded as in millimeters.
- Object and Volume context menu newly contain "Revert conversion from Imperial Unit" to revert the above, or if the user loaded an object in mm through "Import STL (Imperial Units)".
- If the model loaded is very small, a conversion from inches to millimeters is newly offered #4521.
Fuzzy search in parameters #1504
PrusaSlicer newly allows one to search for a parameter to quickly access particular parameter page and parameter field. The search is accessible from both the Plater top toolbar and from the Print/Filament/Printer parameter pages, or with a Ctrl-F hot key.

A modified fuzzy search algorithm by @forrestthewoods is used, which works similarly to the fuzzy search algorithm in Sublime editor. If the application is switched to a local language, both the localized names and English names are searched through. ASCII folding is applied, so one may for example type "cistici vez" to search for "Čistící věž".
Other UI improvements
- Copy/Paste is newly supported for the custom parameters and layer ranges in the object list.
- One may newly merge multiple objects into one multi-part object by selecting multiple objects in the Plater or in the Object list and by executing "Merge" from the pop-up menu.
- Splash screen is newly shown for both PrusaSlicer and the new G-code viewer. Splash screen may optionally be disabled in the preferences.
Other new features and improvements
- Windows specific: PrusaSlicer starts significantly faster due to delayed creation of parameter pages.
- It is newly possible to change the G-code generated for the Color Change, Tool Change and Pause events placed at the layer slider using the new "color_change_gcode", "pause_print_gcode" and "template_custom_gcode" variables #3722.
- Linux specific: Various Linux distros store system SSL certificates at a different locations, which our binary builds were not aware of, breaking automatic profile updates on Fedora and possibly on other Linux distros. PrusaSlicer newly searches for the openssl certificates at locations used by common Linux/Unix distributions on first application start-up, the user is informed about where the certificates are found and the user is asked to accept these certificates #3851 #4448.
- Windows specific: PrusaSlicer newly communicates with the 3DConnexion devices using the 3DConnexion driver, thus it is possible to configure 3DConnexion device for PrusaSlicer in the driver, for example it is now possible to swap the axes of the 3D mouse in the 3DConnexion driver. The latest 3DConnexion driver already installs c:\Program Files\3Dconnexion\3DxWare\3DxWinCore64\Cfg\prusa-slicer.xml, however if you created this file manually, you are advised to remove it before starting the 3DConnexion driver update as the driver update will keep the old file. The 3DConnexion driver does not install a configuration file for the new prusa-gcodeviewer.exe, you have to copy the prusa-slicer.xml to prusa-gcodeviewer.xml and edit it to get the 3D mouse working in the G-code viewer. We are in touch with 3DConnexion to fix that #3864 #3933 #3937 #4104.
- The G-code placeholder parser supports the following new keys: "print_bed_min", "print_bed_max", "print_bed_size", which are calculated as a bounding box of an existing "bed_shape" vector of points.
- The G-code placeholder parser also newly supports the following new keys: "first_layer_print_convex_hull", "first_layer_print_min", "first_layer_print_max", "first_layer_print_size", defining convex hull of the first layer. Please note that the extrusions generated by the custom G-code are not accounted for.
- OSX specific: Implemented automatic switching of color schemes (light to dark and vice versa) on a system notification.
- Custom G-code texts now use a monospaced font, thanks @wavexx #4747.
- It is now possible to stack objects one over the other, however the user will be informed with a notification and when exporting the G-code about empty layers in the print #4041 #4062 #4756.
Bugs fixed
- Windows specific: Fixed loading of PrusaSlicer profiles from a path containing a symlink. The issue is caused by a buggy boost::filesystem::canonical() implementation, which we replaced with boost::filesystem::absolute() #732 #3956 #4557.
- Linux specific: Fixed crash on startup under Wayland. Fixed by setting env "GDK_BACKEND" to "x11" #2515 #4691.
- Fixed under-extrusion upon leaving the MMU2 wipe tower. Wiping moves performed before moving away from the wipe tower were replaced by scheduling a regular wipe that is performed after the regular G-code generator regains control from the wipe tower generator. This makes it consistent with wipes on the model and gets rid of the unretracted travels #2834.
- The print bed is now limited to 1.2m x 1.2m, which is required by the range of a 32 bit fixed point signed int we use to represent coordinates #2877.
- Linux specific: LANGUAGE environment variable was not respected #2970.
- Windows 10 specific: Fixed "rubber band" effect when dragging windows on Windows 10 build 2004 #3009 #4636 #4838 #4886.
- PrusaSlicer does not support "Support material" overrides per layer range, therefore this option has been removed #3060 #4100.
- Fixed position of multi-material purging lines on rectangular beds with non-standard origin #3805.
- Linux specific: Fixed crashes due to a bug in accessing bitmaps for the object list #3837.
- Windows specific: The 3Dconnexion 3D mouse produced scrolling events in case the mouse cursor was over a combo box. This is now fixed with an installation of the latest 3DConnexion driver #3864.
- OSX specific: Selection of profiles by the combo boxes was case insensitive, making it impossible to select a user preset, if its name differed in case only #3889.
- Fixed order of processing configuration files when slicing from command line. The priority of config values is now: 1) Config keys from command line, for example --fill-pattern=stars (highest priority, overwrites everything below), 2) Config files loaded with --load, 3) Config from 3mf (lowest priority) #3893.
- Fixed crash when trying to test-connect to a FlashAir SD card given an invalid IP address #3899.
- Windows specific: Fixed language selection issue for country specific language variants. For example, pt_PT dictionary was incorrectly loaded by PrusaSlicer instead of pt_BR for Brazilian Portugese #3901.
- Improved error reporting when loading presets with option keys or option values that our PrusaSlicer does not understand. This applies to configs added by some forks of slic3r, for example SuperSlicer #3909.
- OSX specific: Fixed crashes when switching printers or attempting to modify the bed shape or size due to a bug in Retina scaling support #3916.
- Fixed extremely wide wipe tower with 0.35mm FAST profile #3919 #4361 #4541.
- MMU specific: Fixed disabling of linear advance with RepRap firmware #3965.
- Windows specific. Fixed scanning of floppy drives when searching for a removable media as a target for G-code export #3967.
- Fixed crash due to a typo in Korean localization #3983.
- Fixed layout of the object manipulation panel in French by shortening the labels #4035.
- The "Eject removable media" is newly shown first after the export is finished #4212.
- Fixed an issue in arrangement, where some objects were left out of bed after arrange #4329.
- Windows specific: Improved scanning of removable drives. PrusaSlicer newly registers for removable media insert / eject notifications, therefore the devices are no more scanned regularly, spinning up removable hard drives. Thanks @mjgtp from prusaprinters.org, see the following discussion #4071.
- Fixed a crash when slicing a specific SL1 project #4836.
- Fixed print-out of the final G-code file name when slicing from command line. The macros in the file name template are now correctly substituted #4872.
- Fixed cutting of objects by a plane in SLA mode with supports already calculated, where the object elevation was not being taken into account.
Architecture, infrastructure
- We have updated to wxWidgets 3.1.3.
- The dependency build script now supports a new parameter DEP_WX_GTK3=on/off to build wxWidgets against GTK3.
- We newly provide Linux/GTK3 builds.
- Improved the "Update How to build - Mac OS" documentation, thanks @danhae #4630.
Known issues
- The new G-code viewer does not correctly support sequential print and spiral vase. We are working on that.
- OSX Big Sur specific: Bold fonts are not displayed as bold, combo boxes at the bottom of the G-code viewer open down, thus they may end up out of the screen. 3DConnexion does not provide a correctly signed driver, which could install on Big Sur.
What is in the working
We are revamping the "Avoid crossing perimeters" feature.
Where you can help
We accept translations and 3rd party printer profiles.