k8s-ml
🎱 A demonstration of existing machine learning toolkits on Kubernetes
Tensorflow Image Classification Demo on Kubernetes
This repo serves as an example to demonstrate the typical machine learning workflow and how to leverage existing machine learning toolkits for Kubernetes to enhance the development and operations lifecycle.
Here is what you will find in this repo:
- Train - how to take an Inception v3 model trained on ImageNet images to retrain a new top layer that can recognize new classes of images.
- Automate - how to run repeatable machine learning experiments using containers.
- Visualize - how to visualize machine learning trainings with Tensorboard.
- Operate - how to automate and provision production-ready immutable infrastructure with Kubernetes.
- Deploy - how to deploy machine learning components to Kubernetes with Kubeflow.
- Scale - how to scale and test machine learning experiments in parallel using Kubernetes and helm.
- Manage - how to manage training jobs by creating end to end training pipelines with Argo.
- Serve - how to serve a trained model for inference with TF Serving as part of Kubeflow.
- Rapid Prototype - how to enable rapid prototyping with self-service Jupyter Notebook from JupyterHub with GitHub OAuth.
This example is based on the Tensorflow Image Retraining example.
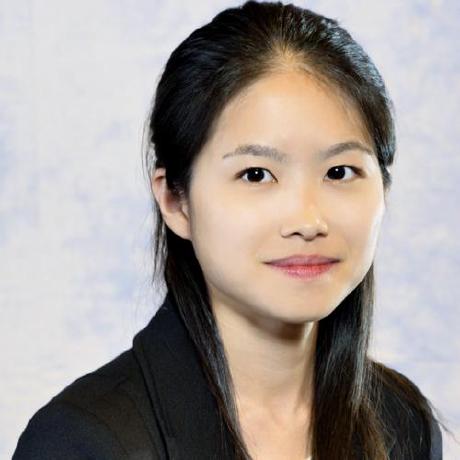
We have modified the example to retrain inception v3 model to identify a particular celebrity. Using the retrained model, we can get predictions like the following:
Retrain Model Locally
-
Train with Inception v3 and Automate with containers
# build docker build -t ritazh/image-retrain-kubecon:1.9-gpu -f train/Dockerfile.gpu ./train # push docker push ritazh/image-retrain-kubecon:1.9-gpu # run docker run --rm -v $PWD/tf-output:/tf-output ritazh/image-retrain-kubecon:1.9-gpu "--how_many_training_steps=4000" "--learning_rate=0.01" "--bottleneck_dir=/tf-output/bottlenecks" "--model_dir=/tf-output/inception" "--summaries_dir=/tf-output/training_summaries/baseline" "--output_graph=/tf-output/retrained_graph.pb" "--output_labels=/tf-output/retrained_labels.txt" "--image_dir=images" "--saved_model_dir=/tf-output/saved_models/1" -
Visualize with Tensorboard
# build docker build -t ritazh/tensorboard:1.9 -f ./train/Dockerfile.tensorboard ./train # push docker push ritazh/tensorboard:1.9 # run docker run -d --name tensorboard -p 80:6006 --rm -v $PWD/tf-output:/tf-output ritazh/tensorboard:1.9 "--logdir" "/tf-output/training_summaries" -
Serve Trained Model for Inference with TF Serving
docker run -d --rm --name serving_base tensorflow/serving
docker cp tf-output/saved_models serving_base:/models/inception
docker commit --change "ENV MODEL_NAME inception" serving_base $USER/inception_serving
docker kill serving_base
docker run -p 8500:8500 -t $USER/inception_serving &

python serving/inception_client.py --server localhost:8500 --image test/fbb1.jpeg
You should get an output as follows:
outputs {
    key: "classes"
    value {
        dtype: DT_STRING
        tensor_shape {
        dim {
            size: 2
        }
        }
        string_val: "fbb"
        string_val: "notfbb"
    }
    }
    outputs {
    key: "prediction"
    value {
        dtype: DT_FLOAT
        tensor_shape {
        dim {
            size: 1
        }
        dim {
            size: 2
        }
        }
        float_val: 0.95451271534
        float_val: 0.0454873144627
    }
    }
    model_spec {
    name: "inception"
    version {
        value: 1
    }
    signature_name: "serving_default"
}
Provision Immutable Infrastructure with Kubernetes
-
Using acs-engine with kubernetes v1.11.4
Deploy Machine Learning Components to Kubernetes with Kubeflow
-
Install ksonnet version 0.13.1, or you can download a prebuilt binary for your OS.
# install ks v0.13.1 export KS_VER=0.13.1 export KS_PKG=ks_${KS_VER}_linux_amd64 wget -O /tmp/${KS_PKG}.tar.gz https://github.com/ksonnet/ksonnet/releases/download/v${KS_VER}/${KS_PKG}.tar.gz --no-check-certificate mkdir -p ${HOME}/bin tar -xvf /tmp/$KS_PKG.tar.gz -C ${HOME}/bin echo "PATH=$PATH:${HOME}/bin/$KS_PKG" >> ~/.bashrc source ~/.bashrc -
Install argo CLI
-
Run the following commands to deploy Kubeflow components in your Kubernetes cluster:
NOTE: This demo has been updated to use kfctl.sh.
# download kubeflow
KUBEFLOW_SOURCE=kubeflow # directory to download the kubeflow source
mkdir ${KUBEFLOW_SOURCE}
cd ${KUBEFLOW_SOURCE}

export KUBEFLOW_TAG=v0.4.1 # tag corresponding to kubeflow version
curl https://raw.githubusercontent.com/kubeflow/kubeflow/${KUBEFLOW_TAG}/scripts/download.sh | bash
# init kubeflow app
KFAPP=mykubeflowapp
${KUBEFLOW_SOURCE}/scripts/kfctl.sh init ${KFAPP} --platform none

# generate kubeflow app
cd ${KFAPP}
${KUBEFLOW_SOURCE}/scripts/kfctl.sh generate k8s

# apply kubeflow to cluster
${KUBEFLOW_SOURCE}/scripts/kfctl.sh apply k8s

# view created components
kubectl get po -n kubeflow
kubectl get crd
kubectl get svc -n kubeflow
Persist Data and Logs With Azure Storage
-
Setup PVC components to persist data in pods. https://docs.microsoft.com/en-us/azure/aks/azure-disks-dynamic-pv
- Setup storage account for Azure Files
export RG_NAME=kubecon export STORAGE=kubeconstorage az storage account create --resource-group $RG_NAME --name $STORAGE --sku Standard_LRS- Setup StorageClass, Roles, and PVC's
# kubectl create -f ./deployments/azure-pvc-roles.yaml

kubectl create -f ./deployments/azure-file-sc.yaml
kubectl create -f ./deployments/azure-file-pvc.yaml
Check status
kubectl get pvc NAME STATUS VOLUME CAPACITY ACCESS MODES STORAGECLASS AGE azurefile Bound pvc-d686be3e-bc75-11e8-a08d-000d3a4f8d49 5Gi RWX azurefile 4h -
[OPTIONAL] If you want to use a static Azure files instead of creating PVCs,
- Run the following to create a Kubernetes secret
kubectl create secret generic azure-file-secret --from-literal=azurestorageaccountname=$STORAGE_ACCOUNT_NAME --from-literal=azurestorageaccountkey=$STORAGE_KEY- From the deployment yaml, you can reference the static Azure file instance like:
volumes:
  - name: azure-files
    azureFile:
      secretName: azure-files-secret
      shareName: data
      readOnly: false
Retrain Model with Kubeflow (TFJob)
-
Deploy TFJob and tensorboard
-
Run training job with TFJob
kubectl create -f ./deployments/tfjob-retrain.yaml # check created tfjob kubectl get tfjob # check created pvc kubectl get pvc # check status of the training kubectl logs tfjob-retrain-master-0 # after completed, clean up: kubectl delete tfjob tfjob-retrain -
Run Tensorboard (after the previous training is completed)
kubectl create -f ./deployments/tfjob-tensorboard.yaml # Get public IP of tensorboard service kubectl get svc -
Clean up
kubectl delete -f ./deployments/tfjob-tensorboard.yaml
-
Hyperparameter Sweep - Scale and Test Experiments in Parallel using Kubernetes, Helm, Virtual Kubelet, and ACI
This step requires Azure Files mount to be available. Please refer to the Persist Data and Logs With Azure Storage section.
-
Ensure Helm and Virtual Kubelet are installed
- Ensure helm is installed and tiller is running in the cluster
helm version- Install Virtual Kubelet so we can scale our training to run on Azure Container Instance with GPU
Provide the following in hyperparameter/virtual-kubelet/values.yaml
targetAKS:
clientId:
clientKey:
tenantId:
subscriptionId:
aciRegion:
Then install the Virtual Kubelet chart in your cluster.
export VK_RELEASE=virtual-kubelet-latest CHART_URL=https://github.com/virtual-kubelet/virtual-kubelet/raw/master/charts/$VK_RELEASE.tgz helm install --name vk "$CHART_URL" -f ./hyperparameter/virtual-kubelet/values.yaml kubectl get nodes ... virtual-kubelet Ready agent 5s v1.11.2 -
Deploy hyperparameter chart to run our experiments in parallel on Azure Container Instance
helm install --name image-retrain-hyperparam ./hyperparameter/chart

az container list -g <ACI RESOURCE GROUP>
Creating End to End Pipelines with Argo
-
[OPTIONAL] If you do not want to use the minio component deployed as part of Kubeflow. Deploy your own Minio for S3 compatibility
- Update Minio deploy yaml with Azure storage account
- name: MINIO_ACCESS_KEY value: "PUT AZURE STORAGE ACCOUNT NAME HERE" - name: MINIO_SECRET_KEY value: "PUT AZURE STORAGE ACCOUNT KEY HERE"- Deploy Minio
# Deploy Minio kubectl create -f ./deployments/minio-azurestorage.yaml # Get endpoint of Minio server kubectl get service minio-service -
Create a pipeline with Argo workflow
- Set environment variables for Argo workflow (here we are using the minio shipped as part of Kubeflow)
# namespace of all the kubeflow components export NAMESPACE=kubeflow # set to "minio" if using minio shipped as part of kubeflow # set to "AZURE STORAGE ACCOUNT NAME" if minio is deployed as a proxy # to Azure storage account from the previous step export AZURE_STORAGEACCOUNT_NAME=minio # set to "minio123" if using minio shipped as part of kubeflow # set to "AZURE STORAGE ACCOUNT KEY" if minio is deployed as a proxy # to Azure storage account from the previous step export AZURE_STORAGEACCOUNT_KEY=minio123 MINIOIP=$(kubectl get svc minio-service -n ${NAMESPACE} -o jsonpath='{.spec.clusterIP}') MINIOPORT=$(kubectl get svc minio-service -n ${NAMESPACE} -o jsonpath='{.spec.ports[0].port}') export S3_ENDPOINT=${MINIOIP}:$MINIOPORT export AWS_ENDPOINT_URL=${S3_ENDPOINT} export AWS_ACCESS_KEY_ID=$AZURE_STORAGEACCOUNT_NAME export AWS_SECRET_ACCESS_KEY=$AZURE_STORAGEACCOUNT_KEY export BUCKET_NAME=mybucket export DOCKER_BASE_URL=docker.io/ritazh # Update this to fit your scenario export S3_DATA_URL=s3://${BUCKET_NAME}/data/retrain/ export S3_TRAIN_BASE_URL=s3://${BUCKET_NAME}/models export AWS_REGION=us-east-1 export JOB_NAME=myjob-$(uuidgen | cut -c -5 | tr '[:upper:]' '[:lower:]') export TF_MODEL_IMAGE=${DOCKER_BASE_URL}/image-retrain-kubecon:1.9-gpu # Retrain image from previous step export TF_WORKER=3 export MODEL_TRAIN_STEPS=200 # Create a secret for accessing the Minio server kubectl create secret generic aws-creds --from-literal=awsAccessKeyID=${AWS_ACCESS_KEY_ID} \ --from-literal=awsSecretAccessKey=${AWS_SECRET_ACCESS_KEY} -n ${NAMESPACE} # Create a user for the workflow kubectl apply -f workflow/tf-user.yaml -n ${NAMESPACE}- Submit a workflow to Argo
# Submit a workflow to argo argo submit workflow/model-train-serve-workflow.yaml -n ${NAMESPACE} --serviceaccount tf-user \ -p aws-endpoint-url=${AWS_ENDPOINT_URL} \ -p s3-endpoint=${S3_ENDPOINT} \ -p aws-region=${AWS_REGION} \ -p tf-model-image=${TF_MODEL_IMAGE} \ -p s3-data-url=${S3_DATA_URL} \ -p s3-train-base-url=${S3_TRAIN_BASE_URL} \ -p job-name=${JOB_NAME} \ -p tf-worker=${TF_WORKER} \ -p model-train-steps=${MODEL_TRAIN_STEPS} \ -p namespace=${NAMESPACE} \ -p tf-tensorboard-image=tensorflow/tensorflow:1.7.0 \ -p s3-use-https=0 \ -p s3-verify-ssl=0 # Check status of the workflow argo list -n ${NAMESPACE} NAME STATUS AGE DURATION tf-workflow-s8k24 Running 5m 5m # Check pods that are created by the workflow kubectl get pod -n ${NAMESPACE} -o wide -w # Monitor training from tensorboard PODNAME=$(kubectl get pod -n ${NAMESPACE} -l app=tensorboard-${JOB_NAME} -o jsonpath='{.items[0].metadata.name}') kubectl port-forward ${PODNAME} -n ${NAMESPACE} 6006:6006 # Get logs from the training pod(s) kubectl logs ${JOB_NAME}-master-0 -n ${NAMESPACE}- Get Serving IP
# Get public ip of the serving service once we reach the last stage of the workflow
SERVINGIP=$(kubectl get svc inception-${JOB_NAME} -n ${NAMESPACE} -o jsonpath='{.status.loadBalancer.ingress[0].ip}')

# Get detailed information of the workflow
argo get tf-workflow-s8k24 -n ${NAMESPACE}
Name:             tf-workflow-s8k24
Namespace:        tfworkflow
ServiceAccount:   tf-user
Status:           Succeeded
Created:          Tue Oct 30 23:44:27 -0700 (26 minutes ago)
Started:          Tue Oct 30 23:44:27 -0700 (26 minutes ago)
Finished:         Tue Oct 30 23:53:56 -0700 (16 minutes ago)
Duration:         9 minutes 29 seconds
Parameters:
aws-endpoint-url: 40.76.11.177:9012
s3-endpoint:    40.76.11.177:9012
aws-region:     us-east-1
tf-model-image: docker.io/ritazh/image-retrain-kubecon:1.9-gpu
s3-data-url:    s3://mybucket/data/retrain/
s3-train-base-url: s3://mybucket/models
job-name:       myjob-b5e18
tf-worker:      3
model-train-steps: 200
namespace:      tfworkflow
tf-tensorboard-image: tensorflow/tensorflow:1.7.0
s3-use-https:   0
s3-verify-ssl:  0
tf-ps:          2
tf-serving-image: elsonrodriguez/model-server:1.6
ks-image:       elsonrodriguez/ksonnet:0.10.1
model-name:     inception
model-hidden-units: 100
model-batch-size: 100
model-learning-rate: 0.01
model-serving:  true
model-serving-servicetype: LoadBalancer
model-serving-ks-url: github.com/kubeflow/kubeflow/tree/master/kubeflow
model-serving-ks-tag: 1f474f30
aws-secret:     aws-creds

STEP                            PODNAME                       DURATION  MESSAGE
 tf-workflow-s8k24
--- get-workflow-info
    --- tensorboard
        --- train-model
            --- serve-model  tf-workflow-s8k24-3774882124  1m

 onExit
--- cleanup                  tf-workflow-s8k24-1936931737  1m
Serve a Trained Model for Inference with Kubeflow (TF Serving)
-
Run test client against the Serving endpoint to get predictions Using the serving IP from the previous step, run the following:
python serving/inception_client.py --server ${SERVINGIP}:9000 --image test/fbb1.jpeg

# You will see the following output
outputs {
    key: "classes"
    value {
        dtype: DT_STRING
        tensor_shape {
        dim {
            size: 2
        }
        }
        string_val: "fbb"
        string_val: "notfbb"
    }
    }
    outputs {
    key: "prediction"
    value {
        dtype: DT_FLOAT
        tensor_shape {
        dim {
            size: 1
        }
        dim {
            size: 2
        }
        }
        float_val: 0.96350902319
        float_val: 0.0364910177886
    }
    }
    model_spec {
    name: "inception"
    version {
        value: 1
    }
    signature_name: "serving_default"
}
Rapid Prototyping with Self-service Jupyter Notebook from JupyterHub with GitHub OAuth
-
Ensure the JupyterHub component is running and the service has a public IP
- Get the pod and the service
kubectl get pod -n ${NAMESPACE} -l app=tf-hub NAME READY STATUS RESTARTS AGE tf-hub-0 1/1 Running 0 30m kubectl get svc -n ${NAMESPACE} -l app=tf-hub-lb NAME TYPE CLUSTER-IP EXTERNAL-IP PORT(S) AGE tf-hub-lb LoadBalancer 10.0.91.30 137.xx.xx.xx 80:31137/TCP 1d-
Create an OAuth app on GitHub. Use the external IP of tb-hub-lb.

-
By default JupyterHub uses dummy authenticator to use plaintext username and password for login. Edit the JupyterHub configmap to enable GitHub OAuth.
kubectl edit configmap jupyterhub-config -n ${NAMESPACE} # Replace the dummyauthenticator with GitHubOAuthenticator # c.JupyterHub.authenticator_class = 'dummyauthenticator.DummyAuthenticator' c.JupyterHub.authenticator_class = GitHubOAuthenticator c.GitHubOAuthenticator.oauth_callback_url = 'http://137.xx.xx.xx/hub/oauth_callback' c.GitHubOAuthenticator.client_id = 'GET THIS FROM GITHUB DEVELOPER SETTING' c.GitHubOAuthenticator.client_secret = 'GET THIS FROM GITHUB DEVELOPER SETTING'-
Restart the tf-hub-0 pod
-
Launch JupyterHub from a browser using the external IP from the tf-hub-lb service. Everyone on the team can now create their own Jupyter Notebook instance after signing in with their github account and selecting the resources they need to create their own Jupyter Notebook instance.
- Start using your own Jupyter Notebook instance to prototype