
GitHubPoster
Make everything a GitHub svg poster and Skyline!
MIT License
GitHubPoster
Make everything a GitHub svg poster and skyline!
svg in README examples
Circular
Skyline
Support
- Strava
- Nintendo Switch
- GPX
- Duolingo
- Issue
- YouTube
- Bilibili
- GitHub
- GitLab
- Kindle
- WakaTime
- Dota2
- Nike
- Notion
- Garmin
- Forest
- Json
- Multiple
- Jike
- Summary
- Todoist
- OpenLanguage
- Apple Health
- ChatGPT
- NeoDB
- AutoSleep
Download
git clone https://github.com/yihong0618/GitHubPoster.git
pip install
pip3 install -U 'github_poster[all]'
Install(Python3.6+)
pip3 install -r requirements.txt
Use
The generated svg is in OUT_FOLDER, named with type (for now)
Different types are used as specified below:
-
--year 2021: You can specify a year (default) or a year range--year 2012-2021 -
--special-number1 10 -- special_number2 20: By default, the number of different colors is automatically generated (special colors), you can also specify the color -
--special-color1 pink --special-color2 '#33C6A4': You can also specify the color -
--with-animation: You can add animation (add GOGOGO animation) -
--animation-time 14: you can control the animation time (default is 10s), use with--with-animation -
--with-skyline: You can save skylinestlfile (default skyline year is to_year), -
--skyline-with-name: set to print user name on model, use with--with-skyline -
--is-circular: With this command, the svg will be circular and with animation -
--without-type-name: Support for hiding the name of the build type in the title ---stand-with-ukraine
Other parameters can be found with python3 -m github_poster <type> --help
GPX
mv gpx files to GPX_FOLDER then run the code
python3 -m github_poster gpx --gpx_dir ~/blog/GPX_OUT/ --year 2013-2021
or pip
github_poster github_poster gpx --gpx_dir ~/blog/GPX_OUT/ --year 2013-2021
Strava
-
Sign in/Sign up Strava account
-
Open after successful Signin Strava Developers -> Create & Manage Your App
-
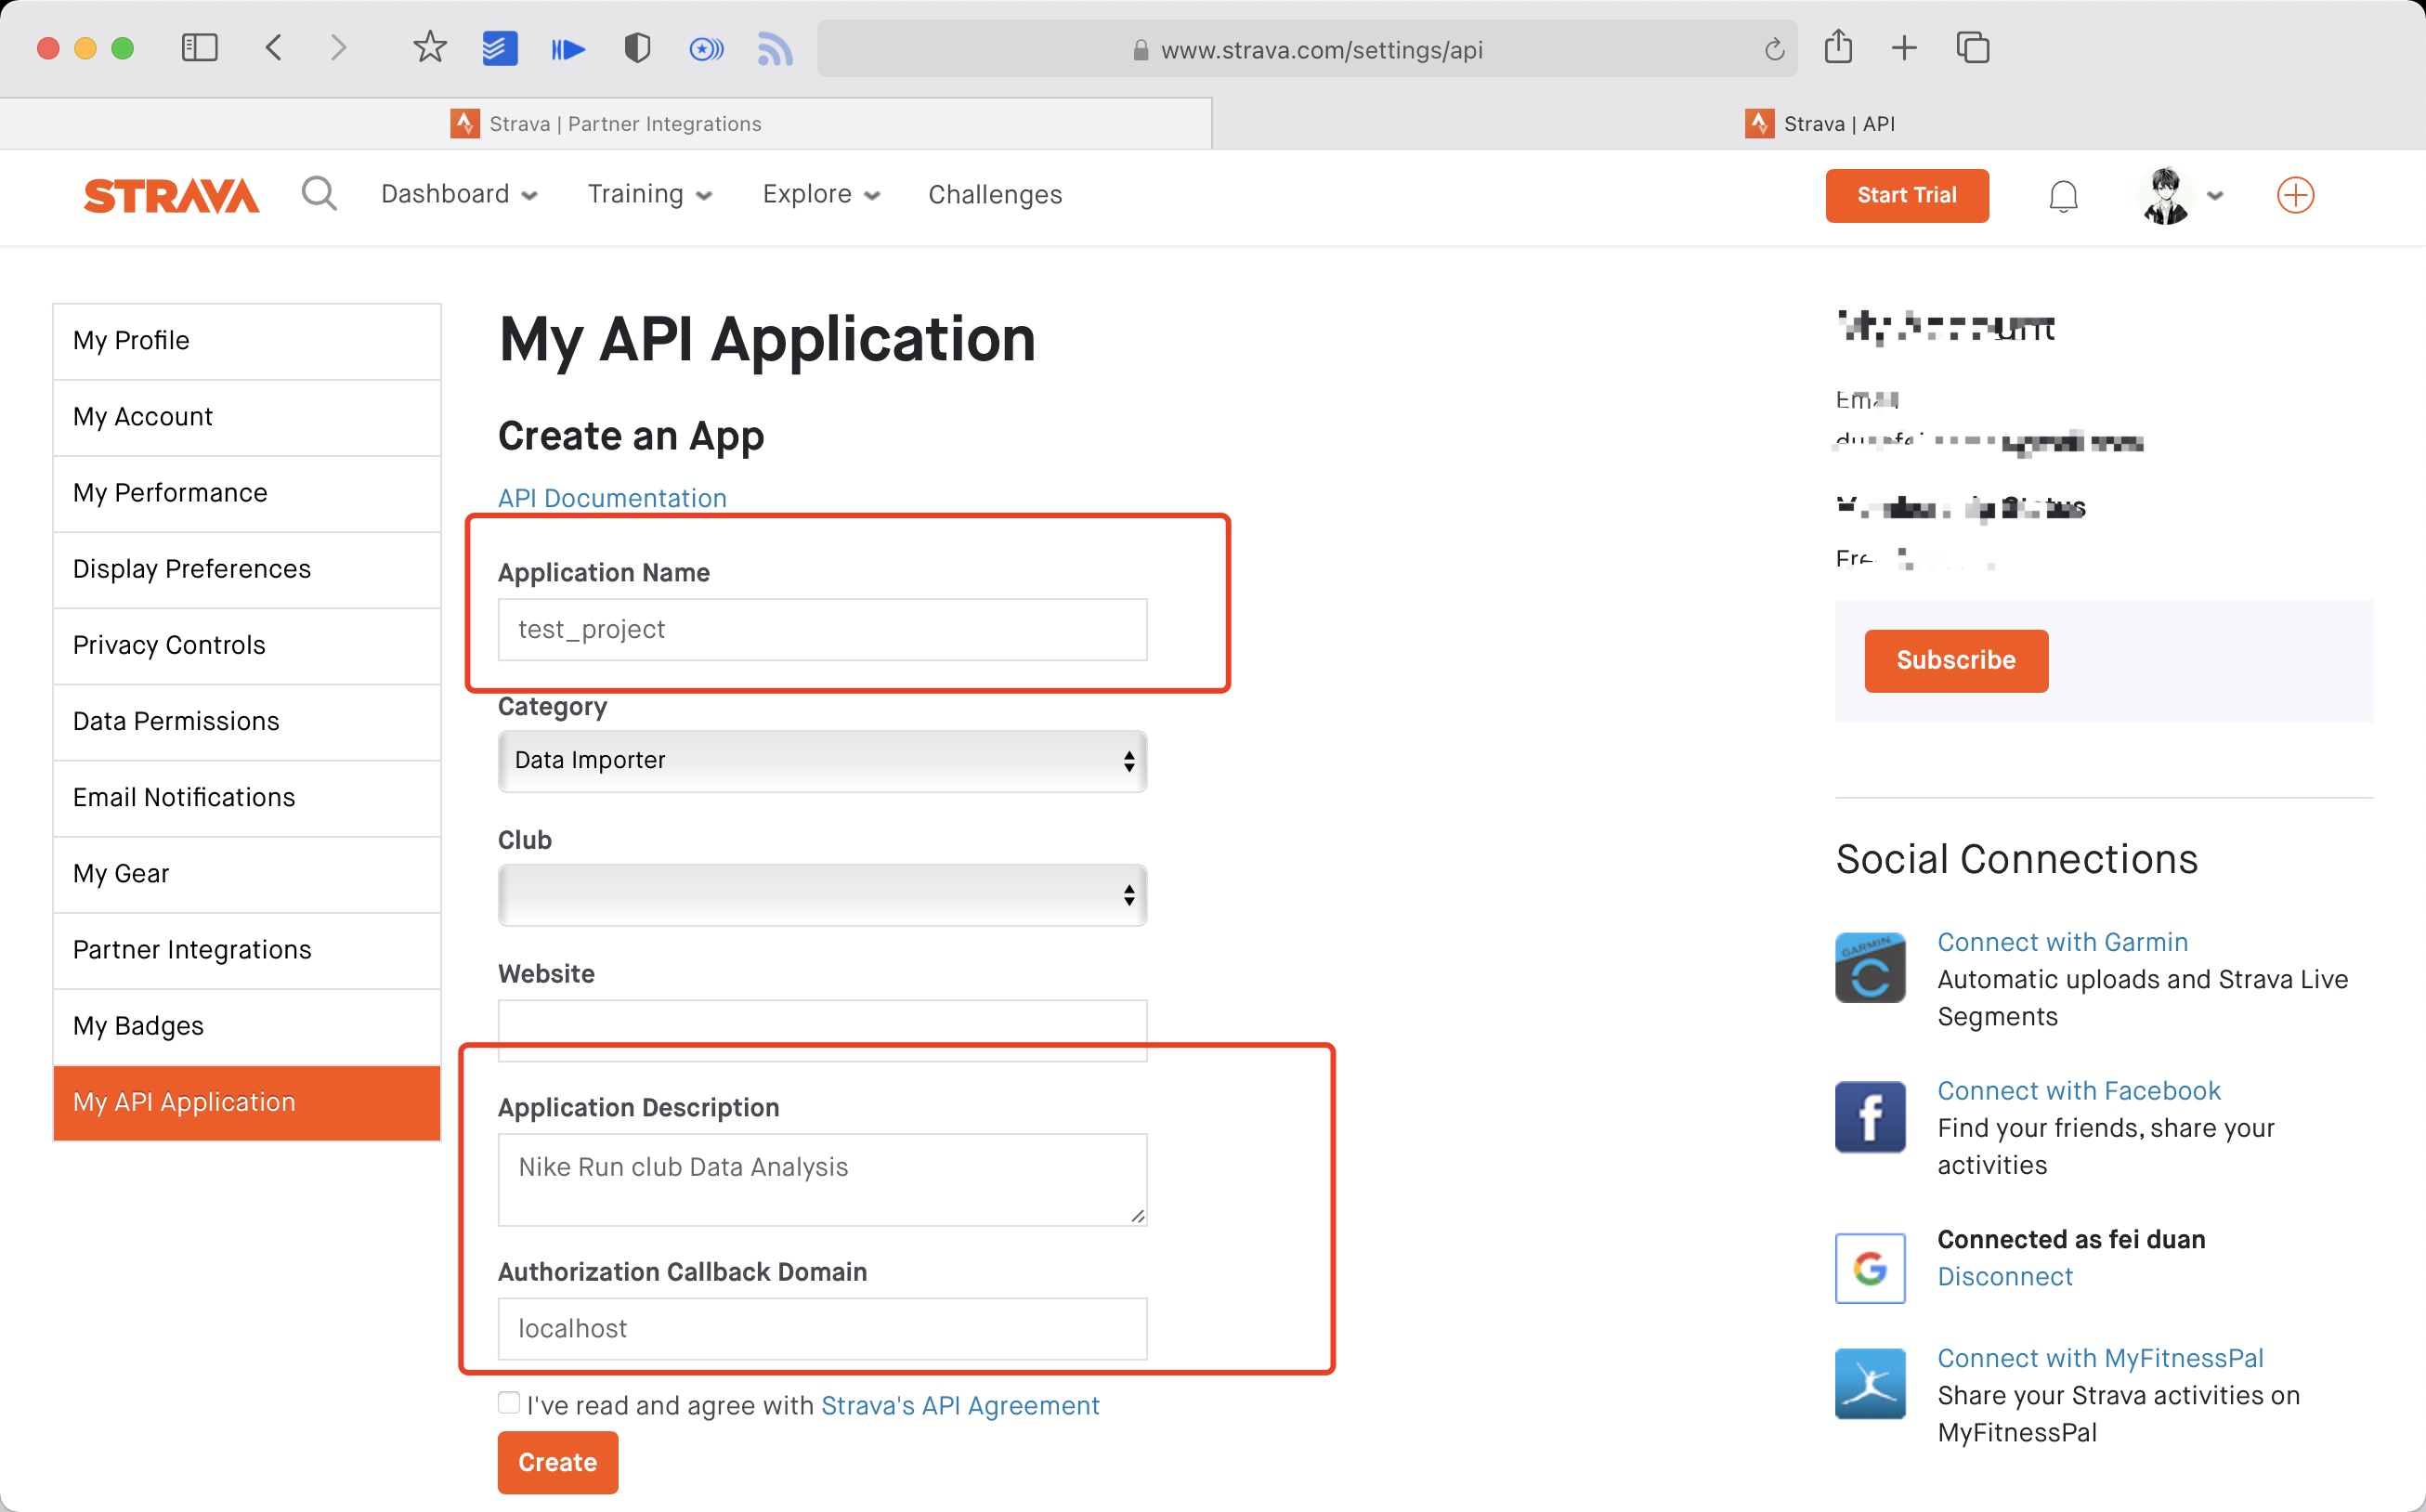
Create
My API Application: Enter the following information
 Created successfully:
- Use the link below to request all permissions: Replace
${your_id}in the link withMy API ApplicationClient ID
https://www.strava.com/oauth/authorize?client_id=${your_id}&response_type=code&redirect_uri=http://localhost/exchange_token&approval_prompt=force&scope=read_all,profile:read_all,activity:read_all,profile:write,activity:write
- Get the
codevalue in the link
example:
http://localhost/exchange_token?state=&code=1dab37edd9970971fb502c9efdd087f4f3471e6e&scope=read,activity:write,activity:read_all,profile:write,profile:read_all,read_all
code value:
1dab37edd9970971fb502c9efdd087f4f3471e6
- Use
Client_id、Client_secret、Codegetrefresch_token: Execute inTerminal/iTerm
curl -X POST https://www.strava.com/oauth/token \
-F client_id=${Your Client ID} \
-F client_secret=${Your Client Secret} \
-F code=${Your Code} \
-F grant_type=authorization_code
example:
curl -X POST https://www.strava.com/oauth/token \
-F client_id=12345 \
-F client_secret=b21******d0bfb377998ed1ac3b0 \
-F code=d09******b58abface48003 \
-F grant_type=authorization_code
python3 -m github_poster --strava_client_id  ${client_id} --strava_client_secret ${client_secret} --strava_refresh_token ${refresh_token} --year 2012-2021
or pip
github_poster --strava_client_id  ${client_id} --strava_client_secret ${client_secret} --strava_refresh_token ${refresh_token} --year 2012-2021
NS
From APP(Nintendo Switch Parent Controls) using mitmproxy to get the session_token and devide _id
python3 -m github_poster ns --ns_session_token ${session_token} --ns_device_id ${device_id} --year 2020-2021
or pip
github_poster ns --ns_session_token ${session_token} --ns_device_id ${device_id} --year 2020-2021
Duolingo
- login duolingo in broswer
- console
document.cookie.match(new RegExp('(^| )jwt_token=([^;]+)'))[0].slice(11)get duolingo_jwt
Find your duolingo id, F12 from XHR

python3 -m github_poster duolingo --duolingo_user_name ${duolingo_user_name}  --duolingo_jwt ${duolingo_jwt}  --year 2015-2021
or
github_poster duolingo --duolingo_user_name ${duolingo_user_name} --duolingo_jwt ${duolingo_jwt} --year 2015-2021
Issue
Like my issue
	python3 -m github_poster issue --issue_number ${issue_number} --repo_name ${repo_name} --token ${github_token}
or
github_poster issue --issue_number ${issue_number} --repo_name ${repo_name} --token ${github_token}
LeetCode
Find your LeetCode Cookie
python3 -m github_poster leetcode --leetcode_cookie ${leetcode_cookie} --year 2019-2021
or
github_poster leetcode --leetcode_cookie ${leetcode_cookie} --year 2019-2021
Youtube
Use Google History Takeout to download YouTube history data,choose json format,mv watch-history.json to IN-FOLDER then run the code
python3 -m github_poster youtube --year 2015-2021
or
github_poster youtube --year 2015-2021
Bilibili
Find your Bilibili (XHR) cookie
python3 -m github_poster bilibili --cookie "${bilibili-cookie}"
or
github_poster bilibili --cookie "${bilibili-cookie}"
GitHub
Get your GitHub Name (in the url)
python3 -m github_poster github --github_user_name "${github_user_name}" --with-skyline
or
github_poster github --github_user_name "${github_user_name}" --with-skyline
GitLab
Get your GitLab Name (in the url)
python3 -m github_poster gitlab --gitlab_user_name "${gitlab_user_name}"
or
github_poster gitlab --gialab_user_name "${gitlab_user_name}"
For self-managed GitLab, specify the base url of your instance. You should use _gitlab_session from Cookies if sign in required.
s
python3 -m github_poster gitlab --gitlab_user_name "${gitlab_user_name}" --base_url "https://your-gitlab.com" --session "${gitlab_session}"
or
github_poster gitlab --gitlab_user_name "${gitlab_user_name}" --base_url "https://your-gitlab.com" --session "${gitlab_session}"
Kindle
Find your Amazon Cookie
python3 -m github_poster kindle --kindle_cookie ${kindle_cookie} --cn --year 2018-2021
or
github_poster kindle --kindle_cookie ${kindle_cookie} --cn --year 2018-2021
WakaTime
Find your own WakaTime API Key at: WakaTime API Key
python -m github_poster wakatime --wakatime_key="your_wakatime_api_key" --year 2019-2021
or
github_poster wakatime --wakatime_key="your_wakatime_api_key" --year 2019-2021
Dota2
Find your dota2_id, eg:Dendi's ID 70388657
Check your dota2_id(steamid32): https://steamid.xyz/.
Check your game data: https://api.opendota.com/api/players/{dota2_id}/matches.
more info: https://docs.opendota.com/#section/Introduction
python -m github_poster dota2 --dota2_id="your dota2 id" --year 2017-2018
or
github_poster dota2 --dota2_id="your dota2 id" --year 2017-2018
Nike
ALL need to do outside GFW
-
Login from this website, open F12 -> XHR -> get the
refresh_tokenfrom login api. -
copy this
refresh_tokenand use it in GitHub Secrets or in command line
python3 -m github_poster nike --nike_refresh_token="your nike_refresh_token" --year 2012-2021
or
github_poster nike --nike_refresh_token="your nike_refresh_token" --year 2012-2021
Notion
Get Notion Internal Integration Token(notion_token), see here for more details.
- Sign in Notion developers site
- Click 'New integration' to create a new token
- You can see
Internal Integration TokenbelowSecretsafter submit
Get Notion Database ID(database_id), see here for more details.
- Open the database as a full page in Notion
- Use the
Sharemenu toCopy link, and you'll get a URL looks likehttps://www.notion.so/{workspace_name}/{database_id}?v={view_id} - The part that corresponds to
{database_id}is the ID of your Notion Database
Note:The database need a property which type is Date, the value of it will be used to generate the poster.
The name of the date property should be set as option prop_name's value,default value is Datetime
python3 -m github_poster notion --notion_token="your notion_token" --database_id="your database_id" --prop_name="your prop_name"
or
github_poster notion --notion_token="your notion_token" --database_id="your database_id" --prop_name="your prop_name"
Garmin
需要填写 Garmin 的账号和密码
python3 -m github_poster garmin --garmin_user_name ${user_name} --garmin_password ${pass_word} --year 2016-2021 --special-color1 blue --special-color2 pink --me yihong0618 --cn
or
github_poster garmin --garmin_user_name ${user_name} --garmin_password ${pass_word} --year 2016-2021 --special-color1 blue --special-color2 pink --me yihong0618 --cn
Forest
Need to add your Forest email and password
python3 -m github_poster forest --forest_email ${user_name} --forest_password ${pass_word} --year 2016-2021 --special-color1 blue --me yihong0618
or
github_poster forest --forest_email ${user_name} --forest_password ${pass_word} --year 2016-2021 --special-color1 blue --me yihong0618
Json
make sure your json file format is like data.json in examples
python3 -m github_poster json --json_file "your json data file" --year 2019-2021 --me PythonHunter
or
github_poster json --json_file "your json data file" --year 2019-2021 --me PythonHunter
Multiple
support multiple types
python3 -m github_poster multiple  --types "github, strava"  --github_user_name "github user name" --strava_client_id  "your strava client id"  --strava_client_secret "your strava client secret"  --strava_refresh_token "your strava refresh token"  --year 2020-2021
or
github_poster multiple  --types "github, strava" --github_user_name "github user name" --strava_client_id  "your strava client id"  --strava_client_secret "your strava client secret"  --strava_refresh_token "your strava refresh token"  --year 2020-2021
Summary
support summary types
python3 -m github_poster summary  --types "github, strava"  --github_user_name "github user name" --strava_client_id  "your strava client id"  --strava_client_secret "your strava client secret"  --strava_refresh_token "your strava refresh token"  --year 2021
or
github_poster summary  --types "github, strava"  --github_user_name "github user name" --strava_client_id  "your strava client id"  --strava_client_secret "your strava client secret"  --strava_refresh_token "your strava refresh token"  --year 2021
Jike
need to find your Jike cookie from Jike (XHR) and jike_user_id, jike_user_id can be found in your personal page link
eg. in the link https://web.okjike.com/u/82D23B32-CF36-4C59-AD6F-D05E3552CBF3, 82D23B32-CF36-4C59-AD6F-D05E3552CBF3 is the user_id
ps. only get the data for the last year
python3 -m github_poster jike --jike_cookie "your jike cookie" --jike_user_id 'your jike user id' --year 2021 --me "your name" --with-animation --animation-time 14 --count_type 'like'
or
github_poster jike --jike_cookie "your jike cookie" --jike_user_id "your jike user id" --year 2021 --me "your name" --with-animation --animation-time 14 --count_type 'like'
Option argument count_type, you can specify statistics type:
-
record: post num (default) -
like: post be liked num -
share: post be share num -
comment: post be comment num -
repost: post be repost num
Todoist
Because of Todoist policies, only users with Pro Plan(or above) can retrieve full historical activity from APIs.
Get your token please find on Todoist Developer Docs
python3 -m github_poster todoist --year 2021-2022 --todoist_token "your todoist dev token" --me "your name"
or
github_poster todoist --year 2021-2022 --todoist_token "your todoist dev token" --me "your name"
OpenLanguage
For some reason, make sure your password only has letters and numbers, otherwise you will get an error.
python3 -m github_poster openlanguage --year 2021-2022 --openlanguage_user_name "you account" --openlanguage_password "you password" --me "your name"
or
github_poster openlanguage --year 2021-2022 --openlanguage_user_name "you account" --openlanguage_password "you password" --me "your name"
AppleHealth
Apple Health has plenty of data that can be visualized. At this moment this loader only supports Move, Exercise, and Stand data from Apple Watch Activity but any record Apple Health has can be supported in the same way.
Loader has two modes:
increment mode (default)is good for daily update. iOS Shortcut can be used to trigger a workflow running loader on this mode. Read this repo for more details.
python3 -m github_poster apple_health --date <date-str> --value <value> --apple_health_record_type <move, exercise, stand> --me "your name"
or
github_poster apple_health --appple_health_date <date-str> --apple_health_value <value> --apple_health_record_type <move, exercise, stand> --me "your name"
backfill mode is good for dumping all data at once.
Open the Health App, click on the avatar on the top right corner, select "Export All Health Data" on the bottom, copy the zip file to IN-FOLDER and unzip. You will get a apple_health_export folder. Then run:
python3 -m github_poster apple_health --apple_health_mode backfill --year 2015-2021 --apple_health_record_type <move, exercise, stand> --me "your name"
or
github_poster apple_health --apple_health_mode backfill --year 2015-2021 --apple_health_record_type <move, exercise, stand> --me "your name"
ChatGPT
Copy the conversations.json from ChatGPT's official export history to IN-FOLDER, then run (renamed to chatgpt-history.json)
python3 -m github_poster chatgpt
or
github_poster chatgpt --me yihong0618
NeoDB
Using the API provided by NeoDB, we can easily make GitHub Poster with marks as data.
An access token is needed, which can be obtained from NeoDB's developer page.
There are to parameters for neodb module. neodb_token`` is the token you get from [NeoDB's developer page](https://neodb.social/developer), mark_type`` is the type of marks you want to import, which can be one of complete, `wishlist` and `progress`.
python3 -m github_poster neodb --neodb_token <token> --mark_type <complete, wishlist, progress, all> --me "your name"
Moreover, you can choose all as mark_type to import all marks.
AutoSleep
Export your AutoSleep data from app(eg. autosleep.csv), then run
python3 -m github_poster autosleep --autosleep_file "your csv file" --me "your name"
or
github_poster autosleep --autosleep_file "your csv file" --me "your name"
Contribution
- Any Issues PR welcome.
- Any new loader welcome
- how to write new loader by
ruter(Chinese) 如何为 GithubPoster 添加 loader
Before submitting PR:
- Format Python code with
black(black .) - Format Python code with
isort(isort --profile black **/**/*.py)
TODO
- GitLab
- GitHub
- LeetCode
- GitHub from issues
- YouTube
- Bilibili
- GitHub Actions
- Change all default color
- Skyline
- Dota2
- pypi
- test
- English README
- Loader doc
- Refactor some code
GitHub Actions
- fork or clone this repo
- Change the secrets
- Change the
typeinymlfile
Special thanks
- @flopp great repo GpxTrackPoster
- @JasonkayZK Wakatime loader
- @shaonianche Dota2 loader
- @umm233 Jike loader
- @ruter Notion loader
- @frostming
CIrefator and some Actions code - @j178 refator the import logic
- @iamshaynez todolist loader
- @guaguaguaxia OpenLanguage loader
- @rip-tyang AppleHealth loader
Support
Thanks is enough.